
iPhone is disabled and won't connect to iTunes

To transfer photos from an iPhone X or XS to your PC or Mac, you can use methods like Photos app, File Explorer, iCloud Photos, AirDrop, Google Photos, and third-party apps.

If you've a large library of photos and videos stored on your iPhone X or iPhone XS, you may be wondering if it's possible to transfer photos to your computer easily, whether it's because you're upgrading to a new Apple flagship, or you just have a solid backup of your precious moments.
How you move the photos from an iPhone X / XS to your computer will depend on the operating system of machine you're running, way of wired or wireless transfer you choose, and the number of photos and video clips.
If you're looking for an easy way to move your photos from iPhone X or iPhone XS to PC or Mac effortlessly, Appgeeker iPhone Data Transfer is definitely worth a try. It is cross-platform file transfer solution that emphasizes speed and flexibility, allowing users to directly transfer media files, including photos, videos, music, podcasts to and from your iPhone, create custom ringtones, and manage the phone media library.
Table of Contents
This comprehensive guide explores iPhone photo transfer, giving you the knowledge and tools to easily move photos from iPhone X or iPhone XS to computer, so you never have to worry about losing your photos.
The classic and reliable choice for transferring pictures and photos to Windows locally. Microsoft Photos app has already been pre-installed on every PC out of the box. All you have is get a working USB cable, connect your phone to the computer, and you're ready to download photos from iPhone X/ XS to computer. Here's how to embrace its simplicity:
1. After your iPhone is connected to the PC, open the Photos app from Start menu.
2. Click the Import button in the top right of the app window.

3. From drop-down menu select Apple iPhone.
4. Wait for the app to scan and load your photos from the phone library.
5. Select the desired photos. You can tick Select all option if you want to transfer all your videos and photos to your computer hard drive.
6. Click the Import button.
See also: iPhone Security Lockout screen
If you're an old school, you can still use the drag-n-drop feature Windows provided in File Explorer to save your photos onto PC from iPhone X or iPhone XS.
1. After the device is connected to the PC via USB cable, open File Explorer.
2. Click Apple iPhone in the left sidebar, which should be located under This PC column.
3. If prompted, unlock your phone with the passcode, and then tap Trust on your device.

4. In the window that opens, double-click Internal Storage. This will open your phone's library with a lot of folders that are named something like 202501_, 202502_, 202503_, etc., on the screen. All your photos and videos are sorted by date and stored in those folders that are accessible.
5. Click on the photos you want to transfer. You can select multiple images by holding down the Ctrl key and clicking on each image, or by selecting a range of files with the Shift key.
6. Press Ctrl+C, navigate to the destination folder on your computer, and press Ctrl+V. Alternatively, right-click the selected pictures, select Copy from the context menu and then right-click in the destination folder and choose Paste.
7. You can now access your photos downloaded from iPhone X/ XS on the PC.
Appgeeker iPhone Data Transfer is a versatile file transfer solution that's primarily designed for Apple users to transfer and manage their media library. It offers bidirectional transfer, meaning that you can transfer your photos and videos from iPhone to computer and vice versa in a straightforward way, no computer skills required.
One of iPhone Data Transfer's key features is its ability to directly transfer songs to your iPhone and vice versa without erasing the current music on the device, which makes it a great replacement of iTunes. The application also offers "Ringtone Maker" for make your personalized ringtones to use on your iPhone, whether for an incoming call, text message, clock alarm, or voice mails.
iPhone Data Transfer is available on both Windows and macOS platform.
To copy photos from an iPhone X or iPhone XS to PC Windows, do the following:
1. Launch Appgeeker iPhone Data Transfer. The application features a refined and clean interface, nothing perplexed that would give you a hard time; as soon as you open it, everything is right in front of you, ready to be managed!

2. Click the Photos menu in the left sidebar to open your photos stored on the phone. You will see a list in the middle pane of the screen, which divides your photos into several categories. Clicking any of them will give a full preview of the images contained.
One of its nice features is it sorts the photos you saved on the phone by date automatically, making it incredibly easy to locate what you want.

3. Select the pictures you want to transfer. You can either tick the boxes next to the items, or select all photos from a particular date by checking the box next to it, or even ticking the Check All option in the top.
4.. Now, click the Computer icon (when you hover it, it says Export to PC), and choose where to save your photos on your Windows computer.

Alternatively, right-click on any of the selected photo(s), then select Export to PC.

Also, you can go to the middle pane and right-click on the root category to import all photos from your iPhone X/ XS to the computer through Export to PC option.

5. Once the transfer is complete, safely disconnect your phone.
With iPhone Data Transfer, you can also transfer your music to iPhone from computer without iTunes and vice versa, not just photos and videos. You get access to a handy tool "Ringtone Maker," which helps create custom ringtones to set on your device. The application also comes with a set of tools to back up your contacts, management your media library, access your text messages and more.
Cloud storage is an excellent way to move photos between devices. Services like Google Photos let you store your entire photo library in Google's cloud storage and you can access them on any of your devices or via its website. The main limitation is the 15GB free storage cap in Google Photos. If you have a photos library more than 15GB to transfer from your iPhone X/ XS, you will need to upgrade to a Google One subscription, starting from $1.99/month for 100 GB.
When needed, you can always download any photos you need from Google Photos to your Mac or Windows PC.
1. Open Google Photos app on your phone if you have it installed.
2. Sign in with your Google account, and then tap your profile picture at the top right of the screen.
3. Select Google Photos settings from the menu, tap Backup & sync, and then turn Backup & sync on.
4. Syncing your photo library to Google Photos can take a while to complete depending on the number of photos and videos to back up, and your internet connection.
5. After uploaded, visit photos.google.com website through a web browser on your Windows or Mac computer.
6. Sign in with the same Google account. You should now view all your backed-up photos which are saved in the cloud.
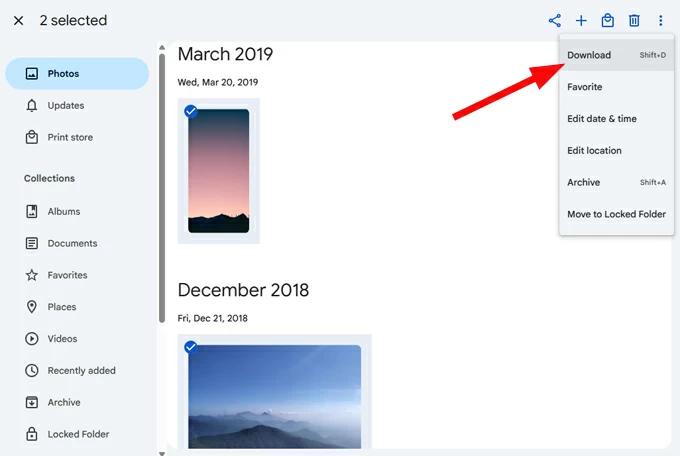
7. Select the photos you want to download onto your Mac or PC, click the three dot in the upper right corner and then select Download button.
8. Select a folder on your computer, and click Save.
9. That's it! Your photos stored on iPhone X or XS have been transferred to your either Mac or PC successfully.
See also: Photos disappears from iPhone
Similar to Windows, Mac machine has a built-in Photos app that allows users to import, edit, and organize their photos and videos. If you're a Mac user looking for a convenient way to transfer your photos from an iPhone X or iPhone XS, the Photos app provides a seamless solution for importing photos and videos into the Mac library.
Follow the steps below to import photos from an iPhone XS/ X to a Mac using Photos app:
1. Hook up your iPhone to your Mac with a USB cable.
2. Launch the Photos app on your Mac. You can find it in the Applications folder.
3. When connected, click your device name in the left sidebar under Devices.

4. In the top toolbar, click Add To to specify where to save the pictures on your Mac.
5. To import individual photos from your phone, select the photos you want. You can hold the Command key to select multiple photos.
6. After selecting the photos, click on the Import Selected button.
7. The Photos app will begin importing the selected photos into its Mac library.
Moving photos and videos from iPhone X/ XS into Mac via Photos app is a straightforward process that empowers you to manage your photo collection effectively. You'll also want to use the Appgeeker iPhone Data Transfer mentioned above if you want to get more control over your library.
See also: How to remove Apple ID from iPad without password
Another way to get photos off your iPhone to Mac is use iCloud Photos, the Apple's own sync service that can shares you images across all of Apple devices. However, if you've got over 5GB of photos and videos, you'll need to upgrade your storage plan. This can cost anywhere from $0.99/month for 50GB to $9.99/month for 2TB of cloud storage.
Make sure both your phone and Mac are using the same Apple account.
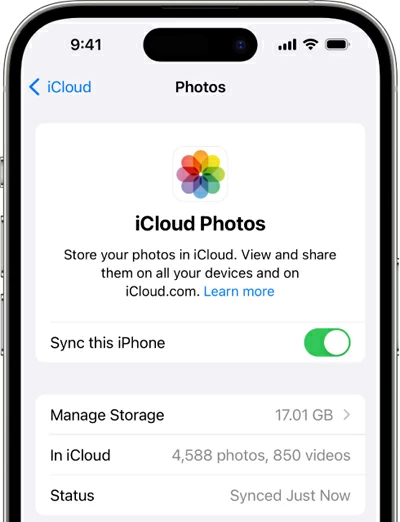
1. On the iPhone X or iPhone XS, Go to Settings > [your name] > iCloud > Photos, turn Sync This iPhone on.
2. On the Mac, go to System Settings (or Preferences) > [your name] > iCloud > Photos on your Mac and turn Sync this Mac on.

3. Provided you've followed both steps, your photos will automatically sync between your iPhone X/ XS and Mac. Please note that if you want to delete the original images on your phone and keep them on your Mac, switch off the sync after transferring everything.
See also: How to fake GPS location on iPhone
AirDrop has been around for many of years (since 2011) and acts a very convenient utility for sharing contents between Apple devices like Mac, iPhone, iPad and Vision Pro.
Before you can transfer photos, you'll first need to ensure that both your iPhone X/ XS and Mac have AirDrop enabled and that they are within 30 feet of each other.
To turn on AirDrop on iPhone X/ XS, go to the Settings > General and then AirDrop from the list of options. From there, choose Contacts only or Open to Everyone; to turn on AirDrop on your Mac, open Finder app, from the Go menu search for AirDrop. Ensure both Bluetooth and Wi-Fi are active for it to function.
Now, here's how to copy photos from iPhone X or iPhone XS to Mac with AirDrop:
1. Open the Photos app on your phone.
2. Select the photos you want to share, and tap the Share icon.
3. Select AirDrop in the opening menu.
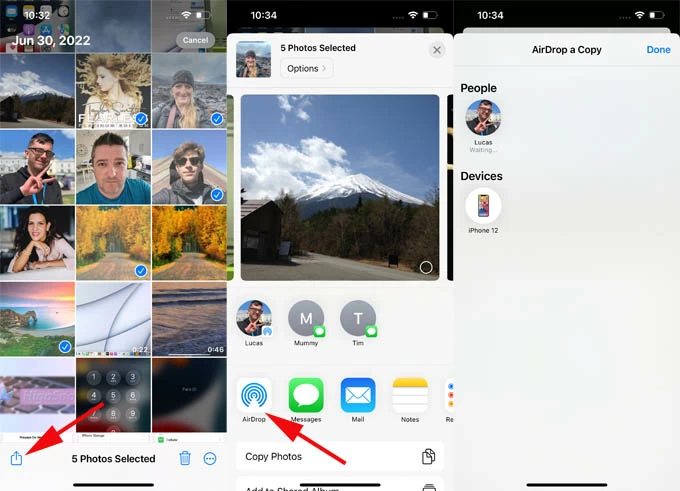
4. When you see your Mac's name in the list of nearby devices, tap it.
5. On your Mac, click Accept when prompted. The photos will begin to transfer!
6. Your selected pictures will immediately be sent to your Mac and saved in Downloads folder, or in Photos library if you're signing in with the same Apple Account.


