
How to Make A Custom Ringtone on iPhone

Want to transfer your photo collection from your iPhone XR to a Windows PC or Mac for storage and backup? This guide will show you several useful methods for this task.

You have multiple options for transferring photos from an iPhone XR to a computer using a USB cable.
Not every photo transfer is the same. Sometimes you need to move hundreds of images off your iPhone XR to computer for storage. Other times, it's just a few pictures you want to share to your computer. The real challenge isn't how to transfer photos from iPhone XR to computer, but rather choosing the right tool to get the job done without wasting time and effort.
Whether you're using Windows or macOS, need to transfer an entire photo library, or just wish to quickly move a few photos, we'll help you find the most suitable and efficient methods to transfer photos from your iPhone XR to your computer.
Table of Contents
If you're using Windows 10 or 11, the built-in Microsoft Photos app not only offers basic organization and editing features, but also provides a user-friendly and structured way to import photos from your iPhone XR to your PC. It's especially useful when you want to preview photos, sort them by date, and import them in bulk without manually handling folders.
1. Connect your iPhone XR to your PC with a Lightning-to-USB cable, unlock it, and tap Trust to authorize the connection.
2. Launch the Photos App via the Start Menu on your PC.
3. Click Import (top-right corner) and select From a connected device. Photos and videos from your connected iPhone XR will begin loading.

4. Select which photos to import, or check Select All to transfer the entire photo library.
5. Choose the destination folder if you want to change it, then click Import to get photos from your iPhone XR onto your computer.
Note:
On a Mac, the Photos app, unlike its Windows counterpart, is tightly integrated with the Apple ecosystem. As long as iCloud Photos is enabled on both your Mac and iPhone XR, your photo library will automatically sync from your iPhone XR to the Photos app on your Mac without manual importing or a wired connection, provided you have sufficient iCloud storage space.
Also see: How to transfer photos from PC to iPhone
File Explorer turns your iPhone XR into a virtual hard drive, letting you directly access your photo library without relying on extra apps or internet. This is a straightforward method for copying photos from iPhone XR to a PC, ideal for Windows users who prioritize speed and privacy.
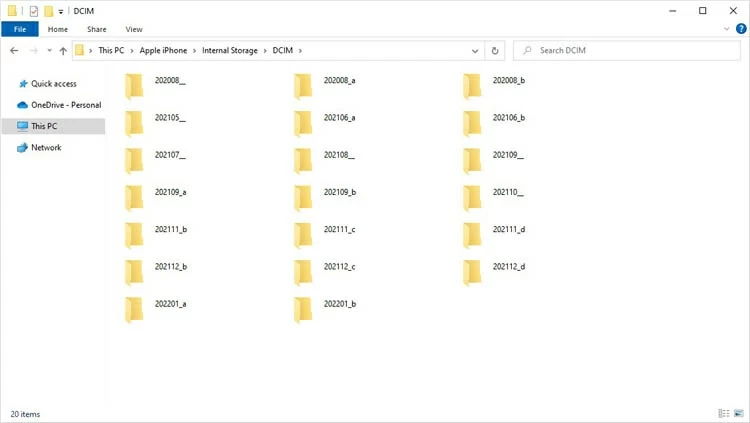
Your iPhone photos will be organized in the DCIM folder within File Explorer, sorted by date, allowing you to precisely locate the photo folders you want to transfer.
1. Unlock your iPhone XR and link it to your PC using a compatible cable.
2. Trust your computer on the pop-up if this is the first time connecting.
3. Open File Explorer (Windows key + E), under This PC, you'll see your iPhone XR listed as a device. Double-click it.
4. Navigate to Internal Storage > DCIM > folders containing your photos and videos.
5. Manually select and copy the desired photos or folders.

6. Paste them into a folder of your choice on the PC.
Alternatively, you can right-click your Apple iPhone in File Explorer, select Import pictures and videos > Import all new items now to quickly transfer your iPhone XR photos to the default Pictures folder on your computer.
Note:
If you want complete control over photo transfers—whether on Windows or macOS—Appgeeker iPhone Data Transfer is a powerful third-party tool designed for flexibility and convenience. It's good for users who need to import large libraries, convert formats, or selectively manage files.
It enables fast batch transfers of photos and videos from your iPhone XR to your computer without quality loss, while also converting HEIC photos, which are incompatible with PCs, into JPG or PNG formats for use on your Windows computer.
Whether you want to selectively transfer specific photos from iPhone to your computer or move your entire photo library with a single click, this tool adapts to your workflow.
1. Launch the software on your PC or Mac and plug your unlocked iPhone XR into your computer.

2. Locate the Photos from the left sidebar and all photos and videos stored on your iPhone XR will be displayed and categorized.

3. Preview and select the photos you want to download to your computer, then click the computer icon [Export to PC / Mac] in the top taskbar.

4. In the pop-up window, choose a target folder to save the transferred iPhone photos to your computer locally.
Related: How to transfer photos from iPhone to USB directly
For users living in a multi-device world, iCloud Photos acts as a digital bridge, effortlessly connecting your iPhone XR to your computer and other devices. This cloud-based solution uploads and syncs your iPhone XR photo library to iCloud, allowing you to access it from any device with an internet connection and the same iCloud account—no USB cable required.
It's a dream for users who juggle an iPhone, iPad, and computer, offering a seamless way to keep your photo library in sync while doubling as a backup.
To download photos from your iPhone XR to your computer via iCloud, first ensure that iCloud Photos is enabled on your iPhone XR and that you have enough iCloud storage to accommodate your large photo library.
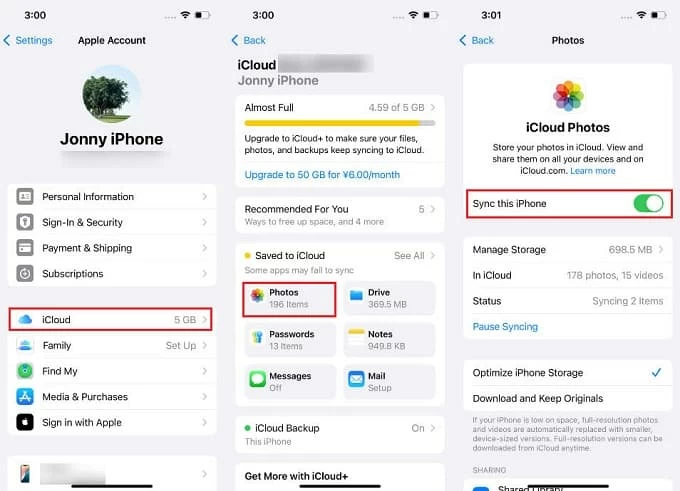
1. On your iPhone XR, navigate to Settings > [Your Name] > iCloud > Photos and toggle on Sync this iPhone to activate iCloud Photos. And your iPhone photos will be uploaded to iCloud.
2. Visit any browser on your computer and go to iCloud.com, then sign in using your Apple account.
3. Click Photos and browse your photo library to select the photos you want. You can use Ctrl to pick multiple photos.
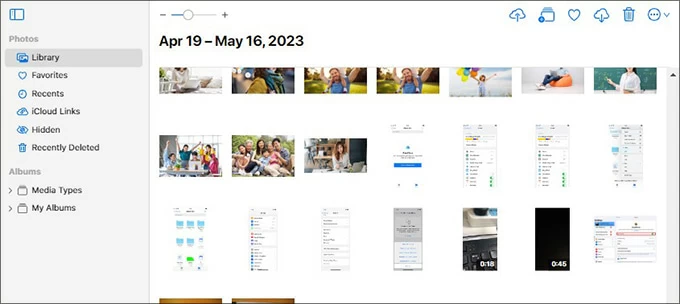
4. Once you're done selecting, click the Download icon in the top toolbar to download images individually or in bulk to your computer.
For Windows PC users, you can also use the dedicated iCloud for Windows app to access photos synced from your iPhone XR.
1. Download and install the iCloud for Windows app from the Microsoft Store.
2. Sign in with your Apple account that you use on your iPhone XR.
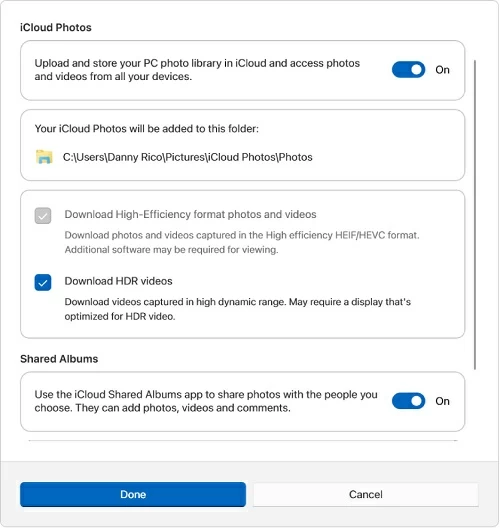
3. In the iCloud control panel, access the iCloud Photos settings by clicking the arrow icon.
4. Turn on iCloud Photos, and if necessary, select "Download High-Efficiency format photos and videos" or "Download HDR videos," then click Done.
5. You can view photos from your iPhone XR by navigating to the iCloud Photos folder in File Explorer or by checking the Microsoft Photos app.
Image Capture is a native macOS utility that allows you to move photos and videos from externally connected devices to your Mac. If you lack sufficient iCloud memory, compared to using the Photos app, transferring photos from your iPhone to your Mac via USB with Image Capture is more recommended.
It enables you to preview, rename, and organize photos before importing, making it perfect for transferring large volumes of photos.
1. Build connection between your iPhone XR and your Mac with a USB cable.
2. Unlock your iPhone and trust the device when prompted.
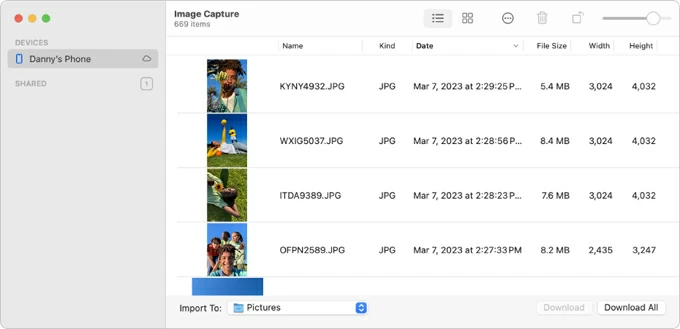
3. Run the Image Capture app on the desktop.
4. Select your iPhone XR from the left sidebar in Image Capture. And your photo library will load with thumbnails.
5. Choose a destination folder from the Import To dropdown.
6. Select specific photos (Cmd + click) and hit the Download button or click Download All for the entire library.
7. Optionally, click the Actions button and check Delete after import to free up space.
Read more: How to transfer photos from Mac to iPhone
Additionally, you can use Wi-Fi and Bluetooth for direct device-to-device communication, sending photos to your Mac from iPhone XR wirelessly via AirDrop. This is well-suited for casual users, quick edits, or rapid social sharing needs.
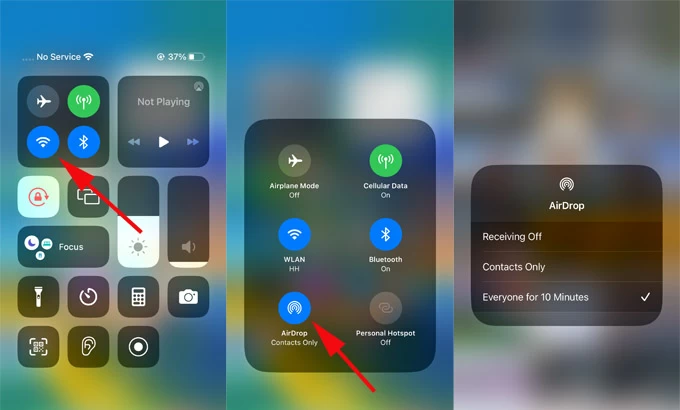
1. On your iPhone XR, enable Wi-Fi and Bluetooth (Control Center > toggle icons). Set AirDrop to Everyone.
2. On your Mac, ensure Wi-Fi and Bluetooth are on, then enable AirDrop in Finder's sidebar and set visibility to Everyone.

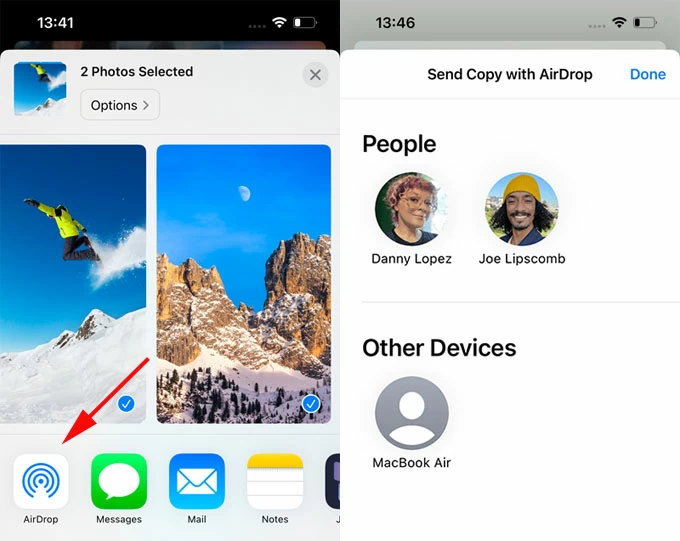
3. Open Photos app on iPhone, select the images.
4. Tap the Share icon and choose AirDrop, then select your Mac's name from the AirDrop list.
5. On your Mac, accept the incoming transfer and files save to Downloads folder by default.
To music transfer, you can check how to transfer music to iPhone XR.
Conclusion
This article outlines six methods to transfer photos from an iPhone XR to a computer, covering both wired and wireless options, whether you wish to transfer specific photos or an entire photo library. Depending on your goals—speed, convenience, control, or cross-platform access—choose the right method to get your photos transferred from your iPhone XR on your computer.


