
Unlock Disabled iPad without iTunes

Have an idea for watching videos on a bigger screen or saving storage on your iPhone? Our inclusive guide will show you how to transfer your videos from iPhone to iPad.

![]()
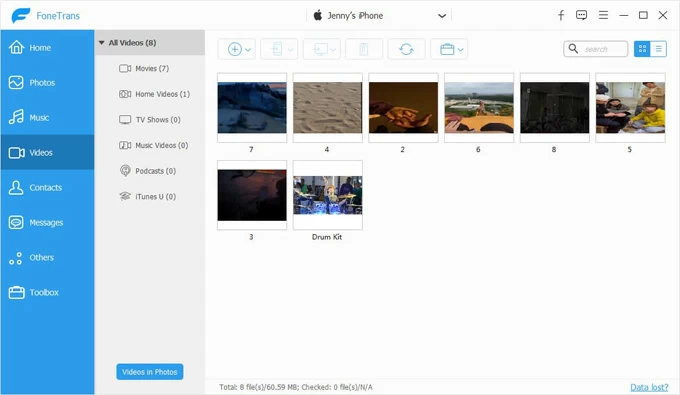
Transferring videos from iPhone to iPad to get a better video watching experience.
In today's technological world, almost all of us are in possession of an iPhone. It is almost impossible to image our life without iPhones. We have to admit that iPhone is one of the most successful inventions in the 21th century and it has made a huge difference to our lives. One of the biggest changes is the feature to instantly gain a photo or video every single time.
It is always easy to capture videos with an iPhone whenever we find something attractive and record-worthy, but before you get sick of being limited to the tiny screen of iPhone or receiving the message that the storage space on iPhone is almost full, it is necessary to know how to transfer video from iPhone to iPad.
Transferring videos from iPhone to iPad isn't a difficult task if you're equipped with the right methods, this post will guide you on how to transfer videos from iPhone to iPad without getting into any hustle.
Transfer videos to iPad from iPhone using iCloud:
Transfer videos from iPhone to iPad without iCloud:
As an iPhone user, you may heard of iCloud— the Apple's official cloud-based storage service. In addition to automatically uploading data to the cloud, you can also use it to sync videos between your iPhone and iPad.
Note:
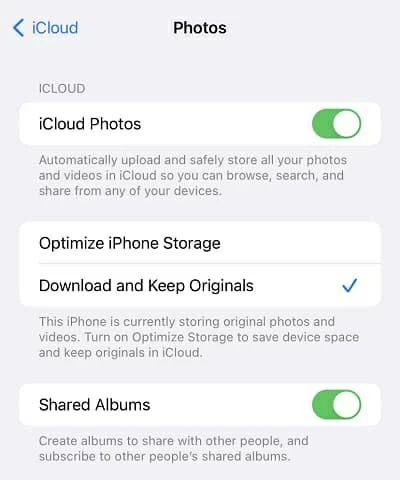
Start with enabling iCloud on your iPhone, for this, you need to go to Settings > Photos >iCloud Photos. Move the sliader to turn on the feature of iCloud Photos. Once you've turned this on, it will start sync your photos from your iPhone to the cloud.
When the videos are uploaded to the iCloud from your iPhone, you need to repeat the same steps above on the iPad. The videos will start synchronizing from your iCloud to your iPad. Make sure to maintain a stable internet connection.
Part 2: Transfer videos to iPad without iCloud
If you have a lot of videos to transfer and they exceeds 5GB, iCloud may not be a convenient method: it can be time-consuming, and you may also need to pay to upgrade to iCloud+ to get more storage. Don't worry, there are also various methods to transfer videos from iPhone to iPad without iCloud.
Since the iPhone came on the scene, Apple has recommended using iTunes to transfer data between iOS devices. People trust iTunes and have grown accustomed to its software interface. When transferring video from iPhone to iPad, you have two options — you can use a Mac to transfer videos, or you can rely on a Windows computer to transfer videos.
The steps for transferring videos from iPhone to iPad are different for Mac and Windows, but rest assured we'll walk you through both.
Step 1: Import videos from iPhone to your computer
Connect your iPhone to the Mac using a USB Cable. Tap on Trust and enter the passcode if needed. Usually, the Photos app will will run on the computer automatically, if not, open it manually.
For Mac users: From the list of devices, click on your iPhone's name. You should see all the videos and photos being displayed on the Photos app. Choose a destination to save the videos. Followed by clicking Import X Selected or Import All New Items to import the videos you want.
![]()
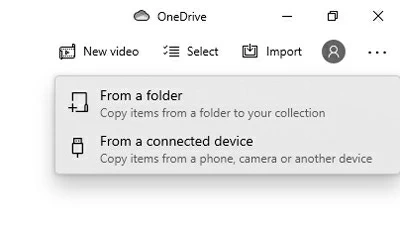
For Windows users: In the upper-right corner, click on the Import button. You should see all the videos and photos from your iPhone in the following Item Window. Check the videos you want to transfer. Select a folder to save the videos to. To begin the process of importing, hit on Import X of X items.
Step 2: Sync iPhone videos to iPad
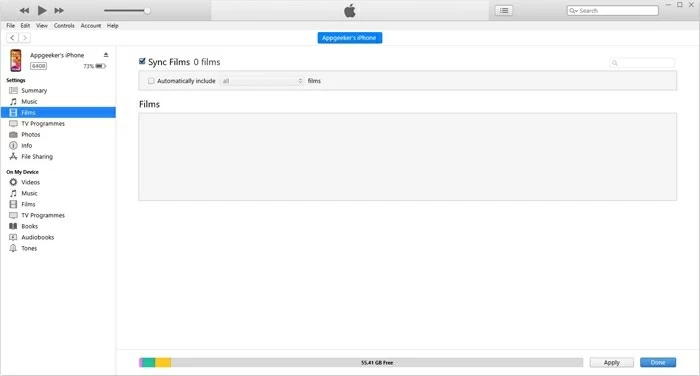
When the videos are copied from the source device to your computer, you should unplug your iPhone and connect the iPad to your computer. Let iTunes run on your computer. Then add videos from your computer to iTunes library: select "File" and "Add files to library" from the drop-down menu. Select the videos that you saved from your iPhone and import them to iTunes library. Click on the Device button that looks like a phone in the upper left corner of iTunes. Click on the name of your iPad. Followed by the Films button. Then check Sync Films and hit on the Apply button.
Note: If your Mac is running mac OS Catalina and later, use Finder, but If it's mac OS Mojave or earlier, try iTunes.
iTunes has a problem previewing videos during transfer. Apple did nothing wrong when creating iTunes, its data manager. However, iOS users consider iTunes as an inconvenient tool and long for an alternative. The good news is that there are many third-party tools can perform the task, one of which is Appgeeker iPhone Data Transfer.
With one-click operations, iPhone Data Transfer allows you to transfer unlimited videos in no time from iPhone to iPad,iPhone to Mac, iPhone to Windows. Recently, AppGeeker has added a powerful feature in iPhone Data Transfer, which can convert your incompatible videos into iOS friendly files easily.
Overall, iPhone Data Transfer spcializes in data transfer as well as data management. It is compatible with Windows and Mac systems. The best thing is that the quality of your videos will not be compromised. Feel your free to download it by clicking on the button below and scroll down to discover how iPhone Data Transfer works.
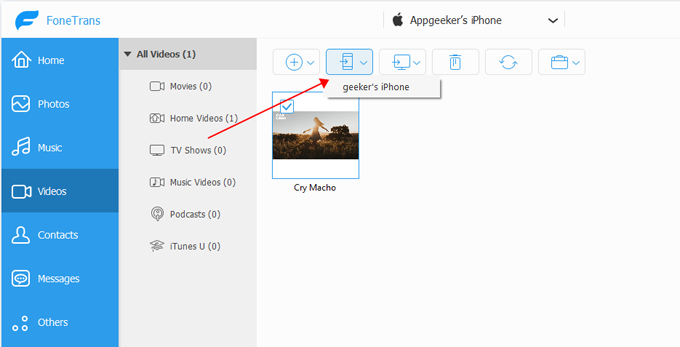
Step 1: Open iPhone Data Transfer and connect your iPhone and iPad
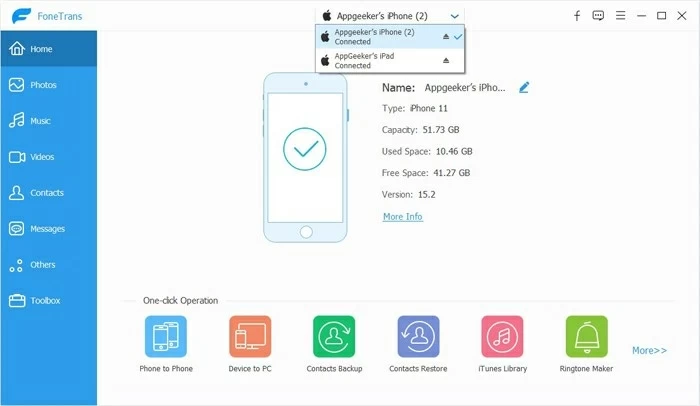
Launch iPhone Data Transfer on your computer. You'll be prompted to connect your iPhone and iPad to the computer. The detailed information about the first-connected device should be displayed in front of you. You can choose the source device from the dropdown menu which is present on the top of the software. In the given case, you should choose your iPhone since you want to transfer videos from your iPhone to the iPad.
Step 2: Check the videos you want to transfer
Tap on the Videos button in left navigation bar and the videos of your iPhone will be displayed on the software. Select the ones that you want to transfer; you can also choose the Check All option if you want to transfer all the videos from your iPhone to your iPad.
Step 3: Transfer the videos to your iPad
When the videos are selected, it's now time to transfer them to your iPad. Click on the phone icon in the top navigation bar. Then click on the name of your iPad, a pop up menu will appear which says that your videos are being transferred to your iPad. After the success of the transferring process, you can enjoy the videos on your iPad.
Many people are looking for the wireless option because it's convenient. If you are one of those people who likes to transfer videos between your iPhone and iPad and don't like to carry around a cable, then Airdrop is perfect for you.
The first step is to turn on the Wi-Fi and Bluetooth on both your iPhone and iPad. After this, open the control center on your iPhone and enable the Airdrop option you see in bottom of the menu. After enabling Airdrop, you need to select the videos that you want to transfer, this can be simply done by visiting the photos app on your iPhone.
When selected, choose the share option and select the Airdrop option.Then tap the name of your iPhone from Other People.
A pop up will appear on your iPad asking you to accept the transfer or not. Accept it and the video will play automatically on your iPad.

Whether you want to save storage space on your iPhone or you want to watch a movie on the bigger screen of your iPad, these methods can be very beneficial to you. You can use any of these methods to transfer videos from iPhone to iPad. Choose the one you like and try it out.


