
iMessages Disappeared from iPhone. The Fix

Having trouble transferring videos from iPhone to MacBook Air? Learn the wireless or cable-based methods to quickly send your videos without data loss or compression.

Are you tired of seeing that dreaded "Storage Almost Full" notification just as you're about to film a cinematic masterpiece? Or perhaps you've captured a stunning 4K ProRes video on your iPhone and now need to move it to your MacBook Air for professional editing. Whatever the reason, getting your high-resolution videos off your phone and onto your desktop shouldn't feel like a chore.
Luckily, transferring videos from iPhone to MacBook Air is easier than ever. Whether you want wireless convenience, cable-based reliability, cloud syncing, or the flexibility of professional software like Appgeeker iPhone Data Transfer, we have the perfect solutions to help with efficient iPhone-to-Mac transfers for both large video files and short clips.
Let's dive into the complete guide on how to import videos from an iPhone to a MacBook Air - using a cable or wirelessly - without losing quality.

You'll learn 5 proven ways to export videos from iPhone Camera Roll to MacBook Air fast and securely.
Modern iPhones are essentially professional-grade cameras that fit in your pocket. With features like 4K at 60fps and ProRes, a single minute of footage can easily exceed 5GB. While Apple's ecosystem is designed to be seamless, transferring these massive files often hits roadblocks, including slow Wi-Fi speeds, iCloud storage limits, and Photos app glitches.
This is why it's important to choose a reliable video transfer strategy that mostly meets your needs, preserving every bit of video quality without the headache.
Whether you want to free up storage, back up important memories, or edit videos on macOS, look at the top 5 tools for moving videos from iPhone to MacBook Air smoothly.
AirDrop is one of the fastest ways to send videos from an iPhone to your MacBook Air without cables or additional software. It utilizes Wi-Fi and Bluetooth to create a direct connection between Apple devices for transferring MP4, MOV, or M4V in a breeze.
If you have only a couple of short clips to copy to your MacBook from your own or someone else's iPhone, simply put both devices nearby, configure AirDrop to enable, and transfer your videos over wirelessly onto the desktop.
1- Turn on AirDrop on your iPhone and MacBook Air.
2- On iPhone, open Photos app and tap on the video you'd like to move.
3- Tap the Share icon.
4- Tap AirDrop and choose the name of your MacBook Air to share your video files with.
5- Accept the transfer on your computer, and the videos at its original quality will appear in the Downloads folder by default.
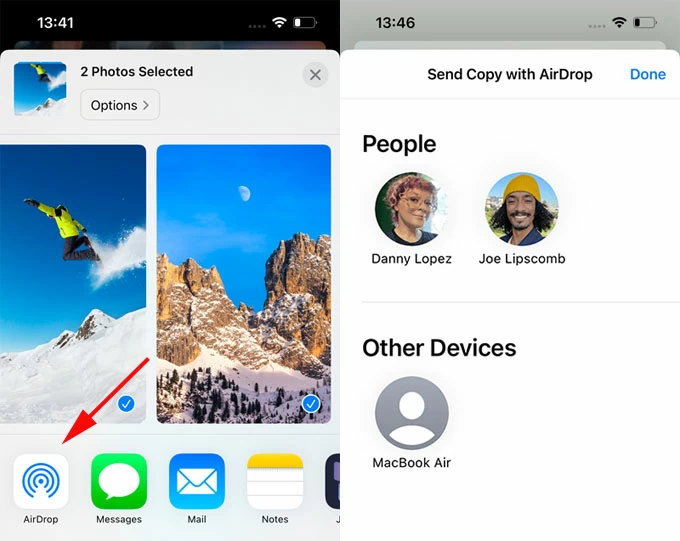
Note that, AirDrop is notoriously flaky once you try transferring large 4K video files, or pushing 100+ items at once.
Also: What happens after 10 failed passcode attempts on iPhone
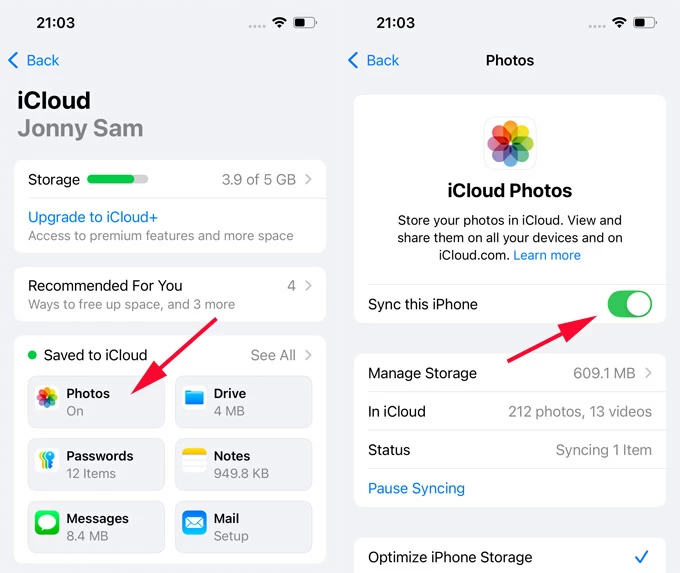
If you use iCloud Photos, your videos can automatically sync from iPhone to MacBook Air's Photos app if both Apple devices are signed into the same Apple Account. It's a set-it-and-forget it option, but it requires sufficient iCloud storage and fast internet speed to make iPhone video transfer to Mac run as expected—in case you have a large library that contains multi-gigabyte files.
Steps to enabled iCloud Photos on iPhone and MacBook Air to keep your entire photo and video library in sync seamlessly.
On iPhone: Go to Settings > [your name] > iCloud > Photos, and toggle on Sync This iPhone.
On MacBook: Go to Apple menu > System Settings (or Preferences) > [your name] > iCloud > Photos, and then switch on Sync this Mac.
Wait for the sync to complete. Your iPhone videos will automatically download in the macOS Photos app without needing a cable transfer.
The process could take minutes or hours to finish depending on the size of your iPhone media library. iCloud Photos is not ideal for one-time or selective imports, though.
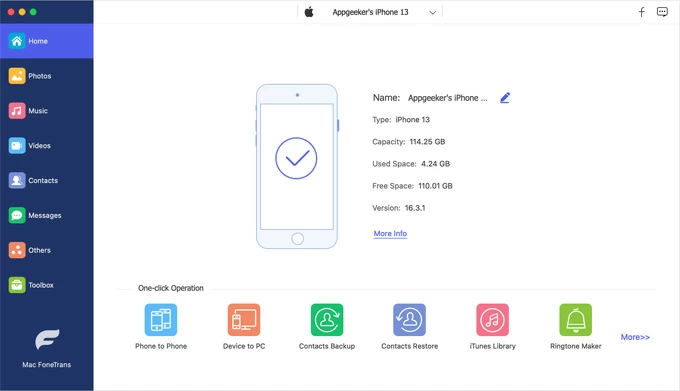
If you frequently transfer videos or deal with large files like full-length movies or high-res TV episodes, a professional tool called Appgeeker iPhone Data Transfer offers the most reliable experience and gives complete control over your video files that Apple doesn't provide.
The software uses a USB cable transfer technique and allows for direct access to iPhone files, letting you drag and drop the videos or photos onto any computer (Mac, MacBook, PC) effortlessly and swiftly. It can handle as many photos as you have on the phone at a time—no AirDrop failures, no iCloud limits, no quality loss.
Plus, selective transfer is supported, meaning that you can pick exactly which video you want to move across iOS and macOS without transferring the whole library.
See how iPhone to MacBook video transfer is made easy with Appgeeker iPhone Data Transfer software below, and export your videos or movies directly from an iPhone to any folder of your MacBook via a wired connection. There's no compression on any video (including large 4K and ProRes video) during the process.
Step 1. After download and installation, open Appgeeker iPhone Data Transfer utility on your MacBook Air.
Step 2. Use a USB-C or lightning cable to connect your iPhone to your laptop. Keep your device unlocked during the quick transfers.
Step 3. On the left column, choose Videos option. This allows you to transfer the home videos, movies, TV shows, music videos over from your iPhone's TV app to MacBook Air.
If you want to transfer your Camera Roll videos straight to the computer, choose Photos instead, then click Videos.
The software will scan your iPhone storage and display all video files on the interface.
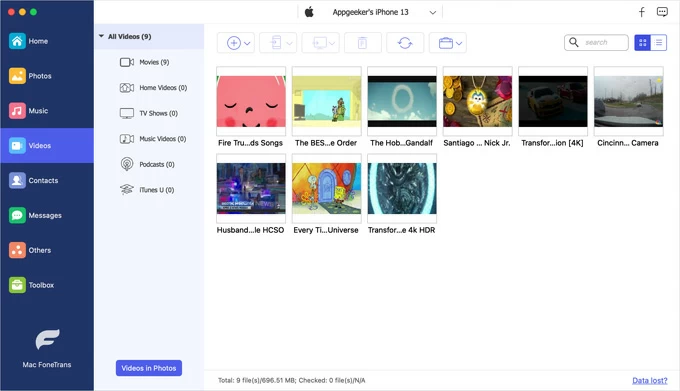
Step 4. Preview and choose the videos to transfer.
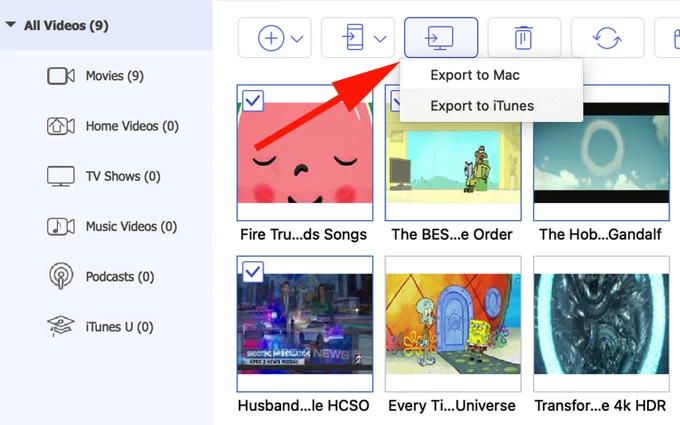
Step 5. Click the Computer icon at the toolbar, select Export to Mac from the pull-down menu, and then opt for a destination folder on MacBook to instantly add your videos from your iOS device.
That's it—your videos on your iPhone Photos app or TV app are transferred safely and efficiently onto MacBook Air's hard drive without relying on AirDrop. Besides that, you can also transfer photos or videos from a Mac back to iPhone if you want to enjoy the media on the go.
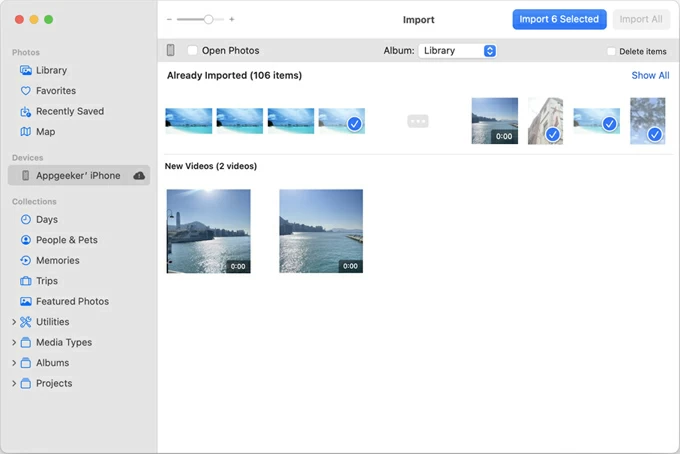
If you want your iPhone videos to live within your MacBook's Photo Library, the native Photos app is your best bet. With a USB connection, you can perform massive transfers, effectively importing the videos from your iPhone to the MacBook Air.
It's a practical, official iOS to macOS video migration solution that retains the full resolution, but it doesn't allow selective folder export—the video files added to MacBook Air can only be saved inside the Photos app.
To facilitate the process of sending iPhone videos to a MacBook Air, unlock your device and do the following.
Wait for all your videos to move into Photo library. As you can see, this cable-based import method helps you batch transferring the media in any file sizes and at a faster speed than using AirDrop video feature.
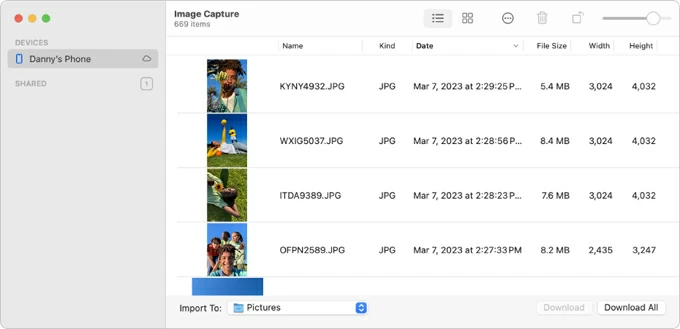
Unlike the Photos app, the inbuilt Image Capture gives you more control over where files are saved, so you can move videos directly to a specific folder (like an external hard drive) without bloating your macOS Photos Library.
Here's how to transfer large video collections from iDevices to MacBook Air safely with no need of the internet connection by using the Image Capture application.
1. Attach your iPhone to your computer through a data cable.
2. Open Image Capture. You can find it in Applications > Utilities.
3. Select [your iPhone] from the DEVICES section on the left.
4. In the Import To menu at the bottom, choose any destination folder as you want, such as Finder folder or an external location.
5. Select the videos you need to transfer. Note that you can't preview the long videos.
6. Click Download or Download All at the lower right corner.
This way, you should successfully get videos from the iPhone to MacBook Air for free, and be able to view or edit them on a big screen.
The best method for iPhone video transfer to a MacBook depends on your needs:
No matter whichever way you decide to use, ensure that your MacBook has enough space to hold the videos coming from your iDevice.
Q1- Can I transfer videos from iPhone to Mac without AirDrop?
Yes. Tools like Photos, Image Capture, iCloud Photos, and Appgeeker iPhone Data Transfer all work without relying on AirDrop, especially you have really large videos to import from your iPhone to your Mac machine.
Q2- Will transferring iPhone videos to a MacBook Air reduce the file quality?
No. All the methods mentioned in this article are effective when it comes to exporting a video or videos from an iPhone to a MacBook Air without compressing the quality.
Q3- What's the easiest way to move 4K videos on iPhone to MacBook?
A wired connection through a USB cable could be the fastest and easiest option to have all 4K videos on your iPhone transferred over to a MacBook. You can use Apple Photos app, Image Capture or Appgeeker iPhone Data Transfer program to initiate a USB-cable transfer for large 4K video files.
Q4- Why are my iPhone videos no showing on MacBook?
If your videos do not appear in your MacBook after connecting your iPhone using a cable that's in good condition, it's mostly due to a locked iOS device, "Trust this computer" issue, or iCloud sync delays.


