
How to put music on iPhone without iTunes

Transferring your photos from an iPhone 15 to a laptop isn't always a one-size-fits-all process. Here are a few different ways to get your images exactly where they need to go.

Tip: If you're looking for a reliable and efficient way to transfer your iPhone 15 photos, videos, and music over to your laptop, consider using Appgeeker iPhone Data Transfer. Everything feels where it should be. Even if you're not tech-savvy, it's easy to navigate and accomplish tasks. Better still, it supports bidirectional transfer between iPhone and laptop.
Moving videos and pictures to your laptop from iPhone 15 can be useful for offline viewing and backup.
When you've just come home from an amazing trip or finished a massive photo shoot, nothing beats seeing your favorite memories captured on your iPhone 15. But what if your phone's storage is completely full, or you need to edit those high-res files on a bigger screen? The good news is you can transfer pictures from your iPhone 15 directly to your laptop in just a few clicks. This article will show you which methods you'll need and what to watch out for when moving your images.
Having your iPhone 15 photos safely backed up on laptop means you can free up space and edit with ease, even if you are working across different operating systems. We'll guide you through the steps to ensure your high-quality images are always exactly where you need them.
Table of Contents
Because you are dealing with massive photos (which usually means high-resolution 48MP ProRAW files or thousands of live photos), the best way depends entirely on whether your laptop is a Windows PC or a Mac.
Since the iPhone 15 series features a USB-C port, you have a massive advantage: you can use a high-speed cable connection to move gigabytes of data in seconds without relying on slow Wi-Fi or cloud compression.
If you use a Windows laptop, the direct USB-C transfer method with File Explorer or the dedicated management software like Appgeeker iPhone Data Transfer would be your best choice; if you use a Mac, the built-in Image Capture utility is a lightweight powerhouse for bulk transfers.
Copying pictures from iPhone 15 to your laptop Windows with File Explorer is very similar to copying images from an USB drive. Follow these simple steps to save your favorite photos directly to your laptop.
1. Connect your iPhone 15 to your laptop with a cable. If possible, use a high-speed USB-C to USB-C cable that supports USB 3.0.
2. Unlock your phone and tap Trust if prompted.
3. Open File Explorer.
4. Under This PC section in the sidebar, double-click Apple iPhone.
5. Navigate through Internal Storage > DCIM, and open the folders where saved your photos.
6. Copy and Paste the images directly to a folder on your laptop.

Do not try to move all 10,000 photos at once via drag-and-drop, as Windows can sometimes time out. Move them in batches of a few gigabytes.
Related: Text messages missing on iPhone
If Windows File Explorer crashes during large transfers, or you want a more intuitive way that can mimic the neat albums, dates, or categories you see on your iPhone 15 Photos app, then dedicated management software like Appgeeker iPhone Data Transfer is the best alternative.
It's a very handy tool that allows you to automatically organize photos by month or album during the export. You can seamlessly move media files (photos, videos, music, etc.) between an iPhone and a Windows laptop, a Mac.
Here we will provide a step-by-step breakdown of how to use its specific photo export features to import pictures from an iPhone 15 to a Windows laptop. The steps should be the same for Mac users.
Before plugging anything in, change this setting to prevent the iPhone 15 from slowing down the transfer by trying to convert files mid-stream:
Open Settings > Photos, scroll to the very bottom and look under Transfer to Mac or PC, then select Keep Originals.
Step 1: Launch iPhone Data Transfer
Launch the tool on your laptop. Connect your iPhone 15 to the laptop using a high-speed USB-C to USB-C cable.
Wait a few moments for it to recognize your device and load the main dashboard.

Tip: the tool offers two-way, drag-and-drop management.
Step 2: Access the photo manager
Click the Photos category icon on the left side of the dashboard. This opens up a detailed file explorer view of your image library.
You will see your photos organized cleanly by categories in the center pane (such as Live Photos, Places, Favorites, Imports, or custom albums).

Step 3: save photos to laptop
Click into any category or album, and check the boxes next to the specific photos or videos you want to move. If you want everything in that category, select the Check All box at the top.
Next, hit the Export to PC (or Export to Mac) button located in the top control menu (it looks like a laptop icon with a right-pointing arrow).

A window will pop up asking you to choose a target location on your laptop. Select your preferred folder (such as your Desktop or Pictures folder) and click Open.
The transfer progress bar will appear. Keep both the phone unlocked and the cable firmly plugged in until the "Transfer Completed" message appears.
Related: iPhone passcode expired
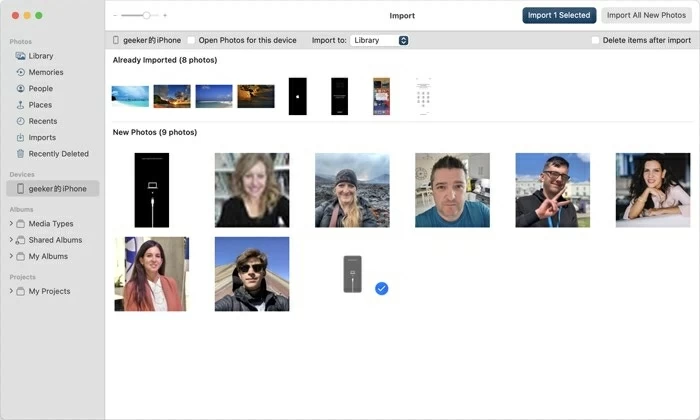
For the MacBook users, Photos will be your primary app. It offers a level of automation, organization, and database safety that other Apple's tools (Image Capture, AirDrop) can't match.
Here's how to import photos from your iPhone 15 into the MacBook with Photos app:
1. Connect your iPhone 15 to your Mac.
2. Open the Photos app.
3. At the top toolbar of the Photos app window, click Import To dropdown menu if you want to send these photos to a specific pre-existing album, rather than just dumping them into your main library.
4. Click on individual images you need, then click Import Selected in the top-right corner.
5. To import only new photos, click the large Import All New Items button instead.
For Windows users, follow these steps to import photos into your laptop.
1. Connect your iPhone 15 to your Windows laptop using a compatible USB cable.
2. Open the Photos app.
3. In the top-right corner of the app window, click the Import button.
4. Select From a connected device from the drop-down menu. The app will automatically scan your device for photos and videos.
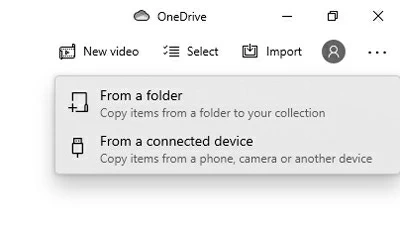
5. Choose what to import, press the Import [X] items button at the bottom.
Once finished, a notification will confirm that your iPhone 15 photos are saved on your laptop.
Related: Fix iPad unavailable try again
If you have a few hundred photos needed to transfer to your laptop with macOS system, all you have to do is make use of Apple's AirDrop feature. It's completely wireless and lossless.
To move iPhone 15 pictures to Mac laptop, do the following:
1. Tap the photos in your Photos app to highlight them.
2. Tap the Share button in the bottom-left corner.
3. Select AirDrop, and choose your MacBook from a list of available devices.
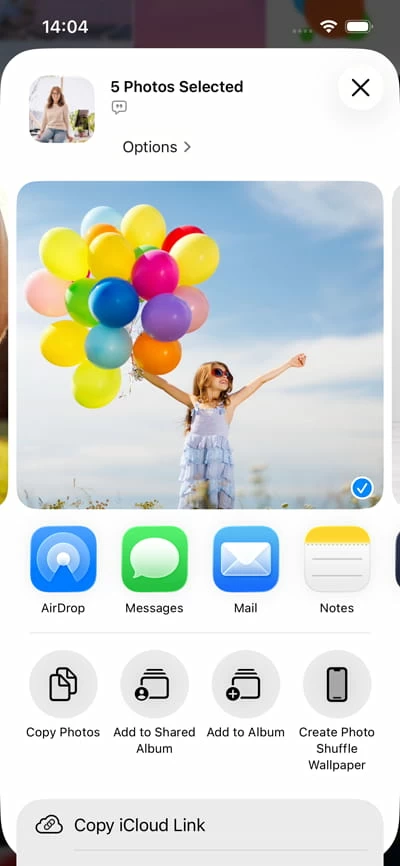
4. If both devices use the same Apple ID, the photos will transfer automatically without a prompt. You'll hear a chime on your Mac when it's done; or a notification will pop up in the top-right corner of your Mac screen, and you need to click Accept.
For massive libraries (50GB+), a wired connection is still highly recommended to prevent battery drain and accidental disconnection.
Instead of syncing with the heavy macOS Photos app, the built-in Image Capture utility is a lightweight powerhouse for bulk transfers.
1. Open Image Capture on your MacBook and connect your phone.
2. Select your iPhone from the left sidebar. Wait a few moments for the app to load all the thumbnails of your photos and videos.
3. Before transferring, at the bottom, choose a preferred folder under Import To. You can choose from Downloads, Desktop, or Pictures. If you want to create a specific new folder, click Other..., navigate to where you want it, and create a new folder.
4. Choose the photos you want to import, click the Download button at the lower right corner. To transfer everything, simply click the Download All button.
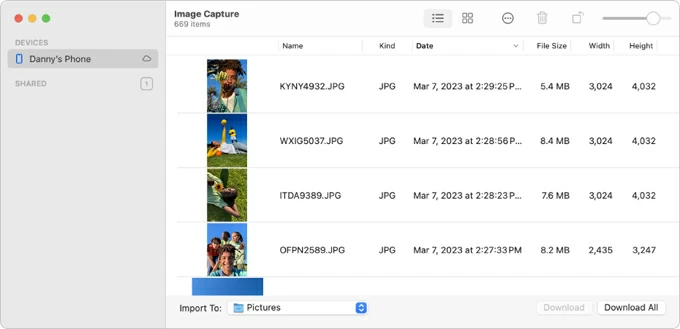
A small progress circle will appear next to your iPhone's name in the sidebar. Once completed, a green checkmark or notification will confirm the files are safely on your laptop.
Related: How to import music from Windows to iPhone
If you prefer never having to plug your iPhone 15 into your laptop again, you can set up iCloud Photos. This keeps the exact same photo library synced perfectly across both devices over Wi-Fi.
Depending on the operating system your laptop is running, the procedure may vary slightly. Here's how to sync photos on iPhone 15 with laptop:
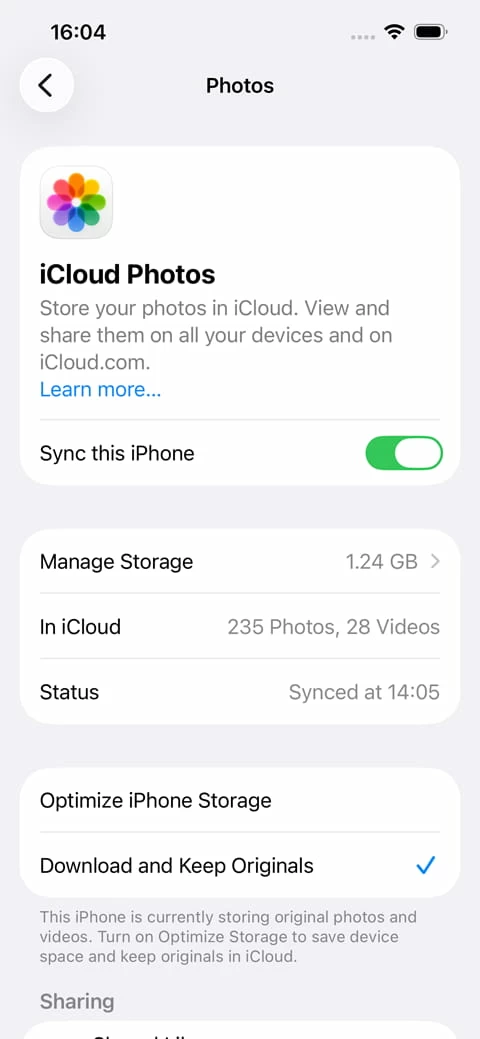
Enable it on your iPhone 15
1. Open Settings on your phone.
2. Tap your Apple Account name at the very top.
3. Tap iCloud > Photos, then toggle on Sync this iPhone.
Enable it on your laptop
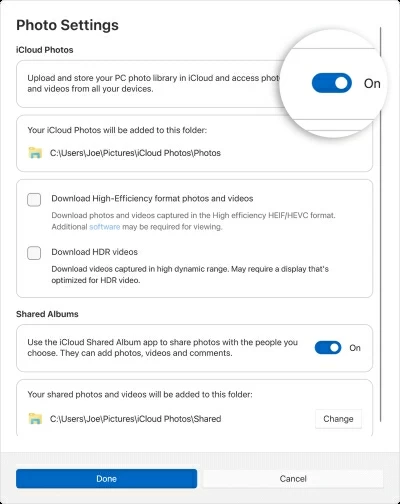
On Windows laptop:
1. Install the iCloud for Windows from Microsoft Store
2. Launch the app and sign in using the same Apple ID credentials.
3. On the main dashboard, locate Photos and click the arrow or settings icon next to it.
4. Check the box to turn on iCloud Photos. Once configured, your photos on iPhone 15 will sync over the air.
5. Open File Explorer. You can now view your pictures in a dedicated folder named iCloud Photos.
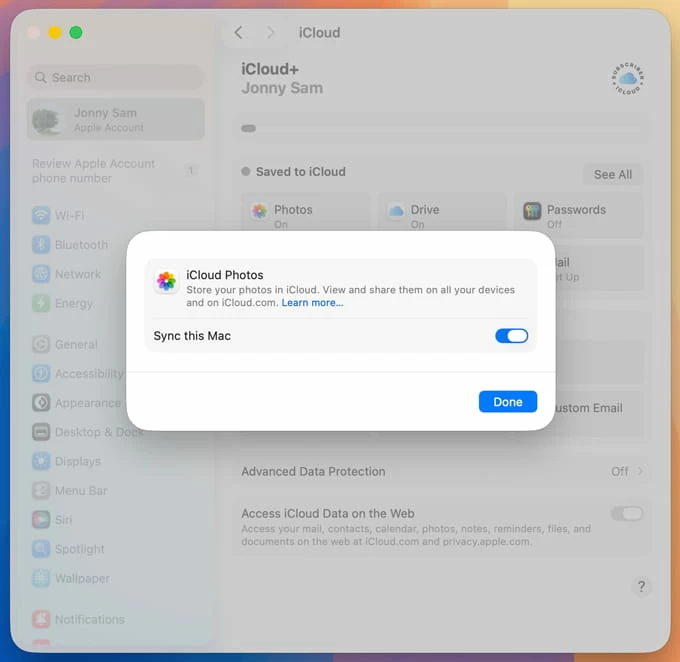
On MacBook:
1. Open the Photos app on your Mac.
2. In the menu bar at the top of the screen, click Photos > Settings.
3. Click the iCloud tab at the top of the settings window.
4. Check the box next to iCloud Photos, and then Sync this Mac.
This method is perfect if you don't want to pull a large batch of photos over a cable connection. However, you may need to pay for an upgrade if the free 5 GB of cloud storage isn't enough.


