Pull Off Music from iPhone and Back Up on Windows 7


Platforms
Developed for both Windows & Mac users


What makes Android lagged behind iOS is the native backup services—the latter owns the stock iTunes and iCloud. This is not the excuse for not backing up Android data. You never know how much you've relied on your Android phone & tablet until it get lost, stolen or even broken.
Disasters with Android smartphone & tablet strike more often you think, which will put you into an extremely bad position - all the contacts, photos, videos, app data, settings, valuable documents and more irreplaceable contents stored in Android device are vanished in a flash. Switching to a new Android phone is a really easy decision, but replacing large amount of stuff on it to start from the scratch should be given serious consideration.
To advert the huge data loss on Android phone, you should implement a planning ahead strategy – create Android backup on a regular schedule. Luckily, there are ways and backup services for Android phones that can keep the data backed up and safely stored. Read the post below and see how simple it is to back up anything on Android phone using different methods. Also see: How to back up iPhone.
Manually Copy Android Data to PC (Old Fashioned Method)
The most common and easiest way for most users to make a backup copy of valuable data on their Android device is to drag and drop the contents directly from it to a PC. The process is relatively simple – plug the phone to the computer, set it to USB Mass Storage mode, then copy the all the files on phone and paste on your PC. This will only save photos, music, videos - other contents like contacts, calendar, app data are excluded.
When disaster occurs, you can reverse the process by copying the backup back to Android phone.
Stick with Google service
Making backup of your Android device and keep on the computer is all well and good, but it's a manual backup solution that won't update automatically and you should make it regularly. How about you other files like contacts, calendars, e-mail, system settings, apps? Don't worry, Google service has your back. Simply go to Settings > Backup & reset then tap Backup my data and Automatic restore. Then back to Settings > Account and click on your Google account. Check the boxes next to sync icons (App data, Gmail, Calendar, Photos, Contacts, Docs, etc) to select things you want backed up. That's it. Also reading Google Help documents:
Use a 3rd party Android Backup utility
As you can see, the method mentioned above can only back up partial of data on the Android phone and doing things one by one is a little tedious and time-consuming, though. If you like the idea of having someone else make a full backup of your Android phone, try something like Fonelab.
It's a handy utility that integrates recovery, backup and restore features in one place. It gives you the options to back up almost all your important data locally without rooting your device — contacts, messages, call history, pictures, videos, audios, documents (ppt, word, excel, pdf, etc). You can choose to one-click to back up the device automatically or just make a copy of the types of files you need. This also applies to restore process.
The following will walk you through both backup and restore process by using this tool.
How to Back Up Android Data
Step 1: Connect the Android phone & tablet to the computer
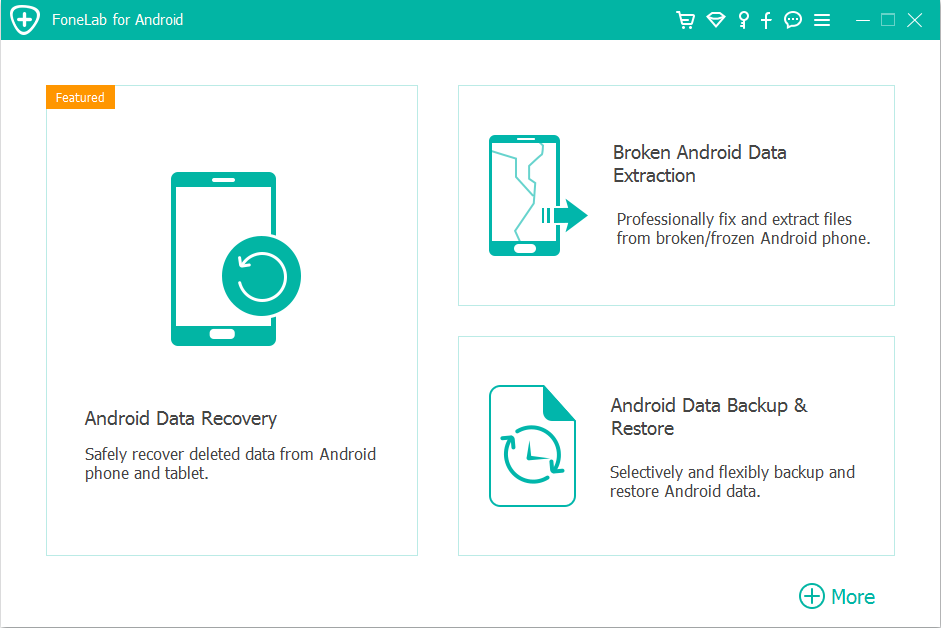
Once you install it on your computer, double click the icon on the desktop to run it. Its main interface will open with three tabs: Android Data Recovery, Broken Android Data Extraction and Android Data Backup & Restore.
To create a full backup of your Android device, click on the "Android Data Backup & Restore" tab on the lower right position.
In the next window that comes up, you will need to choose between two different modes, one for backing up Android stuff, and the other for restoring from backup you created.
Here we click on "Device Data Backup" option and then plug your Android phone or tablet into the computer using a USB cable.

The "One Click backup" option will save you efforts and make the backup process more simplified and quicker. When you click on it, everything that's possible to back up on your Android phone will be backed up and save on your computer.
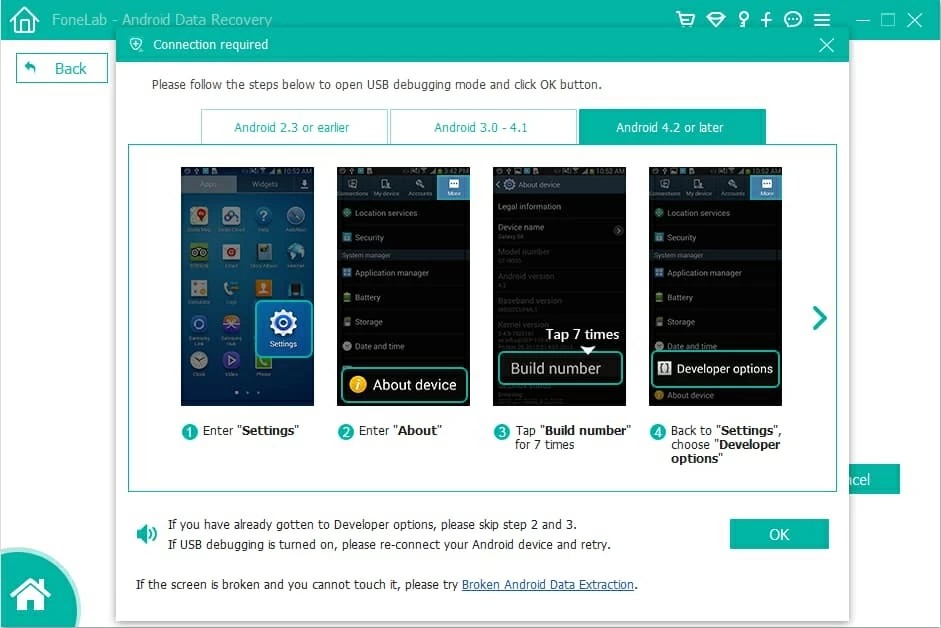
Step 2: Enable USB Debugging mode on Android device
At this point, a notification pops up, asking you to enable the USB debugging mode on the device to let the program access to its internal memory.
If you have done this on your device, you will skip to the next step; otherwise, you need to follow the on-screen instructions to enable it on the device. For Android 4.2.x and higher version, go to Settings > About phone. Locate to Build number field and tap it 7 times to enable developer mode. Then, turn back to Settings > Developer option, and toggle the "USB Debugging" option to ON position.
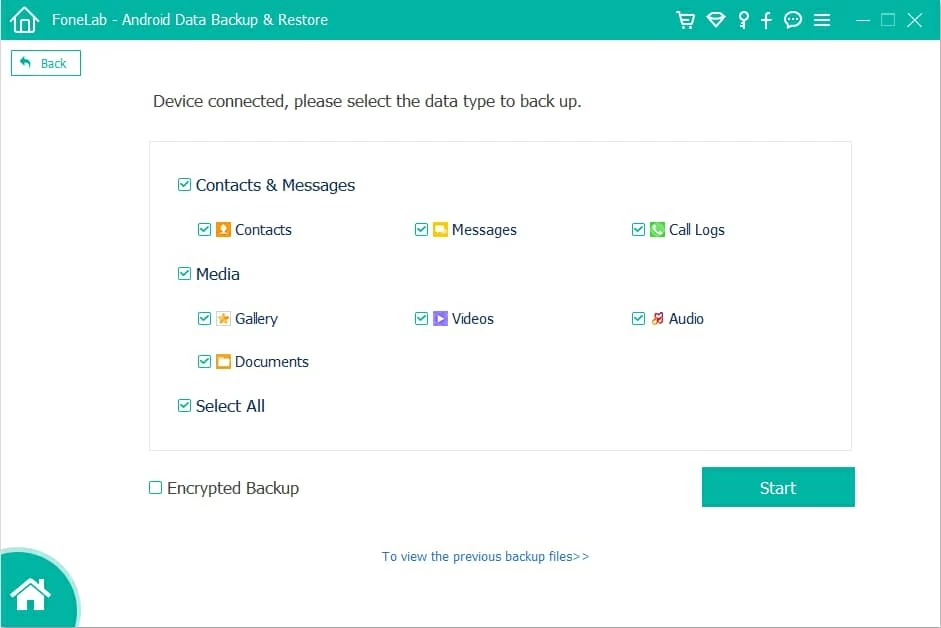
Step 3: Choose data type on Android handset to retrieve
Once you've done so, you will get into a new window. From there you're going to want to select which file types you wish to back up. Contacts, videos, audios, call logs, messages, pictures and documents are all supported.
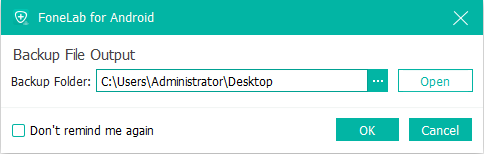
Step 4: Start backing up Android data on the computer
When you're satisfied with your selection, hit the Start button at the lower right corner and a dialog box for output path selection jumps out. You just specify the directory where you wish to save the newly created copy of your Android data.
Then, click the OK button and the process of backing up the Android phone & tablet will begin. A orange progress bar will display and indicate a percentage of completion of the process.
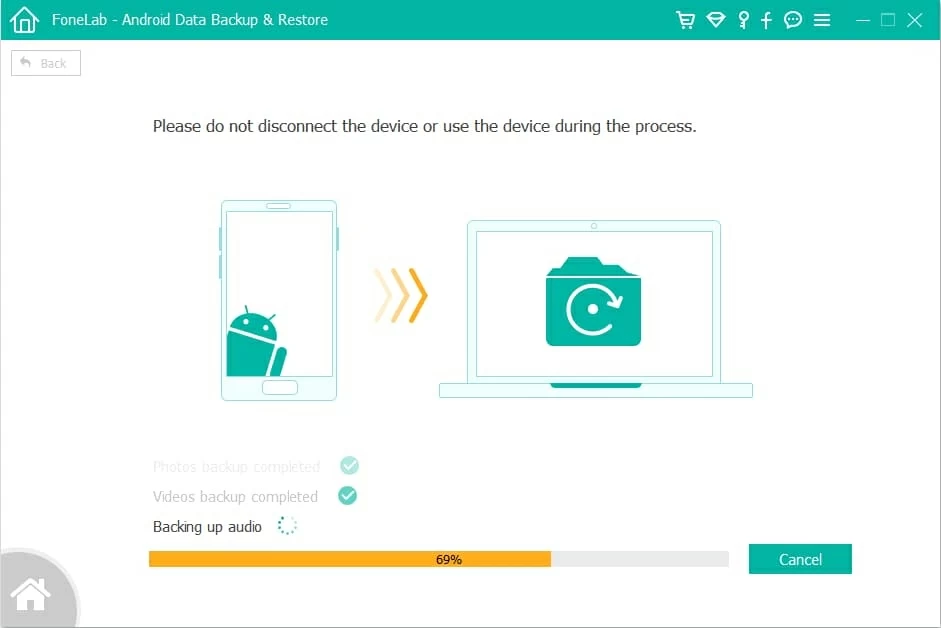
After the process is done, you can now see a backup file in .data extension sitting on the folder you specified earlier.
Now that you've taken a full backup of Android smartphone & tablet, you can use the backup file to restore your device right away when disastrous incidents happen.
Let's have a look at how to restore your device from backup.
How to Restore Android Data
Step 1: Choose "Device Data Restore" mode
When you open the program, navigate to "Device Data Restore" mode and click it.
Step 2: Specify a backup to recover from
On the next screen, the program lists out all the backups you've made for your Android device and you can identify the backup via the name, model, latest backup data, serial number and backup size.
Then, pick the backup you would like to work on to find back the lost files on Android phone & tablet.

Step 3: Select what files you want to get back
Next, click the Start button at the bottom position to let the program scan the backup immediately.
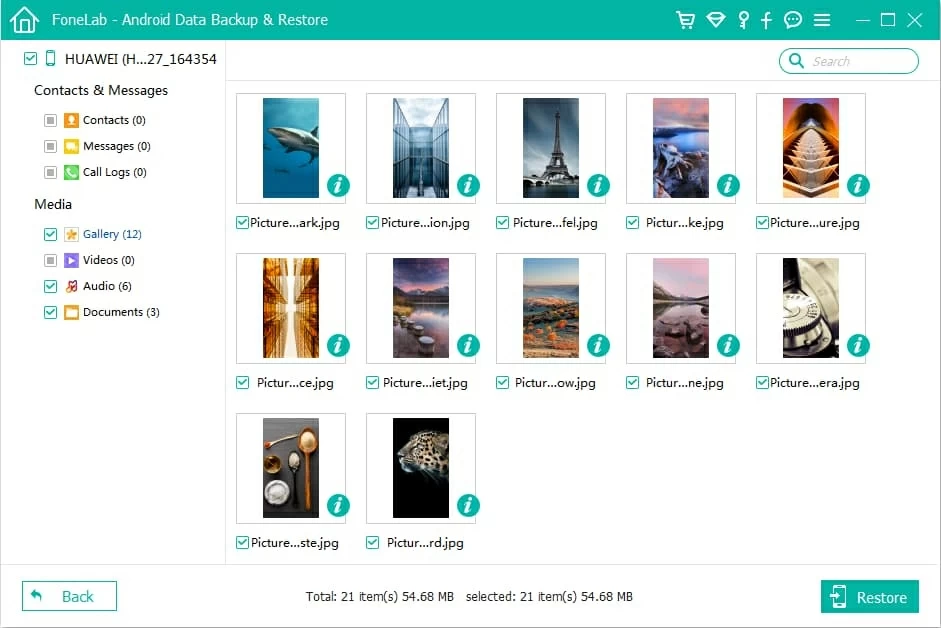
Once done, all files the backup contains will be displayed on the window, just like the screenshot shown below. You can have a preview of each file on the right pane.
Now, you're ready to choose which files you want to retrieve. To do this, click on any of categories on the left sidebar, then check the boxes next to specific items you need on the right pane. You can also placing a checkmark in front of the category on the sidebar to select all of files it has.
Step 4: Start restoring selected files to Android phone
After the selection, simply hit the Restore button at the lower right corner and the process of restoring Android from backup begins.
A window will show up, indicating the progress through a progress bar and giving you a rundown on what the program is restoring and what files have done.
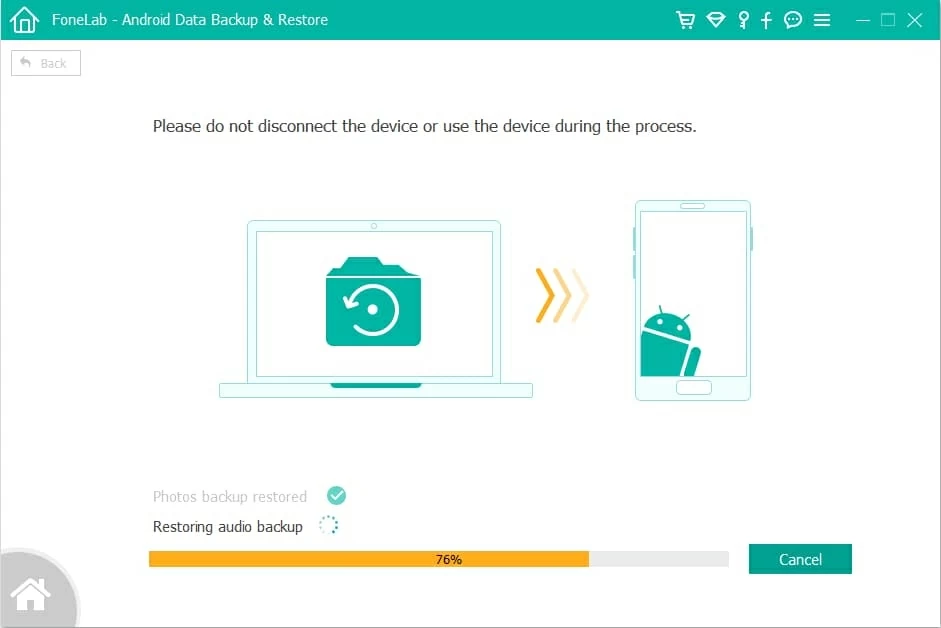
When the process completes, the selected files will be restored to your Android mobile phone.
That's it, you're done!
The Bottom Line
That's how you can back up the data on Android device and how you can use the backup copy to restore the lost files to Android phone. On the whole, both backup and restore processes are pretty straightforward by using this flexible and reliable Android data backup & restore program.