
Recovering Deleted Video Windows 7


For one reason and another, data loss could be present in your Samsung Galaxy phone. Most of the time the complicated Samsung Galaxy data recovery procedure troubles users a lot and this may result in the need of a third-party data recovery tool. Below, we've clarified powerful Samsung data recovery software and a detailed guide to recover text messages, pictures, videos, music, PDF files, and more from all Samsung Galaxy phones (S, Note, A, J, Z or M Series) and tablets.
Figuring out what renders the data loss is usually a great first step before you go ahead to perform Galaxy data recovery. There can be multiple causes that can explain why data loss occurs in your Samsung device, which are as follows:
1. Accidental deletion. You may delete a crucial file by mistake or remove a file but regret it later.
2. Software bugs. Data loss on Samsung Galaxy phone could happen after you update an app or upgrade Android OS. Files can also be deleted when malicious malware or virus attacks the device. Plus, factory resetting Samsung phone will delete all data and files from phone internal storage.
3. Hardware glitches. They can be a draining battery causing your galaxy device to shut down randomly, a SD card corruption, an incorrect connection between your phone to a computer, etc.
Now that you've got a sense of why data gets lost, it's time to do something about Samsung phone data recovery. We'll start off with an excellent third-party Android data recovery tool, followed by a native method to restore from Samsung Cloud.
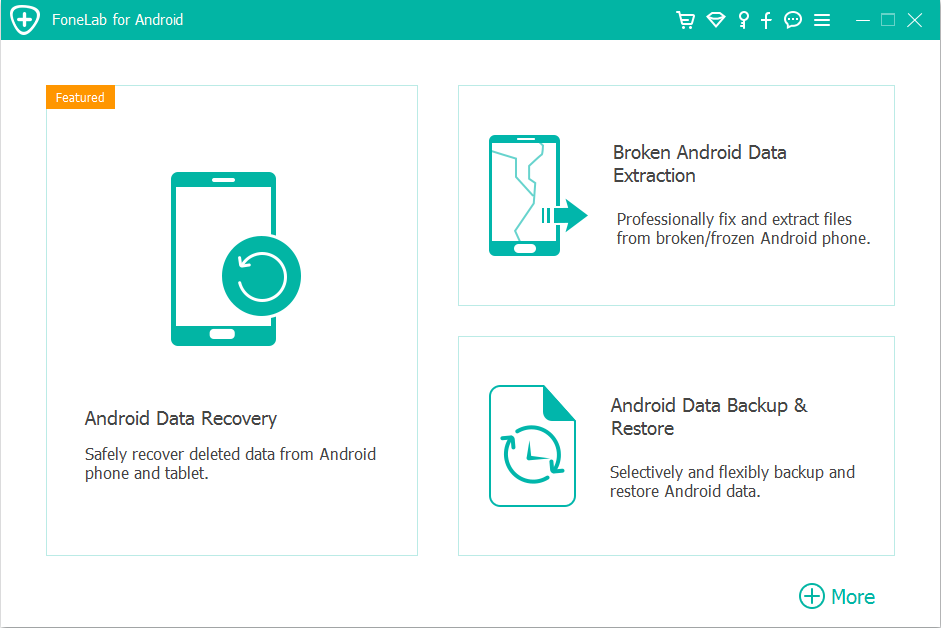
Samsung Data Recovery Software - Easy & Efficient
If you dream of finding all Samsung deleted files and then getting particular files back effortlessly, Android Data Recovery just meets your requirement perfectly. Once you've set up the desired file(s), it'll automatically scan your device - all Samsung Galaxy series and the Android OS version are supported - and return back all recoverable files. All you need to do for recovering deleted files from Samsung Galaxy phone or tablets is just select the files (photos, messages, call history, bookmarks, audio, documents, WhatsApp files, and so on) and click on Recover button.
Now, download the Samsung mobile data recovery software through the link above and get it installed. Then, dive into the following wizard to get back the lost data.
Step 1: Plug your Samsung Galaxy phone to a PC or Mac
Run the software on your computer and connect your Samsung Galaxy phone to the machine using an official USB cable. When you enter the startup window, choose "Android Data Recovery" mode to do Samsung Galaxy data recovery.
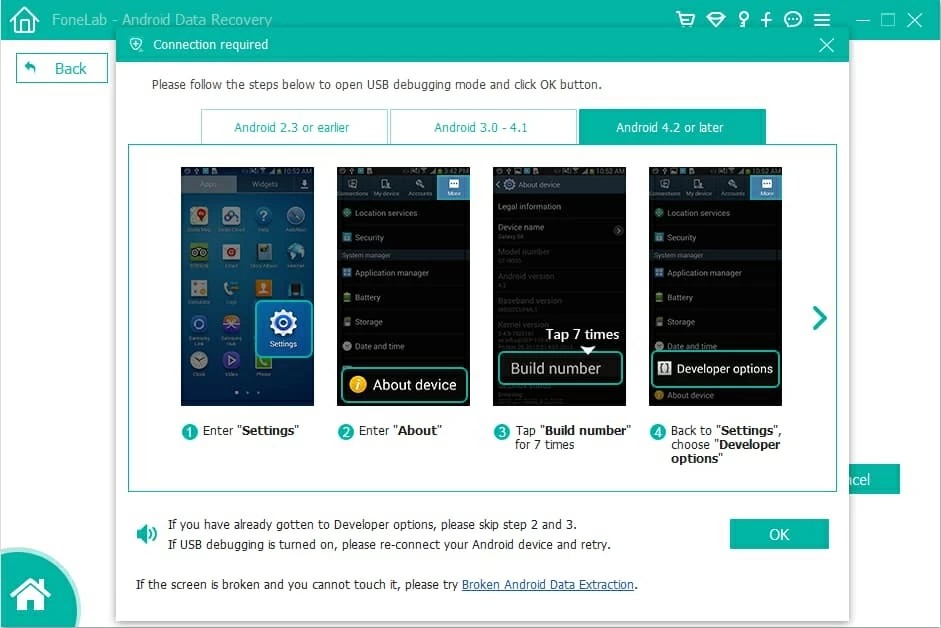
In the new screen, you'll be prompted to set the device to USB debugging mode by tapping Allow from the pop-up "Allow USB debugging" message on your Samsung Galaxy phone.
Tips: If you can't see the alert on your phone, try following the on-screen instructions or the steps in this page: How to allow USB Debugging mode on Android
Step 2: Scan deleted data in your Samsung Galaxy phone
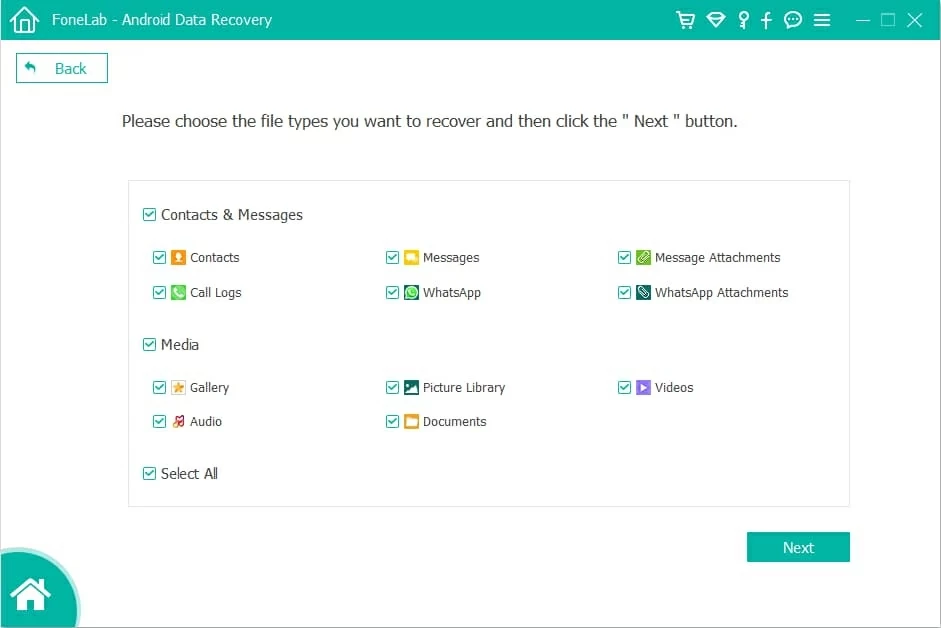
Next up, you'll need to choose the file type(s) you wish to scan. By default, all file categories are checked. If you just need to recover specific file type(s), just untick "Select All" option and highlight the type(s) of data you lost on Samsung Galaxy phone.
Click on Next button to apply the changes.
A window will open, asking you to root your Samsung Galaxy device for a deep scan. Hit Rooting Tools button and get KingoRoot downloaded to root your galaxy phone safely. See: how to safely root and unroot an Android device
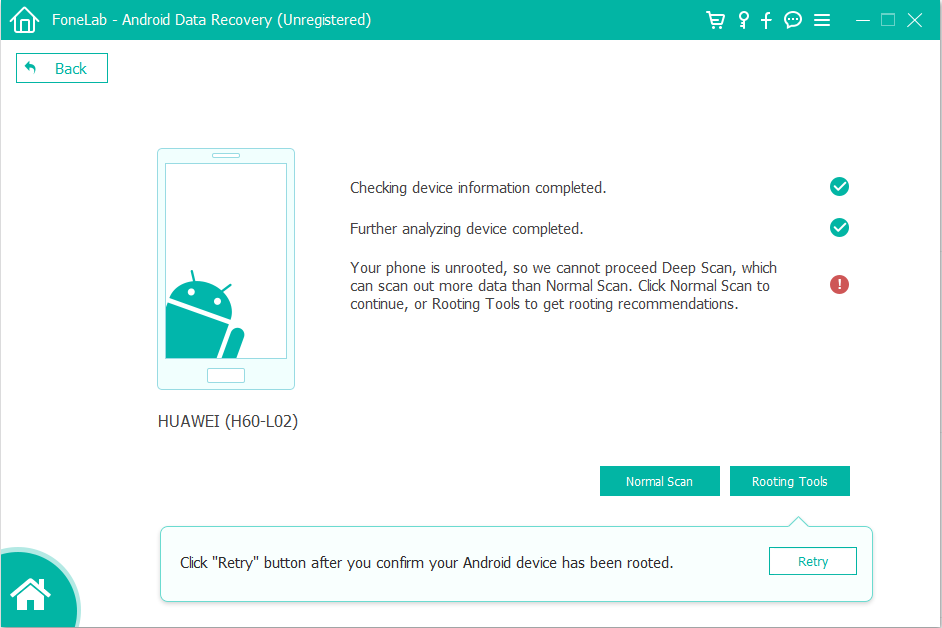
Once you phone is rooted, this galaxy recovery tool will begin scanning your device completely. How it takes depends on amount of the data stored in the phone internal memory.
Step 3: Preview and recover Samsung Galaxy Data
By the end of the scanning, all recoverable data will be displayed on a new panel. If you want the tool to list the deleted data only, enable Only display the deleted item(s) option.
Then, click on the file(s) to preview in details and choose the files you need. When finishing selecting the Samsung deleted files to retrieve, press Recover button.
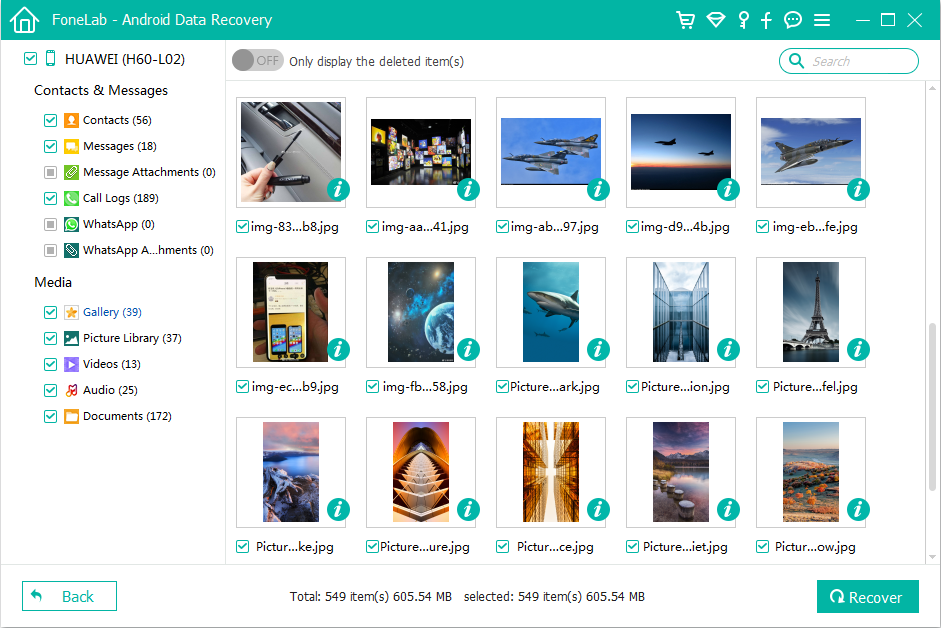
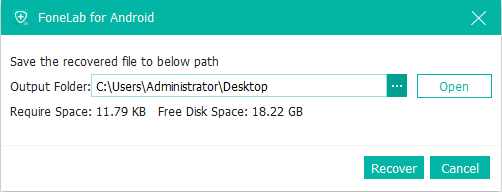
From the dialog box that appears, select a folder to store recovered files on your computer and click on Recover button again.
Pro Tips: Why does Samsung files recovery tool work for finding and retrieving deleted files?
When you accidentally deleted a file on Samsung, your phone just marks its space as available to be used rather than erase the data completely from the device. In other words, the deleted data is still at some place in your phone and remains recoverable. How data recovery program works is to drill through the phone memory to find where deleted files are stored and then recover data from Samsung phone on its own without affecting other existing data and files.
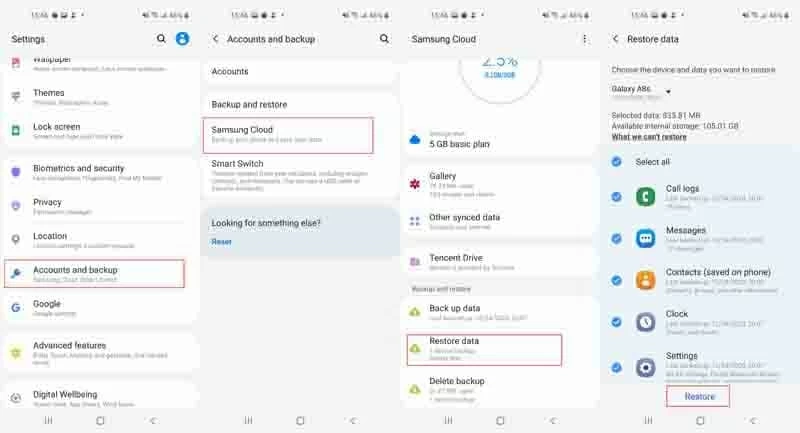
Do Data Recovery from Samsung Cloud
If you've ever backed up your Galaxy phone to Samsung Cloud, odds are that there're copies of your deleted files stored in the cloud. Here's how to retrieve data from Samsung Cloud. Notice: The settings may vary a bit depending on your phone's series and the software version you're running.
Tips: A backup in Samsung Cloud covers call and message history, audio recording, installation files and app settings, etc. Click here to see details on content types supported on Samsung Cloud.
That's it! To avoid suffering data loss in the future, you can try backing up your Samsung phone to a machine for safeguarding all your original data and files.