
How to transfer videos from iPhone to Mac wired or wirelessly

Whether you're using a PC or Mac, this guide covers all wired and wireless methods for photo transfer to computer from an iPhone 13, 13 Pro, 13 Pro Max, and 13 mini.

It doesn't have to be complicated for getting photos off an iPhone 13 to a computer, whether with or without a cable.
Your iPhone 13 takes great pictures but has limited storage. To prevent full storage, transferring photos from iPhone 13 to computer is a good idea for local backup and better organization.
In this guide, we'll explore various methods and show you how to transfer photos from iPhone 13 to computer easily with or without a cable. Depending on whether you have a Windows PC or Mac, the approach to use may differ.
From wired connection for speed to wireless cloud-syncing for convenience, these methods enable seamless photo transfer from iPhone 13 to computer, letting you access your iPhone photos on your PC or Mac effortlessly.
Table of Contents
Working for all Windows and macOS computers, Appgeeker iPhone Data Transfer ensures full-quality photo transfer from iPhone to PC/Mac and the other way around, all in simple clicks.
When you need to preserve precious memories or create more space on your device, transferring photos from your iPhone 13 to your computer provides an effective solution. For quick and direct transfers, wired methods offer excellent performance.
Typically, the cable-based transfers involve the common steps: connect your iPhone, trust this computer, browse and select the iOS photos you wish to transfer, and import them to PC/Mac.
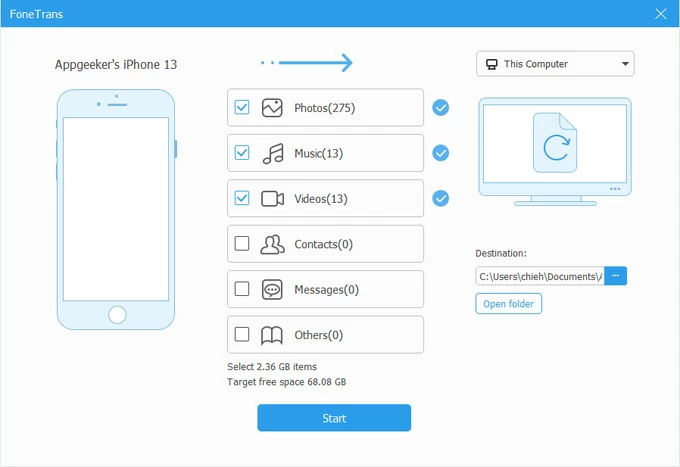
Compatible with both Windows and macOS, Appgeeker iPhone Data Transfer offers one of the simplest solutions for photo transfer from your iPhone 13 to computer.
With just a few clicks, you can seamlessly import your entire Photos Library or select specific photos and videos while preserving their original quality. The process works bidirectionally, allowing you to transfer photos between iPhone 13 and PC/Mac with ease.
Also, this tool supports all iOS images, including your Camera Roll, Live Potos, video recordings, and personal albums. For added convenience, it features a built-in HEIC Converter, letting you transform iPhone's HEIC images into widely-compatible JPEG / PNG formats during transfer.
Here's how to transfer photos from iPhone 13 to your PC or Mac, without iCloud or iTunes:
Step 1. Run Appgeeker iPhone Data Transfer on your computer.
It works for all Windows PCs and macOS computers, Windows 11 & Windows 10 included.
Step 2. Connect your iPhone 13 and trust this computer.
Use a USB or Lightning cable to connect your iPhone; when prompted with Trust This Computer, tap Trust and enter your passcode to proceed.

Step 3. Preview and select iPhone 13 photos before transfer.
From the left side, navigate to Photos tab — where you're able to preview and select any current photos, videos, and albums in your iPhone Photos Library.

Step 4. Transfer iPhone 13 photos to computer.
Click Export to PC button (the computer icon) at the top toolbar, in the opening box, specify a location on your computer to save all transferred iPhone photos.

This will import your iPhone photos to PC Windows 11, Windows 10, or macOS computer in no time. If needed, you may convert HEIC pictures to JPEG / PNG formats for better compatibility, or delete the originals on your iPhone to free up storage.
The built-in Photos app on Windows 10 and Windows 11 makes it easy to import photos and videos from an iPhone 13 (or other models) directly via a USB cable connection. Once transferred, you can view, edit, and share imported iPhone photos on computer as needed.
This provides a simple and efficient way for Windows users to selectively transfer their photos from iPhone 13 to PC via Windows Photos. Here's how:
1. Launch the Photos app from Windows Start menu if it doesn't open automatically. You may press the Windows key and search Photos to open it.
2. Connect your iPhone 13 to computer using a USB cable. When Trust This Computer prompt appears, tap Trust to allow your PC to transfer photos from your iPhone.
Note: For a Windows PC to recognize your iPhone, the newer version of iTunes may be required on your computer in the first place.
3. In the top right of Photos window, click Import button and select From a connected device.
4. It will then scan your iPhone 13 and load all photos and videos on it.
5. Select the iPhone photos you want for transfer and choose where to save them on your PC.
6. Hit Import button and confirm the photo transfer from your iPhone 13 to computer. If necessary, check Delete original items after import option to free up device storage.
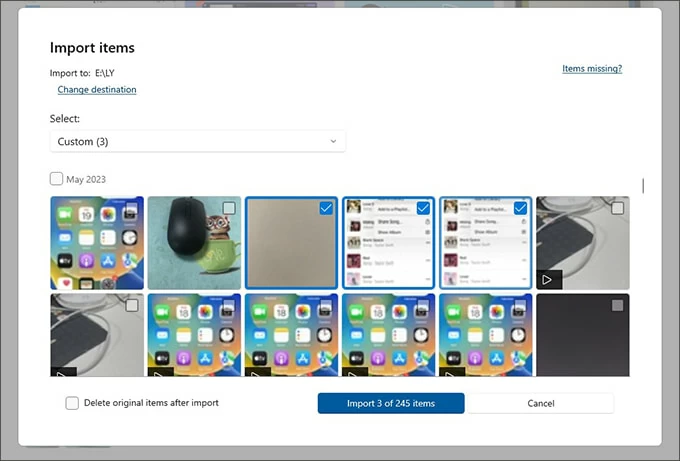
Do not eject your phone until it completes. Once done, open the local folder on your PC for all transferred iPhone photos. This provides the possibility for photo recovery on iPhone 13 in case of accidental deletion.
TIP: If your photos are saved to iCloud not on your iPhone 13, you may not be able to transfer them to your computer this way. Download the iCloud photos on your device and try again.
Alternatively, you can use the File Explorer on PC to transfer photos from your iPhone 13 by simple copy-n-paste. When connected via USB cable, File Explorer lets you browse your iPhone's DCIM storage and selectively copy specific photos to your computer.
Important Notes:
Steps to copy photos from iPhone13 to computer via File Explorer on Windows PC:
1. Link your iPhone 13 to Windows PC with a USB cable.
2. When asked, tap Trust on Trust This Computer prompt and enter your iPhone passcode to allow access. Seek help if you forgot iPhone 13 passcode.
3. Open a File Explorer window by click This PC on your desktop.
4. Under Devices and drives, select Apple iPhone and navigate to Internal Storage > DCIM.

5. Browse the DCIM folders to select the iPhone pictures you want for transfer.
6. Right-click on the selected photos and select Copy from the expanded menu.
7. Paste the photos to a local folder on your computer. Or, you may drag and drop the photos to transfer them from your iPhone to an external hard drive or anywhere you want to keep them.

The photos on your iPhone 13 will be transferred to your computer instantly. However, if you have too many folders of pictures, it might take much time to find the specific photo you want.
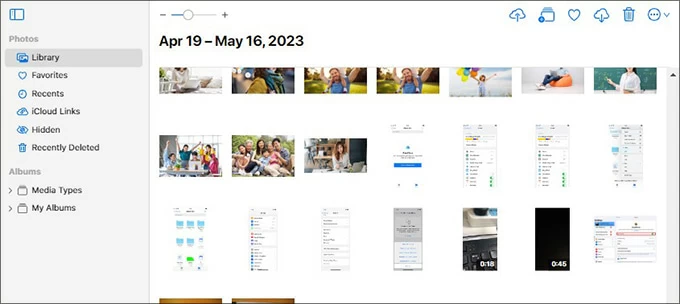
Similar to Windows Photos on PC, macOS includes a native Photos app that supports direct photo transfers from your iPhone 13 via a wired connection. This built-in solution allows you to import pictures directly from your iPhone to a local folder on your computer. Here're the steps:
1. Launch Photos app from the Dock on your desktop.
2. Connect your iPhone 13 using a suitable USB data cable. If required, tap Trust on your device to allow photo access.
3. Select your iPhone under Devices on the left. The Photos app will show you an Import screen with all photos and videos currently on your phone.
4. From the top drop-down box, choose where to save your iPhone photos. You can either choose an existing folder or create a new album.
5. Choose the photos you want to transfer and click Import Selected. Or, click Import All New Photos to transfer only new pictures.

Check Delete items after import option if you don't want to keep the original photos on your device. Wait for a short while, your iPhone photos will transfer to your MacBook or Mac soon.
Aside from manually transferring photos with a wired method, there are also wireless options available for transferring iPhone 13 photos to your PC or Mac without a cable.
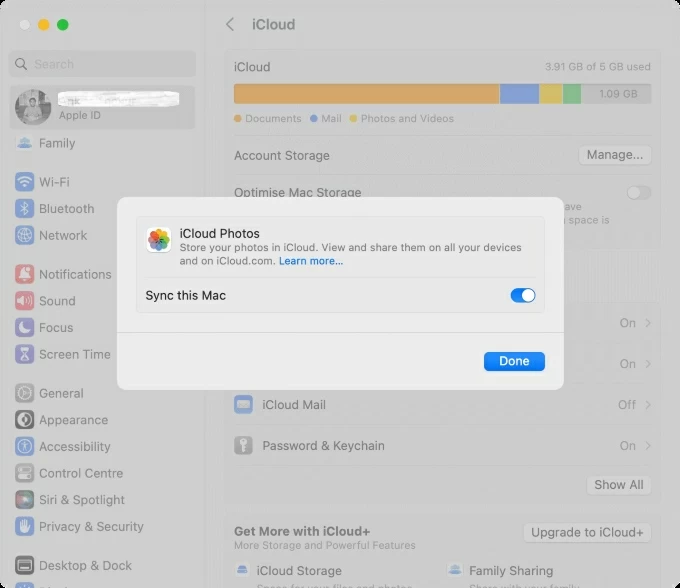
For seamless automatic syncing, iCloud Photos stands as the ideal choice for photo transfer from iPhone 13 to computer. By enabling iCloud Photos, your entire iPhone Photo Library uploads to iCloud and syncs wirelessly across all connected devices — including Macs, Windows PCs (via iCloud for Windows), and iCloud.com.
Mac users benefit from native integration, with synced iPhone photos automatically appearing in the Photos app. On a Windows PC, users can either install iCloud for Windows app for local access or directly download iPhone 13 photos on computer through iCloud.com.
TIP: While convenient, be aware that iCloud only offers a total of 5GB of free cloud storage. If you have a large photo library, you may need a paid plan for iCloud +.
Step 1. Enable iCloud Photos on iPhone 13.
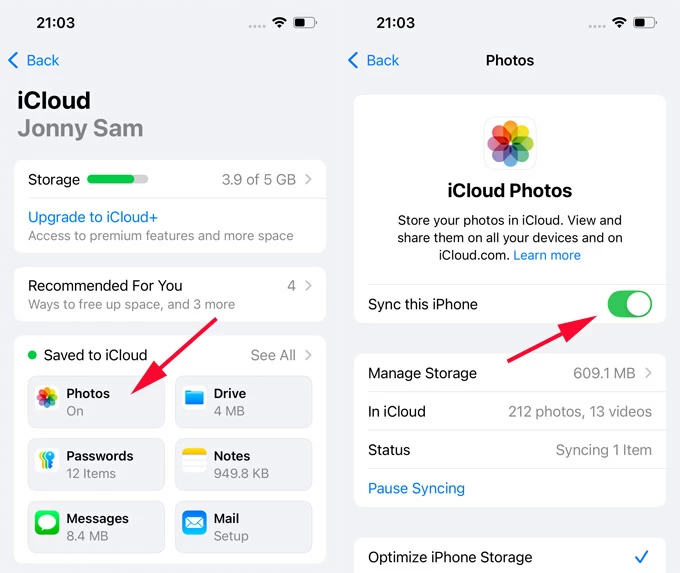
Step 2. Download photos from iPhone 13 to computer through iCloud.
For Windows PC users:
This way, your iPhone 13 photos will get to your PC computer without a cable.
For Mac users:
Then, all iPhone 13 photos in your iCloud will sync with your computer automatically. Simply open the Photos app for all transferred photos.
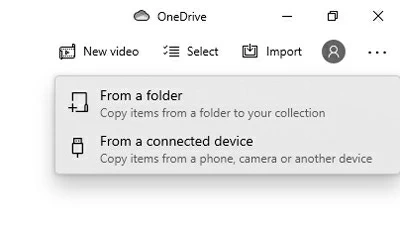
In addition to iCloud Photos, other cloud-based services like Google Photos, OneDrive, and Dropbox can also help move your iPhone photos to computer wirelessly.
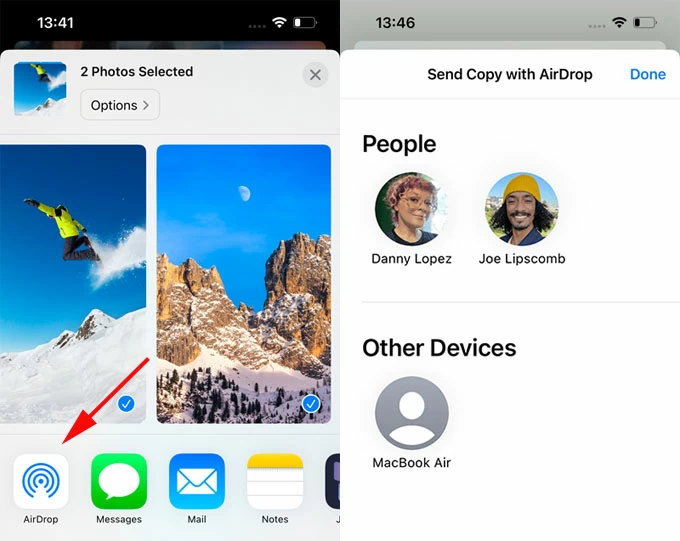
Within Apple ecosystem, AirDrop is a perfect option for instant, small transfers of photos between iPhone and Mac. To wirelessly share photos from iPhone 13 to computer by AirDrop, put them near each other within Wi-Fi & Bluetooth range and follow the steps below:
1. Turn on AirDrop on your iPhone 13 in Settings > General > AirDrop and set it to Everyone for 10 Minutes. Also, you may access Control Center and long-press AirDrop icon to enable it.
2. On your Mac, click the Control Center status in menu bar and click AirDrop to turn it on.
3. Open the Photos app on your iPhone 13, and tap the photos you'd like to transfer to computer.
3. Tap the Share button and pick AirDrop from the sharing options.
4. When your iPhone detects all nearby AirDrop devices, target your Mac to send the photos.
5. An AirDrop prompt will show up on your Mac screen, tap Accept to receive the photos.
To quickly transfer a handful of photos from your iPhone 13 to computer, emailing them to yourself is a straightforward process and works for both Windows PC and macOS machines.
To make things easier, Appgeeker iPhone Data Transfer offers a high-speed way to transfer all pictures and albums from your iPhone 13's Photos Library to your computer in a single click. All you need to do is to connect your iOS device to computer and follow the outlined steps:
Using a USB cable, the wired methods enable fast and straightforward photo transfers from an iPhone 13 to a computer, especially for large batches of pictures and videos.
For a convenient transfer, the wireless options help you move iPhone photos with no cable needed.
Both wired and wireless methods offer reliable ways for iPhone-to-computer photo transfer. Simply choose the one that suits your needs perfectly.
Depending on the method you use for getting photos off your iPhone 13 to computer, here are some common fixes to resolve the transfer issues:
Check the cable
Ensure you're using a proper USB-C or Lightning cable to connect your iPhone 13 and computer before photo transfer. You may disconnect your device and reconnect it or switch to a different data cable, then try again.
Trust your computer
For a computer to recognize your Apple device, a Trust This Computer message will pop up on your iPhone screen after connection. Tap Trust and verify your iPhone passcode to allow for photo access. Otherwise, your computer won't be able to import any photos from the iPhone 13.
Check cloud storage and network
When using cloud storage services (like iCloud or Google Photos) to sync photos across iPhone 13 and computers, ensure the cloud storage doesn't reach its limits. Or, you may expand the storage by upgrading to a premium plan.
Also, a weak network may lead to failed photo transfers. Make sure to connect your iPhone 13 and computer to a stable internet during the transfer process.


