How to Recover Deleted Photos from iPhone 14


Platforms
Developed for both Windows & Mac users

Don't want to use iTunes to transfer photos from iPhone to PC? This guide will show you how to download pictures from your iPhone to a PC with no iTunes in various easy ways.

Tip: If you are wondering how to transfer photos from your iPhone to a PC efficiently without using iTunes, or vice versa, give it a try on Appgeeker iPhone Data Transfer. You'll definitely be surprised.

Moving images from the iPhone to your PC without iTunes helps backup important photos and clear phone storage.
Losing your iPhone is undoubtedly a scary thought, especially if you have an extensive collection of precious photos memories stored in its camera roll. But if you want to make the move before your pictures are gone, you can transfer the photos from the iPhone to your PC without iTunes as a backup in your daily life.
iTunes makes it relatively cumbersome to import iPhone photos to your PC. Not only does it get lagging when you upload photos in bulk, but it also overwrites all your original images in the iPhone. To avoid the inconvenience of using iTunes, you can try other alternative methods to transfer photos to PC from your iPhone without relying on iTunes instead.
Table of Contents
If you happen to delete some pictures on your iPhone but didn't make an iTunes backup, you can refer to our guide on how to recover photos on iPhone without backup.
If your PC is running Windows 8, 10, or 11, then you can use the built-in Photos app to transfer iPhone photos to your computer without using iTunes. However, you'll have to turn off iCloud on your iPhone beforehand. Otherwise, the photos transfer process may suspend halfway.
Note:
Step 1: Connect your iPhone to your Windows PC via a USB cable
Plug the small end of the cable into the phone and plug the other into your computer's port to build the connection. Make sure the plugging is tight enough.
Step 2: Unlock the iPhone and make it trust your PC
Enter the lock-screen passcode to your iPhone to turn it on. Later you'll get a prompt titled "Trust This computer?", asking if you allow your iPhone data to be accessible from the computer. Tap "Trust" and input the device passcode again to complete the connection.
See also: Got your iPhone unavailable? Here're 4 solutions to fix it!
Step 3: Open the Photos app on your PC
Head on to the search box in the bottom-left corner, and search for "photos." Click the best result you got to open the Photos app.
Step 4: Start transferring your iPhone photos to PC without iTunes
Click the option "Import" on the top-right corner of the app, which is the middle one among all the icons. (Notice that you can't see this option when you're viewing a picture in full-screen size.)
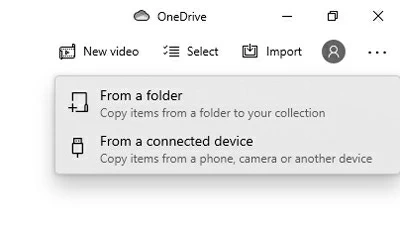
Then choose "From a connected device" and you can pick the photos you want to upload to the PC. After the selection, hit "Import ... of ... items" down below to start the photos transfer.
Tip: There's an option "Delete original items after import" available before you begin transferring the photos not using iTunes. With this choice ticked, your original pictures in your iPhone will be removed once you've copied them to your PC.
Need the photos in a locked iPhone? Check out our tutorial on how to get photos from a locked iPhone.
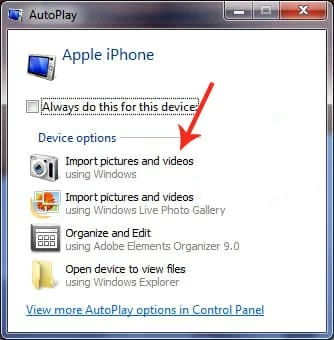
For Windows 7 PC users, the Photos app is not included in the computer to transfer images from iPhone to PC with no iTunes. But instead, AutoPlay can be another great alternative. Just connect your iPhone with your PC, and an AutoPlay dialog box will pop up on the screen. Hit "Import pictures and videos," then select the photos you need to download to the computer and click "Import." The selected pictures will be imported to your PC after a while.
What to do if you didn't get an AutoPlay window?
If the AutoPlay box didn't appear after you plug your iPhone into the Win 7 PC, you can still transfer the photos in your iPhone in another path.
After the connection between your iPhone and the PC, go to the Start menu > Computer. Then right-click the digital camera below "Computer" and select "Import pictures and videos." Click "Import" after picking the photos for transfer.
Besides the Photos app and AutoPlay, many different easy ways are also available for you to download photos from your iPhone to PC not using iTunes, no matter what system your Windows computer is running. In the following, you'll learn about some methods to transfer photos via a cable or wirelessly that are compatible with all Windows system versions.
Ways to transfer iPhone photos to PC with a cable: iPhone Data Transfer, File Explorer
Ways to upload iPhone photos to a computer wirelessly: iCloud, Email
Despite the system of your devices, Appgeeker iPhone Data Transfer makes it a breeze for you to transfer photos between iPhone and PC in both directions without iTunes. Unlike using iTunes, it enables you to upload large pictures in bulk to your PC in just a few seconds. What's more, it will keep your photos still in your iPhone even when you finish the transfer process, which means that no photos will be deleted from the device.
Other highlights of this software:
Here're the steps to use iPhone Data Transfer for importing your iPhone photos to your PC.
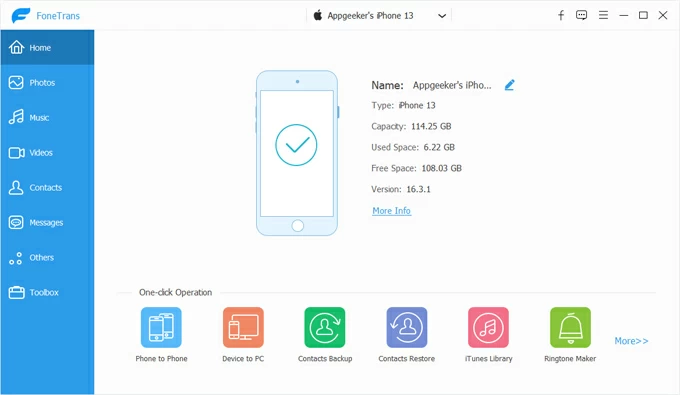
Step 1. Launch the software on your computer, and plug your iPhone into the computer. After detection, you can see your iPhone information onscreen.
Step 2. Click "Photos" from the left-side panel. Here you can see all your photos in the iPhone, which are listed in the order of shooting time.

Step 3. Select the photos you need to transfer to your PC, and click the option of "Export to PC" to upload the photos. You can click the photos one by one or click "Check All" to choose all the pictures at a time.
You should then choose a location for importing the photos and hit "Select folder" to confirm.

Every Windows PC has File Explorer built-in on the system. It is one of the most traditional ways to transfer images between devices and computer, but you may find it irritating to select the desired photos for uploading as all the photos are presented in disorder. Below, let's check out how to transfer your photos from iPhone to PC with no iTunes by File Explorer.
Step 1. Use a cable to connect your iPhone to computer.
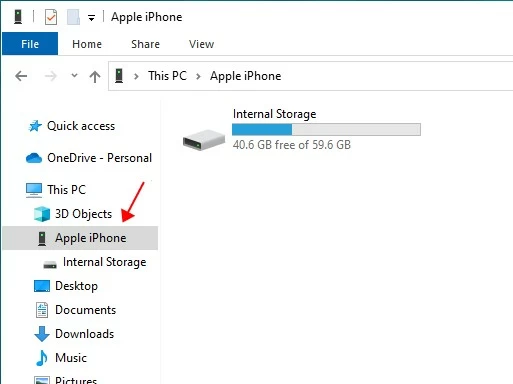
Step 2. Go to Start > File Explorer > This PC > Your iPhone name > Internal Storage > DCIM.
Step 3. Drag and drop the photos in the file to any location on the PC.
If you have no cable in hand, then you can sync your iPhone pictures to PC wirelessly with iCloud. However, it limits you to importing 1000 photos each time at most. And only 5GB of free storage is offered to sync your pictures and other data in different iOS devices; to get an upgrade, you'll have to pay monthly.
Before using iCloud to transfer the photos, make sure you have enabled "iCloud Photos" in Settings. Just go to Settings > [your name] > iCloud > Photos to check if it's turned on.
Step 1. Navigate to icloud.com on your PC and log in with the same account used in your iPhone.
Step 2. Click the "Photos" icon from the iCloud menu.
Step 3. Select your wanted photos and click the "Download" icon (a down arrow on the cloud) from the upper-right options list.

All the selected photos will be downloaded and packed in a compressed file, which you can unzip to view the pictures on your computer.
Instructions on restoring photos from iCloud backup can be found here: How to restore photos from iCloud backup (iPhone & iPad supported)
Email is another convenient way to transfer photos from your iPhone to your PC not using iTunes, especially if you only need to transfer a few images. It's a straightforward process that involves sending the photos as attachments to an email and then downloading them onto your PC. However, there are some drawbacks to using email for transferring photos.
For one thing, it could be troublesome to transfer a large number of photos since most email services have a size limit for attachments, and if you exceed this limit, you may need to send multiple emails, which can be time-consuming. For another, the quality of the photos may be reduced due to compression during the email sending process.
1. How to not use iTunes to transfer my iPhone photos to a PC?
There are several ways to transfer photos from your iPhone to a PC without using iTunes.
You can use the built-in tools on a Windows PC, like File Explorer, the Photos app and AutoPlay. And third-party software such as Appgeeker iPhone Data Transfer works well for transferring photos, too. You also have other options to upload photos wirelessly like using iCloud, and sending emails.
2. How to transfer photos from an iPhone to a Windows 10 PC without iTunes?
3. Do I need to convert the iPhone photos into JPG files before uploading them to PC?
There's no need to manually convert your iPhone photos to JPG files before uploading them to your PC. Using iPhone Data Transfer that supports automatic conversion will save you time and ensure that your photos are accessible and viewable on all your devices.

