How to transfer movies from PC to iPhone with iTunes


Platforms
Developed for both Windows & Mac users

Explore efficient methods to transfer files from a laptop to an iPhone on Windows or macOS. This guide helps you transfer media data and app-specific files quickly and safely.

All-in-one tool: Appgeeker iPhone Data Transfer supports cross-platform file transfers between Windows/macOS laptop and iPhone in both directions, supporting photos, videos, music, audiobooks, contacts, PDFs, and other common files without compatibility barriers.
For laptop-to-iPhone file transfer on Windows and macOS, there are several wired and wireless options to help.
The Apple iPhone functions as a comprehensive center of managing photos, videos, music, and other personal data. In many situations, you may want to transfer files from your laptop to your iPhone for more convenience, whether to access documents on the go, sync media data across platforms, or save important data in one place.
Thankfully, transferring files from a laptop to an iPhone is more straightforward than ever. You can move a wide range of file types, including photos, videos, music, PDFs, and other documents, using either built-in system tools or third-party solutions.
This guide explains how to transfer files from laptop to iPhone on both Windows and macOS. Whether you prefer a wired or wireless method, need to restore a full backup, or simply want to move selected files, you'll find practical and reliable approaches to complete the transfer efficiently and securely.
Table of Contents
When it comes to transferring files from a laptop to an iPhone, the supported file types depend on the method you use.
Apple's built-in tools, such as iCloud and iTunes (or Apple Devices), allow you to add photos, music, videos, and other documents to compatible apps on iPhone. These tools work for both Windows & macOS and transfers laptop files to specific iPhone apps directly.
For media transfers, some advanced 3rd-party tools support a broader range of files, including standard music files, MP3 tracks, MP4 videos, photos, movies, and other common documents, ensuring smooth playback and access on your iPhone.
Additionally, if you have previously created a full Phone backup on laptop using iTunes or Finder, you can transfer all backed-up files to your iPhone through a complete restore process.
Typically, cable-based transfers are more stable for large files and bulk data, while wireless methods offer greater convenience. Depending on the type of files you prefer to transfer from your laptop, the following methods will walk you through the step-by-step instructions.
For seamless file transfers, Appgeeker iPhone Data Transfer offers an all-in-one solution for both Windows and macOS. It enables you to transfer photos, videos, music, ringtones, movies, audiobooks, PDFs, and other common files directly from laptop to iPhone with minimal effort.
This tool supports a wide range of file formats, including but not limited to JPEG, PNG, HEIC, MP3, MP4, MOV, and more. During transfer, it preserves original quality and can automatically detect incompatible files, converting them into iOS-supported formats to ensure smooth access and playback on iPhone.
It's compatible with all iOS versions and major Windows and macOS systems. Files are displayed in clearly-organized categories, letting you preview, manage, and selectively add desired files.
With simple drag-and-drop functionality, you can transfer files from laptop directly to iPhone efficiently. Here're the steps to follow:
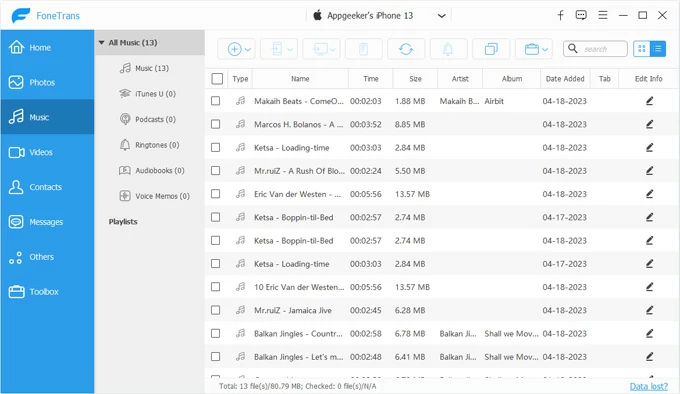
Step 1: Open Appgeeker iPhone Data Transfer on laptop and connect your iPhone.
It's available for Windows 11 / 10 / 8 and macOS. If a Trust This Computer prompt appears on the device, tap Trust and enter your passcode to allow file transfer.

Step 2: Select the file category you want to transfer from this laptop to your iPhone.
The supported file types include Photos, Music, Videos, Contacts, Messages, and Others. This means that you're able to transfer any local recordings, MP3s, MP4s, JPGs, PNGs, HEIC images, ringtones, movies, PDFs, and more.
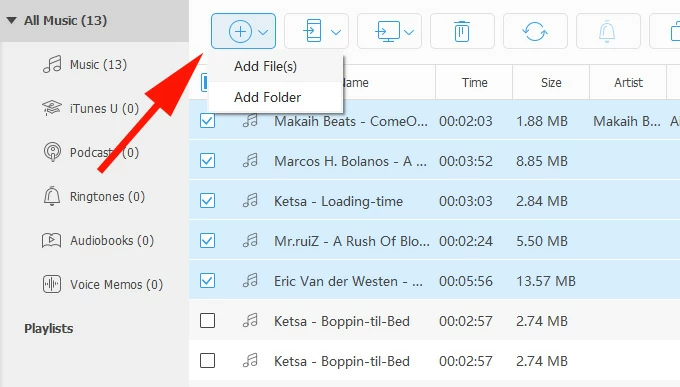
Step 3: Transfer file(s) from laptop to iPhone.
After selecting the data type, you can open a local folder on laptop, then drag and drop your desired files directly to this iPhone window.
Alternatively, you may click the "+" button at the top, then select Add File(s) to transfer individual files or choose Add Folder to import an entire folder from your laptop.
Below is the image showing how to add music files to iPhone without iTunes. Once done, you can open the Music app on your iPhone to enjoy all transferred tracks along with the existing songs you already have, no data loss occurs.
The transfers of other file types work likewise. Also, you may click the computer icon to transfer files from your iPhone to laptop if needed.
If you just want to transfer specific types of files from your laptop to an iPhone app, Apple's built-in tools can handle the task effectively. Some methods require a physical cable connection, while others support wireless transfers over the internet, depending on the app and file type involved.
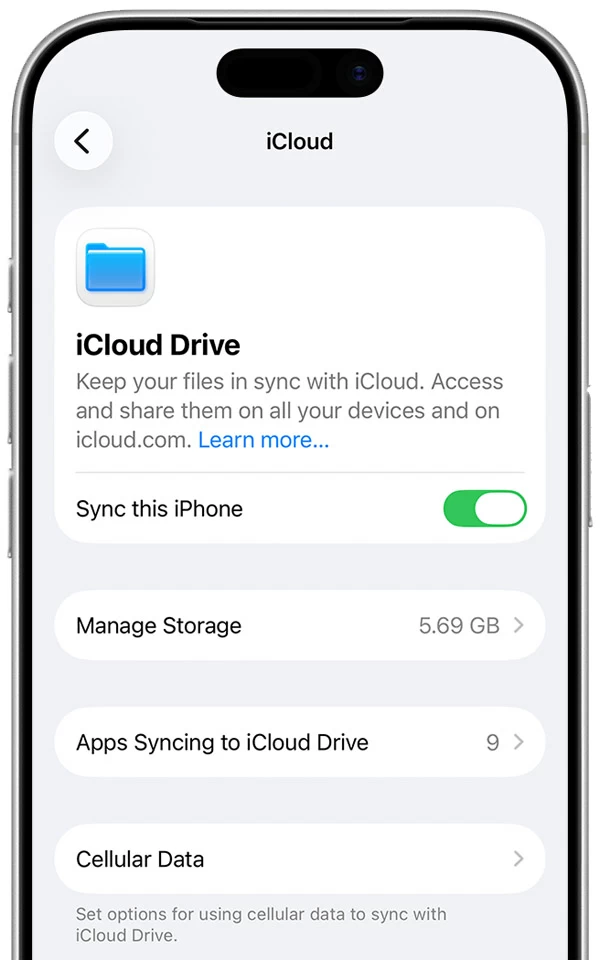
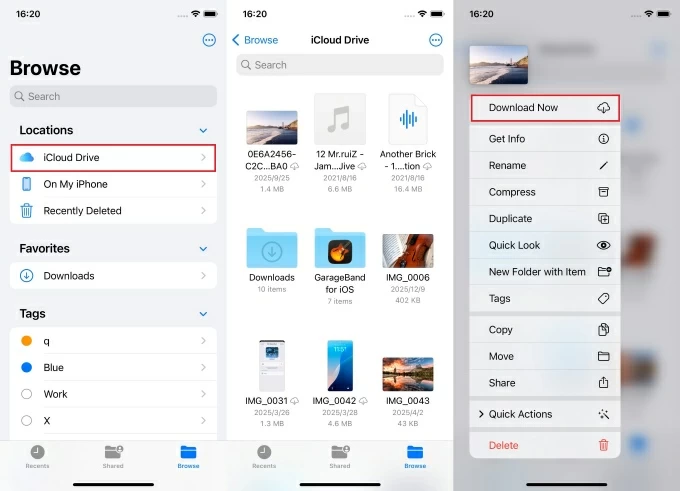
If you're transferring common files from a Windows or macOS laptop to an iPhone, iCloud Drive is a convenient option. It lets you upload files from laptop to the cloud and automatically syncs them across devices signed in with the same Apple Account. The transferred items are accessible in the Files app on iPhone.
This method is suitable for smaller files such as photos, videos, PDFs, Docs, Excels, and other similar content. The process requires sufficient iCloud storage and a stable internet connection on both platforms. Below is how to transfer files from laptop to iPhone wirelessly via iCloud Drive:
1. Enable iCloud Drive on iPhone.
2. Upload files from laptop to iCloud Drive.
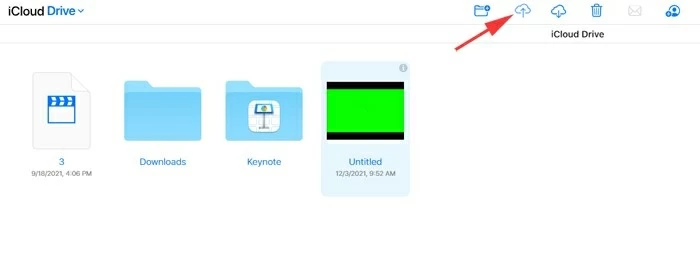
3. Download laptop files onto iPhone.
iCloud includes 5 GB of free storage by default. If the file transfer exceeds the available space, you may upgrade to iCloud + plan for more storage, or use alternative cloud services such as Google Drive, which offers 15 GB of free storage.
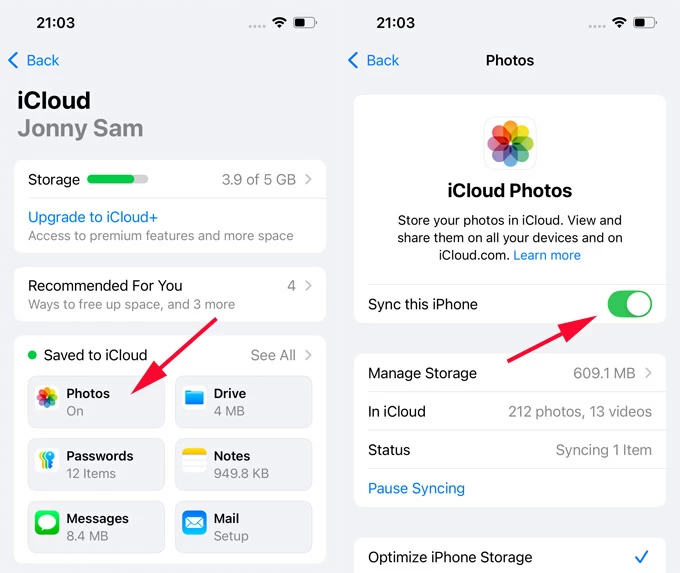
Similarly, iCloud Photos enables wireless photo transfers from laptop to iPhone. Once iCloud Photos is enabled, uploaded pictures and videos automatically sync to the Photos app on your iPhone, with no need for a cable.
1. On your iPhone, head to Settings > [your name] > iCloud > iCloud Photos.
2. Toggle on Sync this iPhone option.
3. On your laptop, open a network-connected browser and go to iCloud.com.
4. Sign in using the same Apple Account credentials associated with your iPhone.
5. From iCloud's main page, select Photos and check the Library tab on the left.
6. Open the laptop folder that holds the photos and videos you want, then drag and drop the files to the iCloud window.
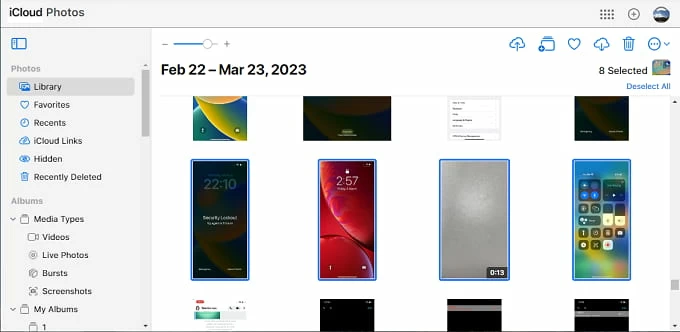
7. Access the Photos app on your iPhone and wait shortly; the transferred files should appear in Library when the syncing process is complete.
If you have a large music library on your laptop and want to transfer those tracks to the Music app on your iPhone for offline playback, a wired transfer using iTunes (on Windows or older versions of macOS) or Finder (on newer macOS) provides a stable and reliable solution.
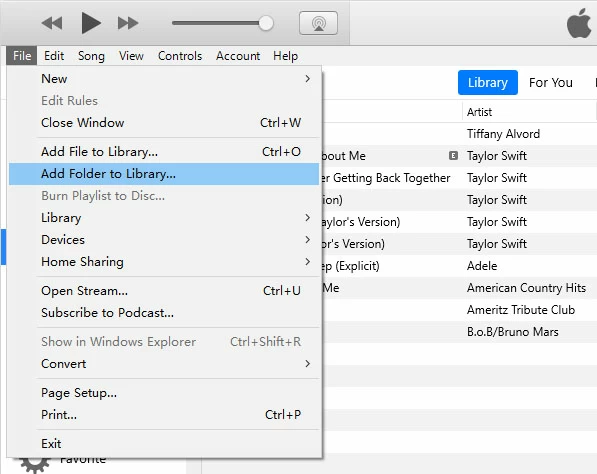
1. Open iTunes on laptop running Windows or macOS 10.14 or earlier, or use Finder on laptop with macOS 10.15 and later.
2. In iTunes Library screen, drag and drop the music files from your laptop folder to iTunes. Or, you may select File > Add File to Library to import individual audio files.
2. Connect the target iPhone using a USB or Lightning cable. If prompted with Trust This Computer notification, tap Trust and enter the passcode to continue.
3. Click the phone icon in upper-left corner in iTunes window. Or, you may select your iOS device under Locations in Finder.
4. Select Music tab on the left sidebar (or in the top toolbar in Finder).
5. Tick Sync Music, and you have the options to transfer Entire music library or Selected playlists, artistes, albums, and genres. Then, include videos / voice memos if necessary.
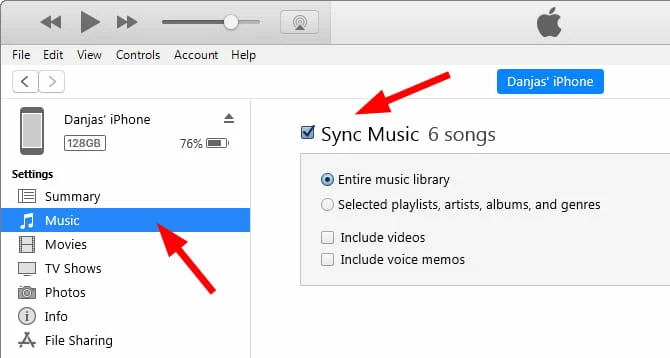
6. Once ready, click the Sync (or Apply) button at the bottom.
The music files on your laptop will be transferred to your iPhone and saved to Music app.
Note: Syncing music through iTunes or Finder will replace the existing Music Library on iPhone, resulting in data loss. To avoid overwriting, click here for more tips on iPhone music transfer without iTunes.
With iTunes or Apple Devices app installed on laptop, you can transfer local files to compatible iPhone apps using the File Sharing feature.
This laptop-to-iPhone transfer works with the apps that support File Sharing, such as iMovie, Keynote, Numbers, Pages, Kindle, and various PDF reader apps. The process will copy files from your laptop and add them directly into the chosen app on your iPhone. Here's how:
1. Install and open Apple Devices on your laptop with newer Windows 11/10. For older Windows and macOS 10.14 or lower, use iTunes; for macOS 10.15 and above, use Finder.
2. Link the iPhone to your laptop via a data cable. If asked, allow it to trust this computer by verifying the screen passcode.
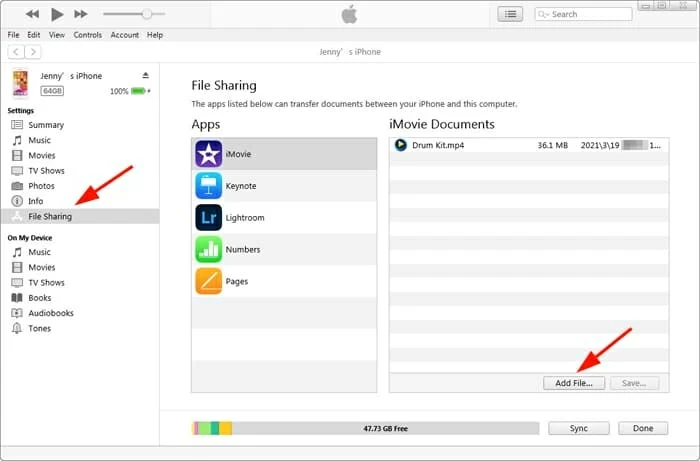
3. Check the device button near the top left of iTunes window.
4. Click File or File Sharing in the left sidebar.
5. From the apps listed on the right, select the iPhone app that you want to transfer files to.
6. Click Add File button in the bottom right.
7. When prompted, select the local files that are compatible with the iPhone app.
Done! The selected laptop files will be transferred to the chosen iPhone app directly.
If you've previously backed up your iPhone with laptop using iTunes or Finder, you can transfer all files back to your iPhone by restoring from that backup.
However, this method restores the entire backup instead of individual files. Once done, your iPhone will revert to the exact state when the backup was created. Any data added after the backup will be overwritten and lost.
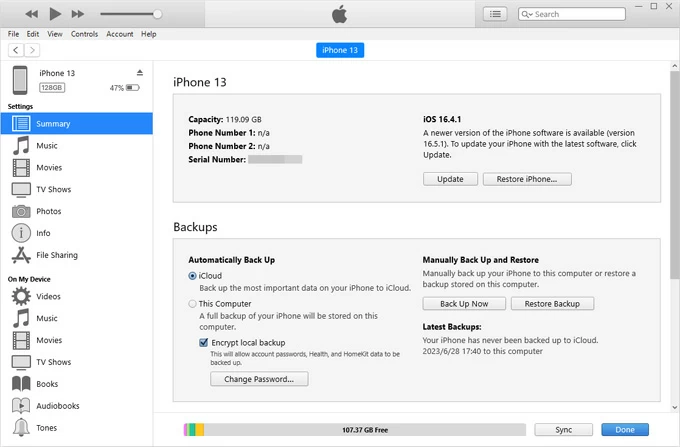
Disconnect your device safely after restoration. All data files and settings will be restored to their original locations on your iPhone.
If the above options are not available, there are still convenient ways to move files from your laptop to iPhone. One simple option is using email. You can send small files to yourself and then download them onto your iPhone wirelessly for free.
Another option is using iPhone's Files app to access the files stored on an external device, such as a USB drive or SD card. Simply copy the files from your laptop to the external storage, then connect it to your iPhone using a compatible adapter or connector. Within the Files app or other supported apps, you can browse the connected device and import the files you need directly to your iPhone.
Q1 - How can I transfer files from a Windows laptop to my iPhone?
To transfer files from Windows to iPhone, you have several options:
Q2 - How do I transfer music files from my laptop to my iPhone without iTunes?
If you want to add music without using iTunes, these alternative options can help:
Appgeeker iPhone Data Transfer lets you import non-purchased music from a laptop directly into iPhone's Music app, supporting MP3, MP4, music videos, ringtones, and other audio formats.
Cloud services like iCloud Drive or Google Drive allow you to upload music files from your laptop and download them onto iPhone. Note that these tracks won't appear in the Music app but can be streamed or downloaded within the respective app for offline listening.
Q3 - Can you transfer files from a laptop to an iPhone wirelessly?
Yes. For multiple files, cloud services like iCloud Drive, Google Drive, or Dropbox let you upload from your laptop and download to your iPhone, enabling wireless access across devices.
For smaller files, sending them via email is an easy and quick solution that doesn't require a USB cable or additional apps.

