How to transfer photos from iPhone to laptop [Windows 11/10]
Looking to back up photos to your laptop to free up more storage space on your iPhone? Follow these simple tips to transfer iPhone photos to your laptop wired or wirelessly.

Alex Griffith Updated on Mar 16, 2026 4:18 PM
With iPhone Data Transfer, you can quickly transfer a large quantity of photos from your iPhone to your laptop [Windows & macOS] without compressing the quality. It's one of the most straightforward and reliable way to export anything from your iPhone.
You can transfer photos and videos between your iPhone and laptop either wired or wirelessly.
Too many photos and videos are taking up excessive memory on your iPhone? Windows built-in tools can connect your device to the laptop's hard drive, so that you can move the photos from iPhone to laptop quickly. And if you have an iCloud subscription, you can even also use the iCloud Photos feature from your iPhone Settings for a wireless photo transfer.
After making the connection, you're able to access your iPhone's library, view the photos and videos, and then import anything you want to your laptop's folder. The major requirement is that you have a physical USB cable to connect both your iPhone and laptop. If you're moving large library of photos and video files, a USB cable always ensures a stable, reliable, and fast experience, especially when dealing with 4K video files or ProRAW photos that can exceed 100MB per shot.
This article will introduce methods of transferring photos from iPhone to laptop through two approaches: wired and wireless transfer. Whether you want to transfer a large batch of iPhone photos to your laptop at once, or find a hassle-free way to transfer your entire photo library from iPhone to laptop, this article covers everything you need.
Transfer photos from iPhone to laptop via USB cable:
How to transfer photos from iPhone to laptop wirelessly:
If you are using a MacBook, you can refer to how to transfer photos from iPhone to MacBook.
Microsoft Photos app
Best for: Moving large batches of photos at once to laptop without using cloud data.
The modern Windows Photos app (Windows 10 and later) provides a straightforward solution for transferring photos from an iPhone to a Windows laptop, requiring no additional software. It offers a full device scan on your phone's library and the flexibility to select exactly what to import.
Before diving into the process of importing pictures from iPhone to laptop, go to Settings app, tap Photos, then select "Keep Originals" under "Transfer to Mac or PC" section to ensure you get the full-quality pictures after importing.
1. Unlock the iPhone and plug it into your laptop with a compatible data cable.
2. If necessary, tap Trust on your iPhone to allow the laptop to access your device.
3. Tap or search for Photos in the Start menu to open it. If the app isn't installed yet, you can get it from the Microsoft Store.
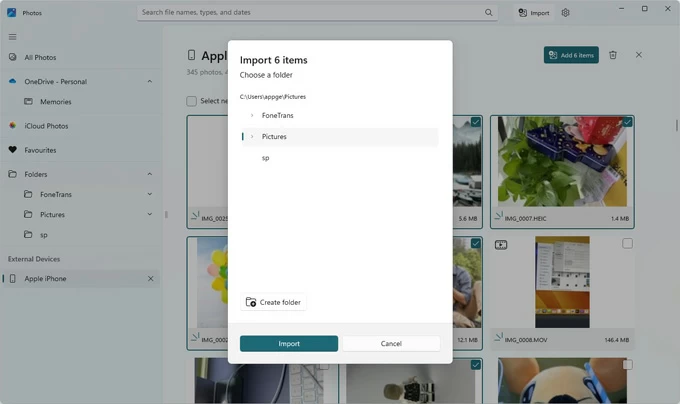
4. Click Import in the upper-right corner of the Photos window and choose your connected device to start loading photos and videos from your iPhone gallery.
5. Manually select your desired photos, or click Select All for the entire library.
6. Click Add [number] items in the top-right corner and choose a save destination, then hit the Import button to get your iPhone photos on your laptop.
The Microsoft Photos app have slight differences depending on the version. Laptops running Windows 11 use a new version of the Photos app that lacks the 'Delete original items after import' option, which is still available in older version (such as on Windows 10).
See also: iPad passcode not working
File Explorer
Best for: Manual copy-n-paste and total control over your folder structure
In Windows File Explorer, you can right-click the iPhone when connected, then select "Import pictures and videos," which allows to scans your iPhone photo library and provides a simple wizard to copy and paste iPhone photos into a local folder on your laptop.
To import photos to laptop from iPhone, follow these steps:
1. On iPhone, go to Settings > Photos, scroll to the very bottom to the section "Transfer to Mac or PC." Change the setting from Automatic to Keep Originals.
2. Connect the iPhone to your laptop using the original USB cable.
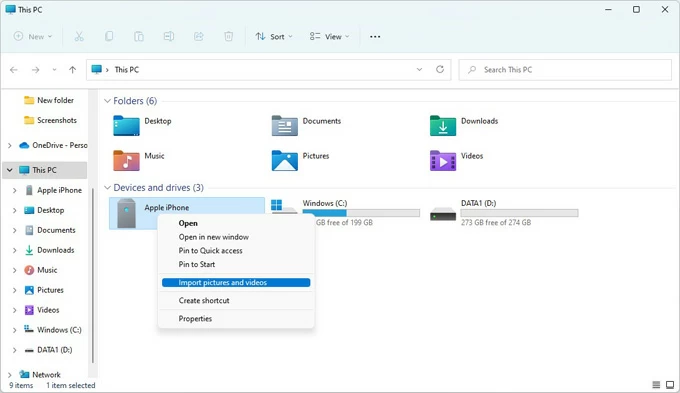
3. Open File Explorer on your laptop desktop. Click This PC on the left sidebar and you can see your Apple iPhone under the Devices and drives section.
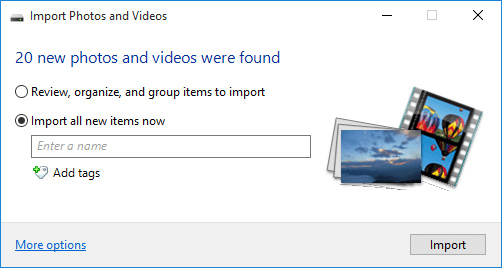
Right-click on Apple iPhone and select Import pictures and video. In the pop-up window, you can choose to either import all new photos and videos to laptop, or select specific items for transfer.
- Select Review, organize, and group items to import to view and check the photos you want from categorized folders, then click Import to transfer them to your laptop.
- Select Import all new items now, then click Import to download your entire photo library.
6. Once the transfer is complete, disconnect your iPhone.
See also: Photos disappeared from iPhone
Note:
- File Explorer has limitations when transferring Live Photos, displaying them only as static images.
- If you have more than 2,000 photos, don't grab them all at once. Move them in batches of 500 to prevent File Explorer from hanging.
Alternatively, double-click Apple iPhone > Internal Storage > DCIM. From the opening folder, find pictures you want, selected and copied them to a folder on the laptop. After you finish copying the first folder, repeat the same steps for each remaining folder.
Appgeeker iPhone Data Transfer
Best for: Full control over the phone library and the direct, high-speed transfer
If you wish to save time and effort in handling a massive photo library in a reliable way, Appgeeker iPhone Data Transfer always do a good job. It provides a direct, flexible bridge for seamless media transfer between iOS devices and computer (two-way). You can preview and hand-pick specific photos, albums, songs, or videos to transfer, rather than being forced to perform a full device sync.
With an intuitive and clearly sorted interface, it provides faster transfer speeds for batch transferring photos from the iPhone to the laptop and can convert photo formats to ensure compatibility with your computer system. It also comes with advanced functions for managing and editing photos, such as adding, deleting, renaming, creating photo albums, etc.
1. Download and install the software on your laptop, then launch it and connect your iPhone.
2. Go to the Photos tab on the left side, where all your iPhone photos—including Live Photos, Places, Bursts, Downloads, and those from other apps—will be displayed and categorized for preview.
3. Check the photos or albums you want to download onto your laptop.
4. After selecting, click the computer icon [Export to PC] on the top taskbar and select a destination folder to save photos to your laptop locally.
Keep the phone connected until you see the Transfer Completed screen.
iCloud Photos
Best for: Automatically backed up the entire media library and sync in real-time across devices
As long as you have enough iCloud storage, enabling iCloud Photos feature allows for uploading your photos from iPhone to laptop wirelessly. All you have to do is install an iCloud for Windows on the laptop, which makes your cloud storage look and feel like a local folder.
Here's how to sync photos between an iPhone and a laptop without a cable.
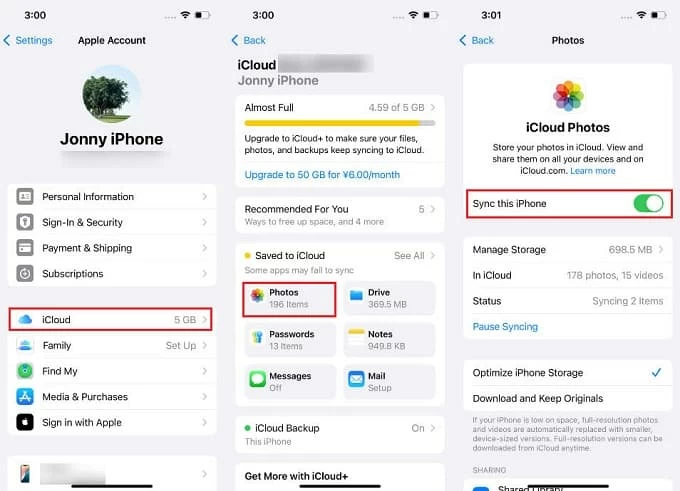
1. Enable iCloud Photos on your iPhone. Navigate to Settings > [Your Name] > iCloud > Photos, then toggle on Sync this iPhone, wait for your photos to be uploaded to iCloud automatically.
2. Open the Microsoft Store on your laptop and download iCloud for Windows.
3. Sign in with the same Apple ID as your iPhone.
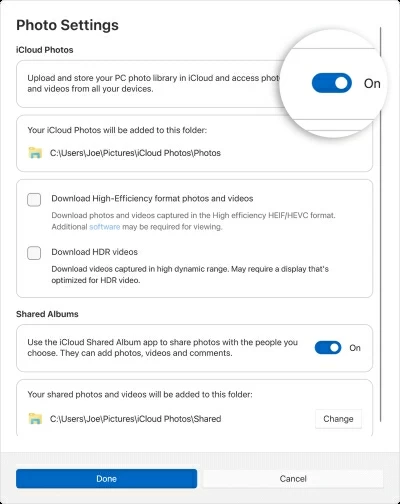
4. Click the arrow icon next to iCloud Photos and switch the iCloud Photos option to On.
5. You can check Download High-Efficiency format photos and videos to download original, full-resolution photos from iCloud to laptop.
6. Click Done.
To view photos stored in iCloud Photos on your laptop, open File Explorer, then access the iCloud Photos folder or Pictures folder in the left-hand navigation panel. You can view, delete, and edit these photos as if they were on your laptop's hard drive.
See also: Transfer WhatsApp messages from Android to iPhone
Other cloud-based services
Besides iCloud, you can also copy photos from iPhone to the laptop wirelessly using other popular cloud services like Google Drive, OneDrive, or Dropbox. These widely used cloud-based platforms offer apps for both iPhone and Windows, enabling you to upload photos from iPhone and retrieve them on laptop with ease.
Here takes Google Drive as an example to move your iPhone photos to your laptop:
1. Download and install the Google Drive app from the App Store on your iPhone.
2. Open the Google Drive app and log in with your Google account.
3. Tap the plus icon in the bottom-right corner, then tap Upload > Photos and Videos > Allow Access to All Photos.
4. Pick the photos and videos you need, then tap Upload.
5. On your laptop, open any browser, visit the Google Drive website and log in.
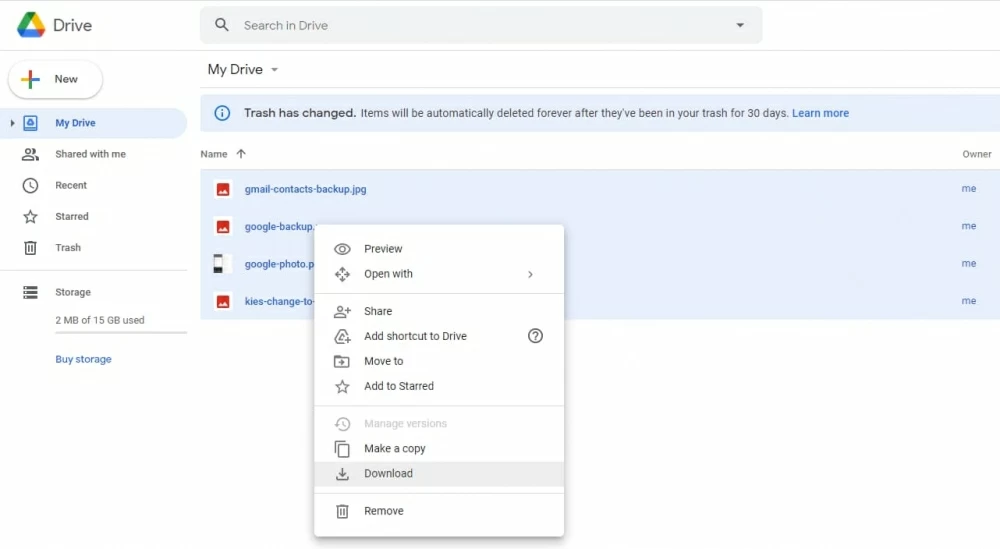
6. Navigate to the My Drive tab, where you can see recently uploaded items.
7. Select the photos you uploaded from your iPhone, right-click, and choose the Download option to save them to your laptop.
See also: How to reset Screen Time passcode
Bonus Tips: Comparing wired vs. wireless methods
When it comes to transferring photos to laptop from iPhone, the choice between wired and wireless methods depends on your priorities.
Speed and Stability: Wired transfers are relatively faster and more stable because they rely on a direct physical connection, typically transferring 100 photos in 2-3 minutes via USB 3.0. Wireless methods depend on internet or Wi-Fi speed and signal strength, which can easily be disrupted.
Convenience: Wireless transfers let you transfer iPhone photos to laptop anytime and anywhere, while wired transfers require well-connected USB cable and a computer to operate.
Storage and Backup: Wired transfers are ideal for one-time transfers or creating local backups on your laptop. However, with wireless transfers, the amount of files you can transfer or back up depends on how much available storage you have in your cloud space.
Performance: Wired transfers are better suited for handling large batches of photo transfers, while wireless transfers are more appropriate for sharing or transferring specific photos to your laptop.
Conclusion
This article introduces various ways to get your photos from iPhone onto laptop, ranging from wired options (Microsoft Photos App, File Explorer, Appgeeker iPhone Data Transfer) to wireless solutions (iCloud, other cloud-based services). These methods are compatible with laptops from major brands, including Lenovo, HP, Dell, ASUS, and more. Choose the one that suits you best and get started!
FAQs: Moving iPhone photos to laptop
1. What is the fastest way to transfer 1,000+ photos to laptop?
A direct USB-C to USB-C cable using Windows File Explorer or Appgeeker iPhone Data Transfer is significantly faster than Wi-Fi .
2. Do I need iTunes to move my photos on iPhone?
No. Windows 10 and 11 laptop use the built-in Photos App or File Explorer to handle media without needing iTunes.
3. Can I use AirDrop to move iPhone photos to a Windows laptop?
Not natively. AirDrop is Apple-only.
4. How do I transfer photos from an iPhone to a laptop without a cable?
The most seamless way is to install iCloud for Windows. Once you enable iCloud Photos on your iPhone, the pictures will sync and appear automatically in "iCloud Photos" folder that's added directly into your Windows File Explorer.
5. Why does "Device is unreachable" error appear during transfer?
This happens when the iPhone tries to convert HEIC to JPEG on the fly and fails. Fix it by going to Settings > Photos and choosing "Keep Originals."
6. What do I do if my laptop says "No new photos found"?
The Windows Photos app sometimes misses files if they've been indexed before. Try using File Explorer to manually drag them from the DCIM folder.