
Reset Unavailable iPhone without Passcode

Trying to import photos from iPhone 14 to your Mac? These are six tools that really work: Photos, Appgeeker iPhone Data Transfer, iCloud Photos, AirDrop, Finder, Image Capture.


It's straightforward to import photos or photo albums from the iPhone 14 to the Mac without quality loss or full device syncing.
Have you ever spent an afternoon snapping stunning shots with your iPhone 14's camera, only to realize that moving that large photo library to your Mac is a total bottleneck? From backing up memories, freeing up space on your phone, organizing your photo library to edit your high-resolution images on a larger desktop screen, it shouldn't be a chore to transfer photos from an iPhone to a Mac.
Whether you prefer a hands-off automatic sync, wired bulk transfer, quick wireless sharing, or safety-net backup, there are several ways to move your memories over efficiently. This guide covers six proven methods on how to transfer photos to Mac from iPhone 14 (Pro, Pro Max, Plus) in minutes with step-by-step instructions and tips.
To make the iPhone 14 to Mac photo transfer easier while preserving the original quality, you can use Apple's built-in utilities to build a direct bridge for seamless imports, or third-party desktop-tool like Appgeeker iPhone Data Transfer that can step in to handle heavier bulk transfers between iOS device and computer (two-way).
Table of Contents
The easiest, most hands-off solution is to let iCloud Photos handle the iPhone 14 photo transfer to Mac for you. Once enabled, every photo on your iPhone automatically uploads to the cloud and syncs straight to your Mac's native Photos library over Wi-Fi without manual USB transfers.
However, keep in mind that syncing photos between iPhone 14 and Mac machine relies entirely on your cloud storage capacity. Apple only gives you 5GB of free iCloud space out of the box. If your iPhone has a large library with a lot of Live Photos, HEIF or ProRAW images to import to Mac, you will quickly fill up that baseline and need to upgrade to a paid iCloud+ plan (which starts at $0.99 per month for 50GB).
Here's how to sync photos from iPhone 14 to Mac by setting up iCloud Photos automatic wireless transfer on both devices.
1. First, keep the devices connected to an active Wi-Fi network to ensure faster syncing.
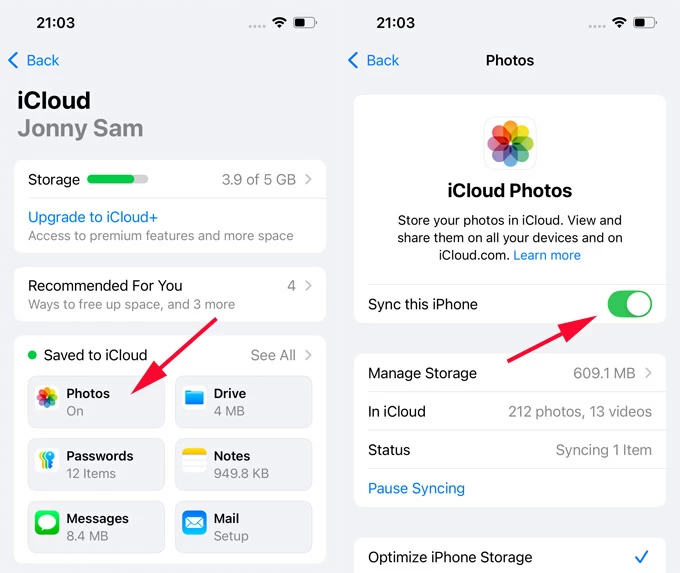
2. Turn on iCloud Photos on iPhone 14 for automatic photo syncing to the Mac.
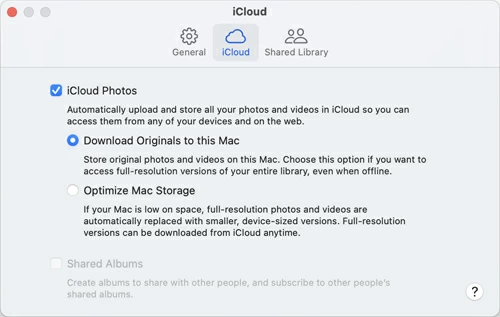
3. Enable iCloud Photos on Mac to let your iPhone 14 photos arrive on your Mac without a cable.
Your Mac will seamlessly download photos from your iPhone 14 whenever connected to Wi-Fi.
Tip: iCloud Photos keeps the original quality of your pictures, but you can choose to optimize storage on your iPhone to save space by going to Settings > Apps > Photos > Optimize iPhone Storage.
Also: How to fix Apple ID locked for security reasons
If you aren't paying for extra iCloud storage or you find yourself without a reliable internet connection, a physical cable remains the fastest option for transferring iPhone 14 photos to a Mac, which bypasses the internet lag entirely — especially when you need to move over large photo collections.
By connecting your iPhone 14 to the computer through a USB cable, the preinstalled Photos app should allow you to selectively import your full-resolution photos to your Mac without compatibility issues. However, there's no support of copying a photo album, as Mac's Photos app won't keep the structure of iPhone Photos album.
To use the macOS Photos app and complete a direct cable import of photos from an iPhone 14 to a Mac (iMac or MacBook) without relying on internet, do the following:
1- Plug your iPhone into your Mac using a USB-C-to-Lightning cable.
Unlock your iPhone screen. If a prompt appears asking you to "Trust This Computer", tap Trust and enter your passcode.
2- On your Mac, the native Photos app should open automatically. If it doesn't, manually launch it from your Applications folder or Launchpad.
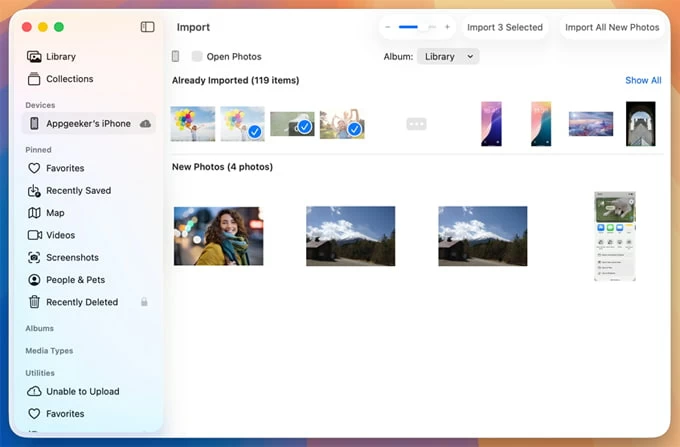
3- Under the Devices section on the left sidebar, click on [your iPhone 14]. Your Mac will load all the videos and photos currently sitting on your phone's camera roll.
4- Click Import All New Photos button in the top right corner, or highlight individual photos and click Import [Number] Selected button.
Wait for the import to finish, then safely eject your iPhone. You should see your photos transfer straight to Mac Photos library from your iPhone 14.
If you're looking for a stable, wired bulk transferring solution for thousands of high-resolution images or specific photo albums without quality loss — while preserving your custom device's album structures, it's wise to use Appgeeker iPhone Data Transfer.
This cross-platform desktop utility gives you precise, granular control over your photo library, allowing you to manage your photo library locally, and transfer photos between iPhone and Mac or PC. Unlike standard importing through macOS Photos app, the tool reads your iPhone 14's native collection organization, meaning you can export entire album—like Live Photos, Screenshots, Places, Downloads, Imports, etc.—in a single click without sorting through a messy camera roll.
In addition to cable-based photo transfers, you can use it to migrate your videos, music, playlists, messages, contacts and more from iOS device to any computer, or vice versa.
Let's see how Appgeeker iPhone Data Transfer software works for massive, multi-gigabyte wired transfers, simplifying the process of getting your photos from iPhone 14 to Mac with a cable.
Step 1. Download iPhone Data Transfer for macOS and install it on your Mac. Then, run it.
Step 2.ttach your iPhone 14 with the Mac using a USB cable. The software will instantly scan your phone and display a summary of your device on its main home screen.
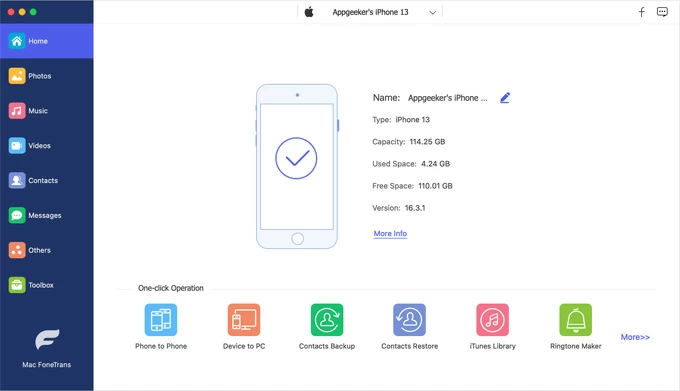
Step 3. Click on the Photos tab located in the left-side navigation menu. The tool will neatly categorize your images into their original phone albums, and display all camera roll photos on the right pane.
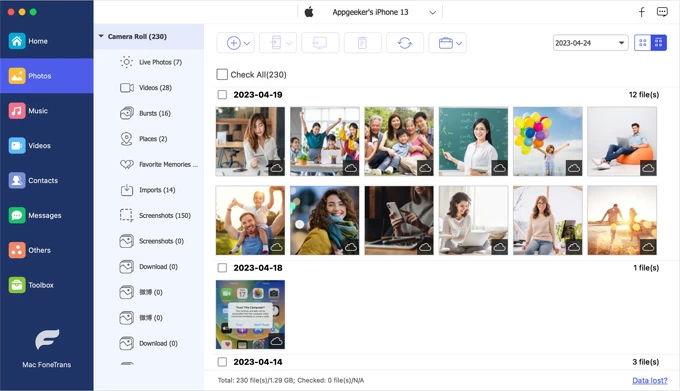
Step 4. Move PNG, JPEG, HEIF(HEIC), ProRAW photos from iPhone 14 to Mac swiftly.
Finally, choose your desired destination folder on your Mac's hard drive, and the transfer will complete in seconds, maintaining original photo quality.

After you successfully download the high-quality photos from iPhone 14 to Mac computer, you can delete them from your device through this software window, in case you need to clear out your storage in one clean sweep.
Related: How to erase an iPhone with or without passcode
What if you just want to move two or three photos from your iPhone 14 over to your macOS device? You don't need to go hunting for a cable or wait on a cloud sync. For small batches, you can always turn to AirDrop, which uses a combination of Bluetooth and localized peer-to-peer Wi-Fi to transfer pictures between Apple devices wirelessly.
Even though the cable-free photo transfer is incredibly fast, AirDrop can stutter or drop connections if you try to send huge photo albums or massive video clips all at once. Keep it to a handful of items at a time for the best results.
Here're detailed steps to quickly AirDrop a small number of iPhone 14 photos to the nearby Mac without a cable or iCloud.
1. Ensure both your iPhone 14 and Mac have Wi-Fi and Bluetooth enabled.
2. Open the Photos app on your iPhone.
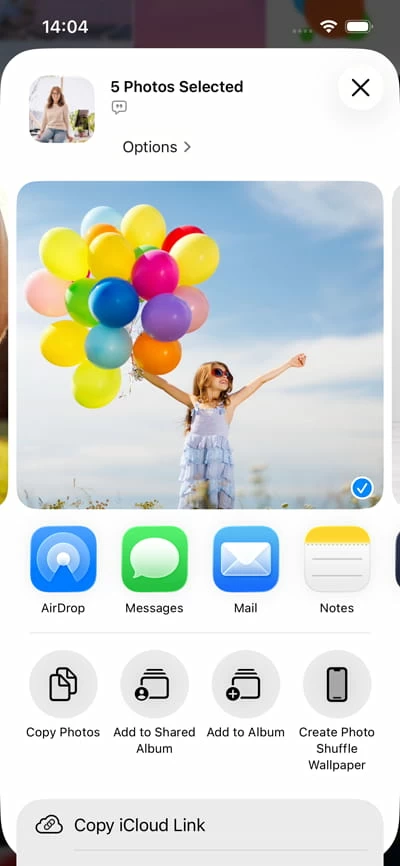
3. Choose the specific photos you want to send.
4. Tap the Share icon in the lower-left corner.
5. Select AirDrop from the row of sharing options.
6. Tap your Mac's icon when it pops up in the list of available nearby devices.
7. On your Mac, a notification window will appear. Click Accept, and the images will download directly into your Mac's Downloads folder.
If you want a USB cable transfer but hate using Apple's native Photos app—which forces your pictures into a rigid, closed library database file—Image Capture is a good option for the job.
Thanks to its flexibility, Image Capture lets you download your iPhone 14 photos to Mac desktop and dump them straight into any standard Finder folder, desktop directory, or an attached external hard drive, instead of Photos app.
1. Connect your iPhone 14 to your Mac with a Lightning cable and unlock your phone screen to select "Trust".
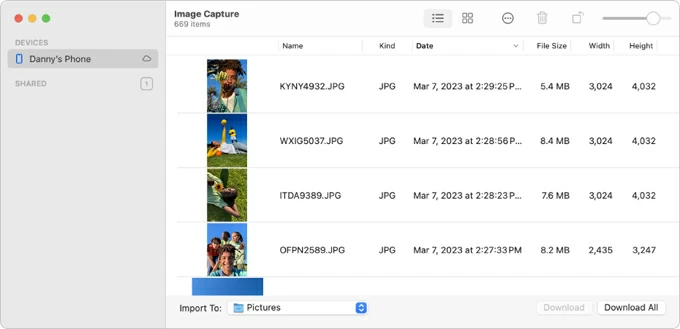
2. On your Mac, open Image Capture, and then select your iPhone under the Devices in the left-hand menu.
3. Look at the bottom of the window for the "Import To" dropdown menu. Click it to choose exactly where you want the photos to go on your Mac's drive, like Desktop, Download or a custom folder.
4. Select the specific photos you want to copy over, then click Download at the bottom right. If you want to move your entire camera roll, simply click Download All.
macOS Finder comes in handy to sync photos from Mac to an iPhone. In the event that you need to transfer all photos from iPhone 14 to Mac using Finder, you can only create a full backup of your entire phone—including all pictures, messages, contacts, notes, settings, app data, etc.
1. Open Finder and connect your iPhone to your Mac with a USB cable.
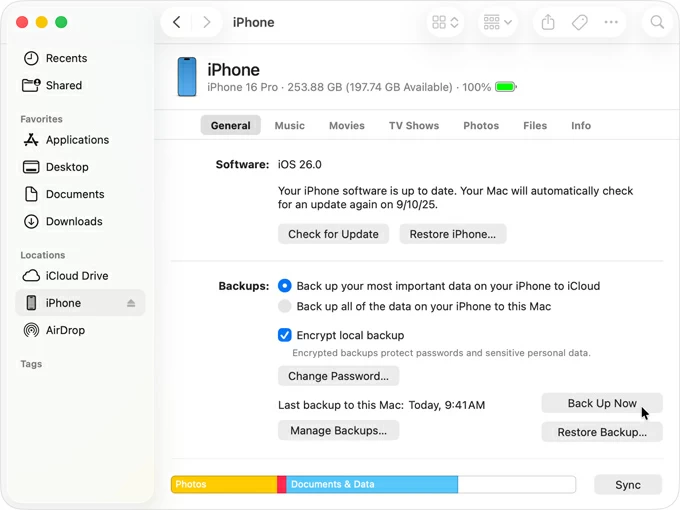
2. Locate your iPhone's name under the "Locations" section in the left sidebar.
3. In the main dashboard of Finder window, click the General tab.
4. Under the "Backups" section, click "Back up all of the data on your iPhone to this Mac."
5. Hit Back Up Now start migrating your phone's full storage data including photos over to your Mac's hard drive.
Although performing a Finder backup can transfer your photo library to a Mac from your iPhone 14, it may not an ideal option if your goal is just to look at your photos on computer. To view your iPhone photos after importing to Mac, you need to access your Finder backup by either restoring it to device—which will overwrite the new data that hasn't been backed up, or simply sing Appgeeker iPhone Data Recovery tool to scan the backup file and get the photos without going through full restoration.
Also: How to restore iPhone photos from iTunes/ Finder backup
Why aren't my photos transferring from my iPhone 14 to my Mac?
This usually stems from one of these common issues: an untrusted connection, a faulty cable, or iCloud Photos not syncing, or AirDrop not working. To fix your photos on your iPhone 14 not importing to your Mac,
If iPhone is not appearing in Photos app:
If iCloud Photos is not syncing:
If AirDrop is not working:
Can I transfer photos from my iPhone to my Mac without using iCloud?
Yes. While iCloud offers an automatic wireless transfer option for syncing entire photo library from iPhone to Mac, there's also a time when you want to move some of pictures and keep your photo management entirely off the cloud.
The most convenient way is to use local peer-to-peer AirDrop to wirelessly send the original, uncompressed photos from iPhone to Mac individually
If you prefer stable wired transfer solutions using a direct USB connection, the native Mac Photos app, Image Capture, and Appgeeker iPhone Data Transfer tool are your best bet to make copying iPhone photos over to Mac smoother and easier.


