How to view iCloud photos on iPhone


On Macs and Windows PCs alike, you can transfer your iPhone 12 videos to the computer through AirDrop, iCloud Photos, a cloud service, or by connecting it with a Lightning cable.

Below is a full-length, comprehensive article to import iPhone 12 videos to computer hard drive.
When Apple launched the iPhone 12 series, it brought cinema-grade video recording to millions of pockets. Equipped with 4K recording at up to 60 frames per second and 10-bit Dolby Vision HDR capability, the iPhone 12 captures stunning footage. However, those high-bitrate clips come at a steep cost to your internal storage: a single minute of 4K 60fps video can easily consume 400MB or more.
Whether you need to clear space on your phone, edit a family video project on a desktop, or securely archive your memories to an external drive, getting large video files off your iPhone 12 and onto a PC or Mac is an essential skill.
Fortunately, you have several ways to make the move. Here is a complete guide to transferring video files from your iPhone 12 to your computer, ranked from the most versatile third-party tool to standard wired and cloud methods.
If you want total control over your video files without wrestling with Apple's restrictive syncing rules or clunky software interfaces, Appgeeker iPhone Data Transfer is the gold standard for third-party iOS management. Available for both macOS and Windows, it acts as a modern replacement for iTunes and Finder, letting you browse your iPhone's file system like a standard flash drive.
In addition to transferring videos from your iPhone 12 to computer, it also lets you move pictures and music files to and from your desktop without a hitch.
Steps to download videos from an iPhone 12 to a computer with Appgeeker:
First of all, click the link above, download the installer for Windows or Mac, and follow the setup wizard.
Step 1: Connect your iPhone 12 to computer
Plug your iPhone 12 into your Windows or Mac machine using a Lightning-to-USB cable. Unlock your device screen and tap Trust This Computer if prompted.
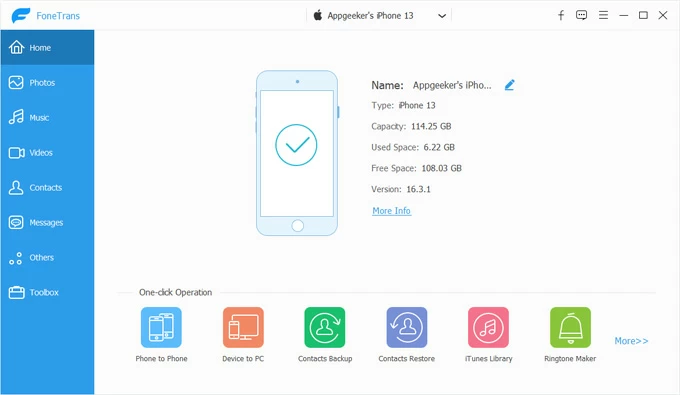
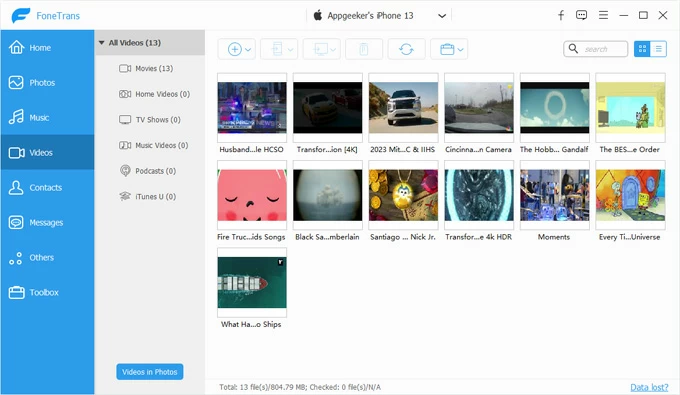
Open the app and you should see the basic information of the device on the window.
Related: How to unlock iPhone without passcode or Face ID
Step 2: Access media library
In the left sidebar, click on Videos. This will isolate video clips from your media library and display them in a window, sorted by different categories: TV Shows, Home Videos, Music Videos, etc.
Step 3: Transfer videos to computer
Highlight the specific videos you want to copy. You can hold Ctrl (Windows) or Command (Mac) to select multiple files, or click Ctrl+A / Command+A to grab everything.
Click the Export to PC or Export to Mac button at the bottom of the window. When a dialog opens, choose where you want to save the files on your computer's hard drive.
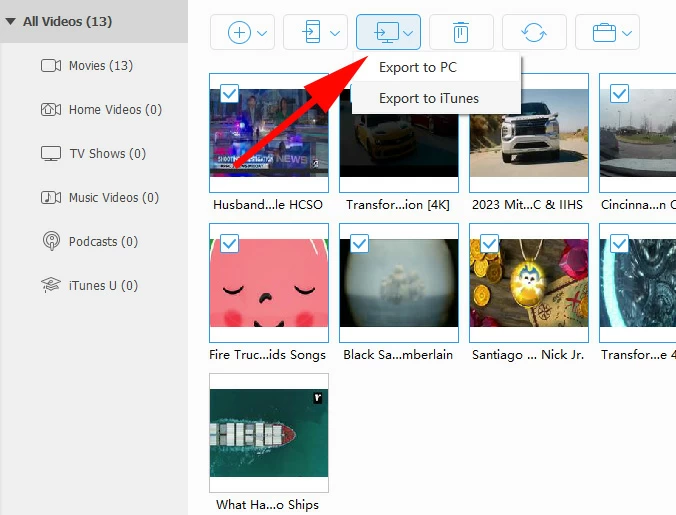
Once configured, Appgeeker iPhone Data Transfer transfers the iPhone 12's video files directly to your PC or Mac computer, displaying a progress bar with estimated completion times.
If you don't want to install extra software, a combination of a basic USB cable and system native file transfer tool is the most straightforward option. However, the experience differs drastically depending on whether you are running Windows or macOS.
When you plug an iPhone 12 into a Windows PC, Windows recognizes the phone as a digital camera, giving you access to the phone's internal storage folder to import videos and pictures.
1. Plug your iPhone 12 into your PC's USB port using a Lightning cable.
2. Unlock your iPhone screen and tap Trust when asked to give the computer access to your photos and videos.
3. Open File Explorer on Windows and click This PC.
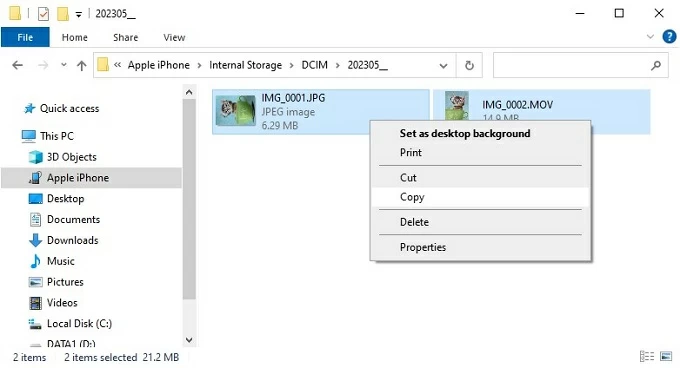
4. Double-click Apple iPhone under "Devices and drives," then navigate through Internal Storage > DCIM.
5. You will see several subfolders (named like 100APPLE, 101APPLE, etc.). Open these folders, select the .MOV video files you wish to transfer, and drag-and-drop them into a local folder on your PC (e.g., your Pictures or Videos library).
If your iPhone is set to convert media files automatically during transfer, long transfer sessions over File Explorer can trigger a generic "Device Unreachable" error. To fix this before transferring, go to Settings > Photos on your iPhone 12, scroll to the bottom, and select "Keep Originals."
Related: How to recover old iMessages on iPhone
While macOS users can use the built-in Photos app, the lesser-known Image Capture application offers a much faster, bare-bones video transfer process that doesn't force your videos into a massive, organized library file.
To move videos from iPhone 12 to computer that's running macOS:
1. Connect your iPhone 12 to your Mac using a USB cable.
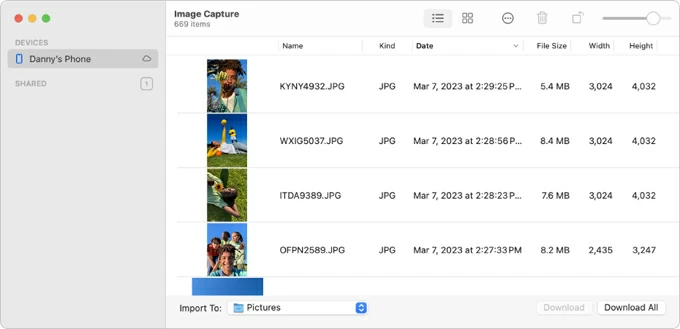
2. Open Image Capture via Spotlight Search (Command + Space and type "Image Capture").
3. Select your iPhone 12 under the Devices list on the left.
4. Sort the file list by Kind to group all your video files together.
5. Choose a destination folder in the Import To dropdown menu at the bottom of the window.
6. Highlight your videos and click Download or click Download All to import all video files in the list.
For those who already pay for an expanded Apple iCloud storage tier (50GB, 200GB, or 2TB), iCloud Photos keeps your entire media library synced across devices in the background. This way, you don't manually transfer your iPhone 12 videos to computer, instead, as long as you enable iCloud Photos on the phone, everything—including your videos—will automatically sync with your computer.
Accessing Videos via iCloud for Windows:
1. Download iCloud for Windows from the Microsoft Store and sign in with your Apple ID.
2. Check the box next to Photos, click Options, and ensure iCloud Photos is enabled.
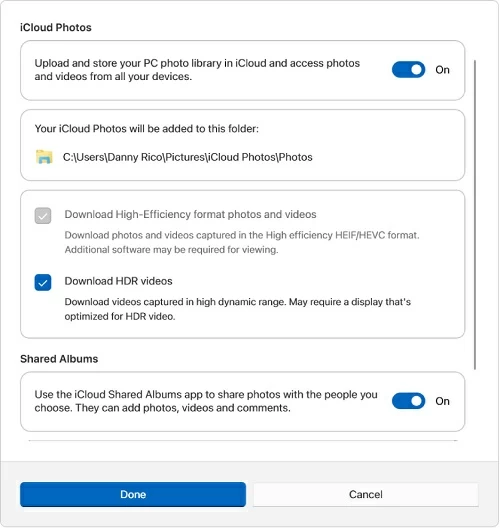
3. Open File Explorer, click iCloud Photos in the navigation panel, and find your synchronized videos. Double-click a video file to download the full-resolution file to your PC.
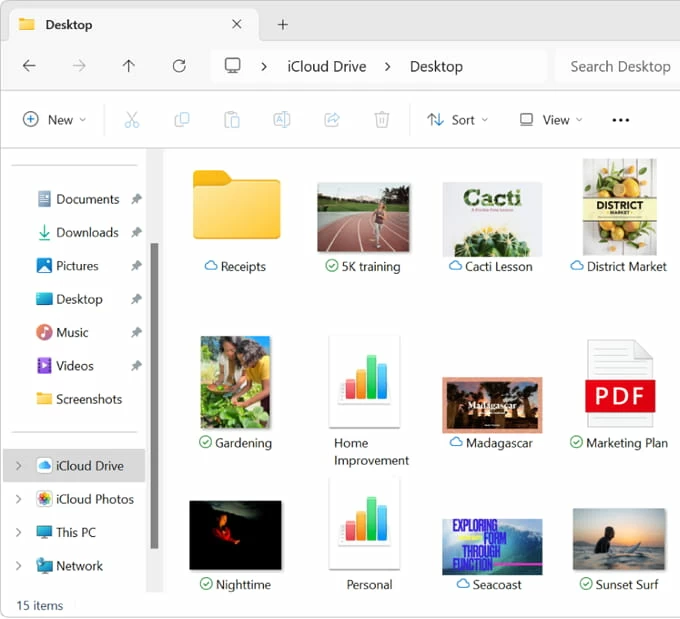
Downloading directly via Web Browser (PC or Mac):
1. If you don't want to install the desktop client, open any web browser, go to iCloud.com, and sign in with your Apple ID. Click the Photos tile, highlight the videos you want to download, and click the Cloud Download icon at the top right. All selected videos will directly be saved on your PC or Mac.
By default, downloading from iCloud.com grabs a compressed version for faster web delivery. If you want the full-resolution, uncompressed 4K file containing Dolby Vision metadata, click and hold the download icon and select Unmodified Original.
Related: How to transfer iPhone data to laptop
If iCloud isn't your primary cloud platform, third-party sync engines and native wireless tools can bridge the gap.
Apple AirDrop (Mac Only)
If you own a Mac, AirDrop is arguably the fastest wireless option for sending small-to-medium video clips from iPhone 12 to Mac computer:
1. Turn on Wi-Fi and Bluetooth on both your iPhone 12 and your Mac.
2. Open the Photos app or Files app on your iPhone 12 and select your video.
3. Tap the Share button, select AirDrop, and tap your Mac's name.
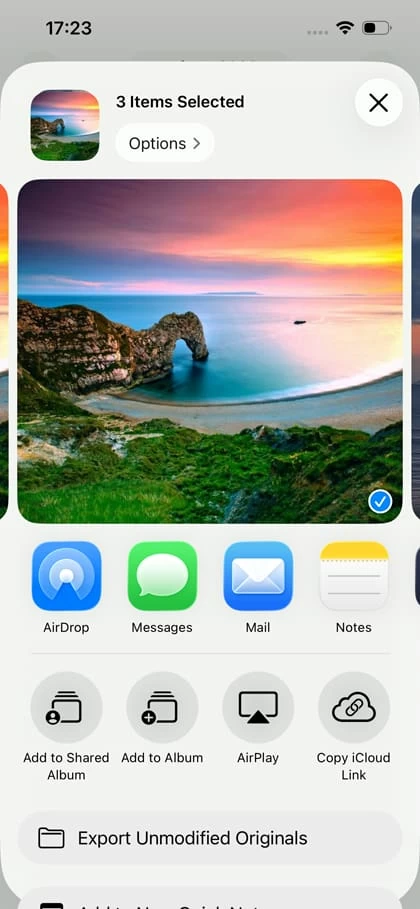
4. The file will land directly in your Mac's Downloads folder within seconds.
Google Drive, OneDrive, or Dropbox (PC & Mac)
If you use cross-platform cloud storage like Google Drive or Microsoft OneDrive, do the following to import your iPhone 12 videos.
1. Open the respective cloud app on your iPhone 12.
2. Tap the + (Upload) button and choose Photos and Videos.
3. Select your iPhone 12 videos and wait for the upload to complete over Wi-Fi.
4. Log into the matching app or web interface on your computer and download the files.
By default, the iPhone 12 shoots video in High-Efficiency Video Coding (HEVC / H.265). While HEVC cuts file sizes in half compared to older standards, legacy Windows 10 and Windows 11 systems don't include native HEVC playback support out of the box.
For most users with a few small clips, a quick AirDrop to a Mac or a Lightning-to-USB cable connection to a PC will handle the iPhone 12 video to computer transfer job. However, if you are offloading gigabytes of 4K 60fps footage from your phone, dealing with Windows playback compatibility, or looking to preserve full original metadata without sync errors, a dedicated manager like Appgeeker iPhone Data Transfer offers the most seamless, hassle-free transfer experience available.