How to Convert a Blu-ray to H.264 Video File Format on Mac


Let's say you have a multitude of Blu-ray discs lay around in the corners of your room, but you can't remember when last view those BD movies on your home TV or on computer with Blu-ray player, then you just want to move to your Mac and do edits in Final Cut Pro X software. But when you tried to import those movies from Blu-ray directly to Final Cut Pro (X) window, nothing happened. Everyone knows FCPX doesn't support either DRM-protected Blu-ray or commercial DVD discs.
Thankfully there's a simple, streamlined solution. In order to fulfill the task of editing Blu-ray movies in Final Cut Pro (X) on your Mac machine, all you need is to rip the disc and convert movies into Final Cut Pro (X) acceptable files. To do this, you're going to need a few things.
Download link below.
[Related Topic: How to copy a Blu-ray onto a new Blu-ray disc]
Let's take a look at how it works in Blu-ray ripping.
Step 1: Insert Blu-ray into the drive and open up the software
Open the program on your machine and once you've inserted the Blu-ray disc into the drive, the software should be able to read all of your BD content.
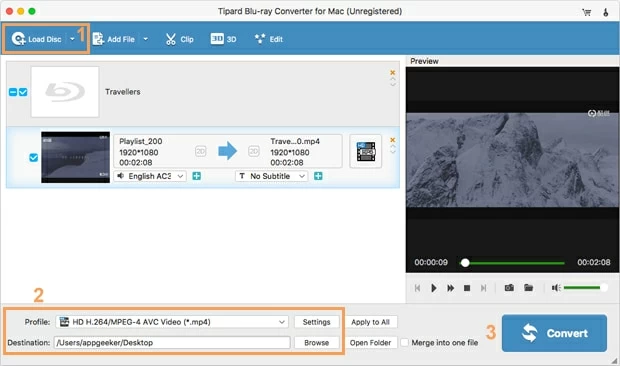
Click the Load Disc at the top left corner to load the Blu-ray movie mounted on your Mac to the program window. Or simply use the program's drag-n-drop feature to import files into the window.
Once the disk loaded, the titles along with subtitles and audio tracks are listed on the window, like the screenshot shown below:
Step 2: Select an output format that's FCPX can read
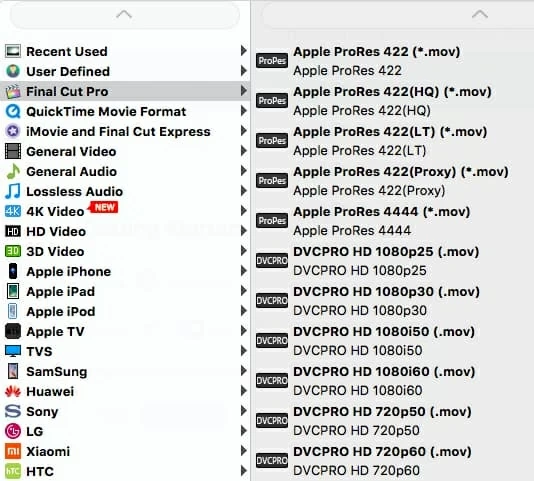
Next, you need to decide the format for the output footage. To do so, click on the Profile drop-down box on the lower left corner of the screen and a drop-down box appears with a great selection of file types you can choose from.
In order to convert Blu-ray for editing Final Cut Pro X, move to Final Cut Pro category, then select a profile you like from its opening list.
Tip: since FCPX favors MOV or MP4, you can also choose to select HD MOV Video or HD MP4 Video option under HD Video category.
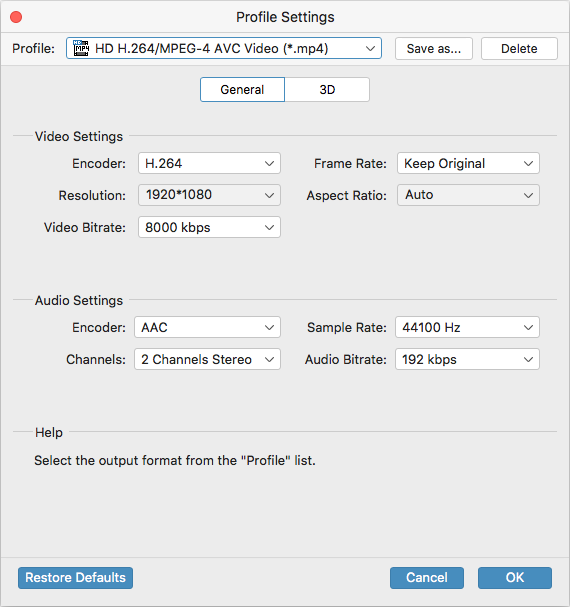
If you are an experienced user, you may have some idea for the video quality and be ready to control over it. Accordingly, this utility gives you the chance to get it out.
Press the settings button located in the lower centert of the screen and this will bring up a Profile Settings window. From there you're able to adjust the audio and video parameters for the resulting video. Bit rate, aspect ratio, frame rate, sample rate, and channels are all changeable separately.
Tip: You could keep original quality "1920*1080" in the Resolution box.
If you aren't sure whether the tweaks you made is suitable, we recommend you leave the original settings alone and click OK to save the settings and back to main interface.
Related: Does Macbook play Blu-ray?
Step 3: Start Converting Blu-ray into selected format for Final Cut Pro X
Before the conversion, you can choose a local directory to save the output video onto your Mac machine through Destination field at the lower right side.
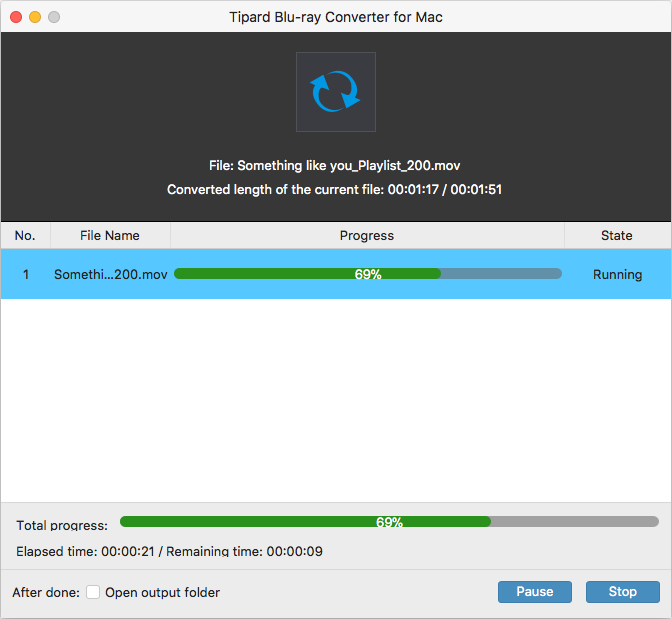
Finaly, just click on green Convert button located on the lower right of the main interface and the software will go about its magic. Every movie title in the queue will be converted to format you selected in Step 2.
The whole process of ripping Blu-ray to Final Cut Pro (X) editable file will take you everything from minutes to hours. All that's left for you to do is wait for the conversion to finish.
Step 4: Make import of the ripped Blu-ray files to Final Cut Pro X
Once the process is done, you can get your full quality (MOV) videos and put into Final Cut Pro (X) to make your own further edits.
Happy editing!