How to Make a Custom Ringtone on iPhone


Platforms
Developed for both Windows & Mac users

If you want to save or edit iPhone photos on a computer, this article provides the most comprehensive guide to transfer your photos from iPhone 14 to your Windows PC or Mac.

For time-saving and efficient iPhone-to-computer photo transfer, Appgeeker iPhone Data Transfer is a great tool that enables bulk download photos from iPhone to computer without compressing image quality.

From wired connections to wireless solutions, you can transfer photos from an iPhone 14 to a PC Windows 10/11 or Mac.
Whether you're taking photos with the camera on your iPhone 14, capturing screenshots, or downloading images from apps and websites, your photo library can quickly grow, rapidly consuming your device's storage space. In such cases, transferring your photos from iPhone 14 to a PC or Mac becomes essential.
It's a critical step to transfer photos from your iPhone 14 to your computer for preserving precious memories, optimizing device storage, and unlocking advanced editing capabilities. In this guide, we'll explore several effective and user-friendly methods on how to transfer photos from iPhone 14 to computer—covering both Windows and macOS, with or without a cable.
Through simple and step-by-step approaches, you'll be able to confidently and efficiently manage your photo collection for a smoother transfer experience.
Table of Contents
If you're looking for a versatile and powerful solution to transfer photos from your iPhone 14 to a PC or Mac, Appgeeker iPhone Data Transfer software is the great choice. Unlike native tools, this software breaks free from the limitations of the Apple ecosystem, designed specifically for intuitive drag-and-drop photo transfers and efficient handling of large photo libraries.
Not only can it transfer photos in their original quality, but it also converts HEIC to JPEG during transfer for compatibility and filters out duplicate photos. It operates without iTunes or iCloud, giving users greater flexibility and control over transferring iPhone 14 photos to computer.
Key features of Appgeeker iPhone Data Transfer:
Here's how to transfer photos from iPhone 14 to PC or Mac:
1. Launch Appgeeker iPhone Data Transfer on your computer and connect your iPhone 14 to the computer using a Lightning to USB cable.

2. Navigate to the Photos tab on the left, where you can view all photos on your device, including Live photos, screenshots, and images from other apps. All photos are neatly categorized.

3. To download your iPhone photos to your computer, you can choose individual photos or select Check All to export your entire photo library for storage.
4. Once selected, click the computer icon at the top [Export to PC/Mac], then choose a destination folder to save the exported iPhone photos on the computer.

Tip: If you're transferring photos from your iPhone to a PC, especially on Windows 10, don't worry—the software's built-in HEIC conversion feature will convert HEIC files to standard JPG or PNG images for easy viewing on your PC.
Related: How to transfer music to iPhone 14
If your computer runs Windows, ensure you have a reliable USB cable to connect your iPhone to the PC. You can use the Microsoft Photos app or File Explorer to copy photos from your iPhone 14 to a Windows 10/11 PC.
The Microsoft Photos app, built into Windows 10 and Windows 11, is a versatile and intuitive tool for transferring photos from your iPhone 14 to your computer without additional software, making it an excellent choice for users who value simplicity and integration.
This method lets you preview thumbnails and select specific images by date, ideal for quickly and visually organizing large photo libraries. After importing, photos are automatically sorted by date for easy organization and use. But the options and operations in the Microsoft Photos app slightly differ between Windows 10 and Windows 11.
Transfer photos from iPhone 14 to PC Windows 10
1. Unlock your iPhone 14 and plug it into your Windows 10 PC using a Lightning-to-USB cable.
2. On your iPhone, you'll see a pop-up asking "Trust This Computer?" Tap Trust, then enter your passcode.
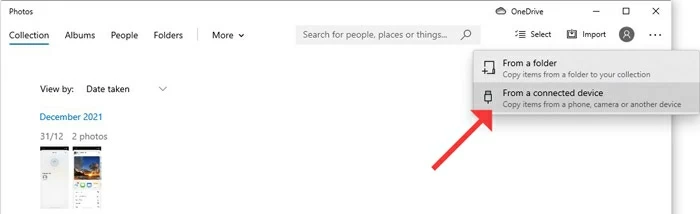
3. On your PC, open the Microsoft Photos app. You can search for it via the Start menu.
4. In the top-right corner of the Photos app, click Import > From a connected device.
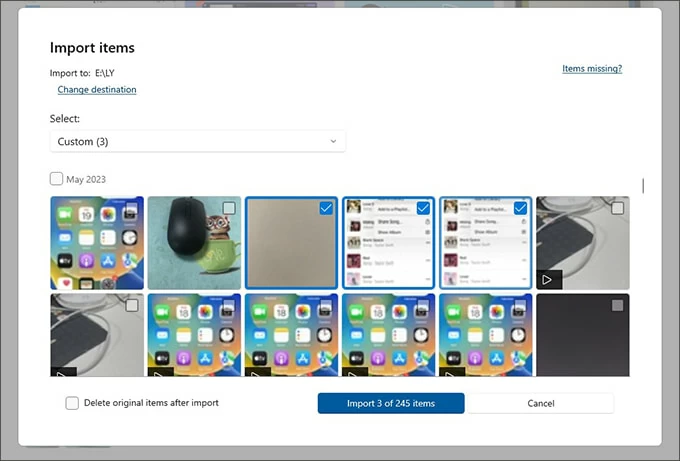
5. The system will scan your iPhone 14 for photos and videos. This might take a minute depending on your library size.
6. Once photos load, pick the images manually you want to move to your PC, or select All in the upper left corner.
7. After selecting, click Change destination to select your save folder or let the app save them to the default Pictures folder.
8. Click Import to begin the transfer. The Photos app will show progress and completion notifications.
Note:
Import iPhone 14 photos to Windows 11 PC
1. Connect your unlocked iPhone 14 to the Windows 11 PC with a USB cable.
2. Tap Trust on your iPhone to establishes a secure link between your iPhone 14 and your computer.
3. If the Microsoft Photos app doesn't open automatically, launch it from the Start menu.
4. In the Photos app, go to the External Devices section on the left and select your iPhone 14; your iPhone's photo library will begin loading.
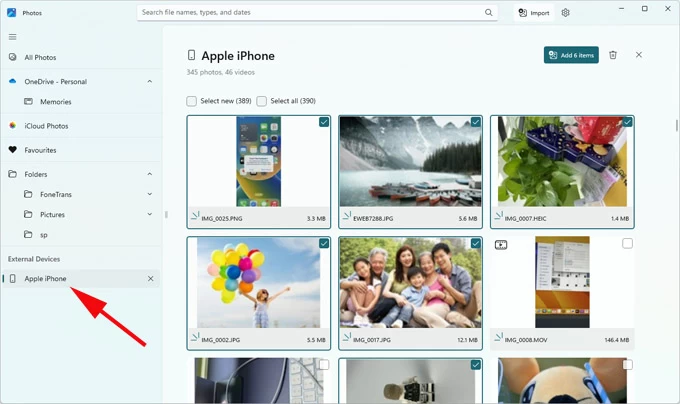
5. Choose specific photos or check Select all at the top to move the entire library.
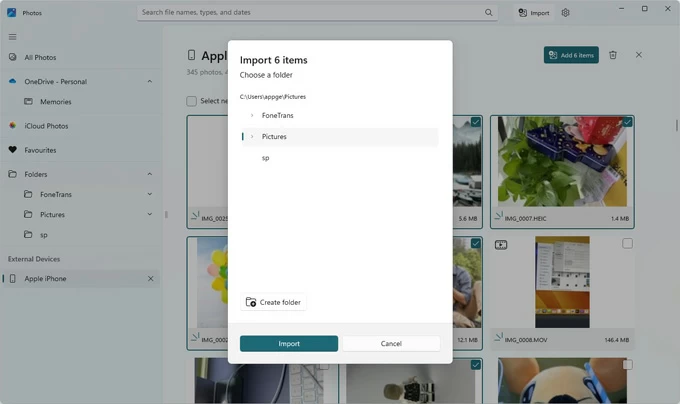
6. Click Add [Number] items in the top right corner and select a target destination.
7. Hit the Import button to transfer photos from your iPhone 14 to your Windows 11 PC.
Note:
Also see: How to unlock iPhone 14 passcode when you forgot it
File Explorer offers a straightforward method to transfer photos from an iPhone 14 to a PC, providing unmatched control for users who prefer manual file management. File Explorer allows you to directly access your iPhone's DCIM folder, select desired photos and videos, and save them to custom folders, making it perfect for one-off transfers or detailed organization tasks.
1. Hook up your iPhone 14 to your computer using a Lightning-to-USB cable.
2. After authorization connection, press Windows key + E to open File Explorer on your PC.
3. Locate your iPhone 14 under This PC, typically displayed as Apple iPhone or a similar name.
4. Double-click your iPhone's icon to access Internal Storage.
5. Open the DCIM folder, which contains subfolder storing your photos and videos in formats like HEIC or JPEG, sorted by date.
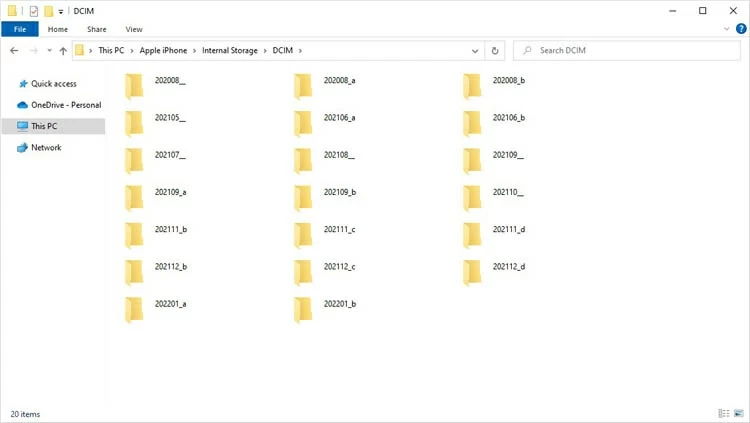
6. Browse and select the photos or entire folders you need, then copy them (Ctrl + C).

7. Navigate to a PC folder and paste (Ctrl + V) to get the iPhone photos transferred to your PC.
Note:
For Mac users, here are two ways to transfer photos from the iPhone 14 to a Mac via USB connection.
The Photos app on macOS offers the smoothest and most native image import experience. Designed for seamless integration, this method leverages the iPhone 14's Lightning port for fast transfers, allowing you to import photos from an iPhone 14 to a Mac computer.
1. Establish a wired connection between your iPhone 14 and Mac with a Lightning-to-USB cable.
2. When prompted, click Allow accessory connection on your desktop. Also, trust your computer if needed.
3. The Photos app should open automatically. If not, open it from your Applications folder.
4. Your iPhone 14 will appear in the sidebar under Devices as your device's custom name.
5. Click your iPhone's name to display its photo library in a grid view.
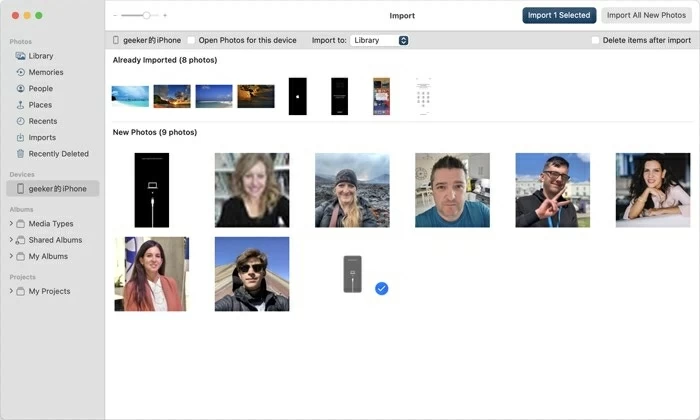
6. Select specific photos (Command + click) or choose Import All New Photos to transfer only items not previously imported.
7. Customize the album you want to import photos to and choose to keep photos on your iPhone (default) or delete them after import to free up space.
8. Click Import Selected and wait for the transfer to complete — the Photos app will then integrate your photos into your system library.
Note:
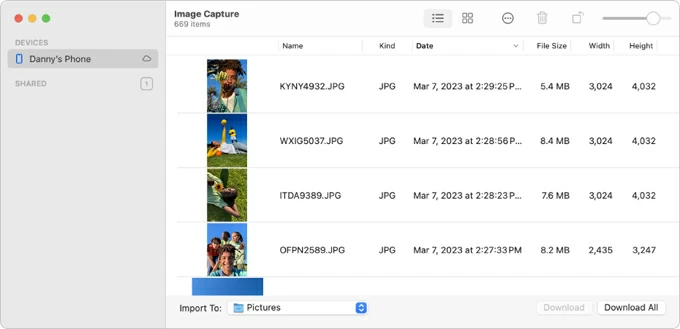
Actually, your Mac also comes with a powerful and flexible tool called Image Capture, which you can use to upload photos from iPhone 14 to your Mac, especially when dealing with a large number of photos and videos.
This method is ideal if you prefer to save photos directly from externally connected devices or cameras to custom folders, or if you want to create web pages of transferred images.
1. Attach your unlocked iPhone 14 to your Mac.
2. Run Image Capture from the Applications folder or via Spotlight.
3. Click your iPhone's name to view its photos and videos in a thumbnail or list view.
4. Use the drop-down menu at the Import To section to choose your destination folder.
5. Select individual images and click Download. Or click Download All for a full dump.
Read more: How to recover deleted text messages on iPhone 14
Want a more convenient way to transfer photos wirelessly? With Apple's ecosystem and cloud tools, you can effortlessly sync photos to your computer from iPhone 14 without cables.
iCloud Photos, deeply integrated with the Apple ecosystem, syncs all your photos and videos across devices, letting you wirelessly access and get your iPhone 14 photo collection in full resolution on your PC or Mac.
With a stable internet connection, you can download your iPhone 14 photos to your computer via iCloud Photos at any time. However, note that a free iCloud account only provides 5GB of storage. You may need to upgrade to sync your entire photo library.
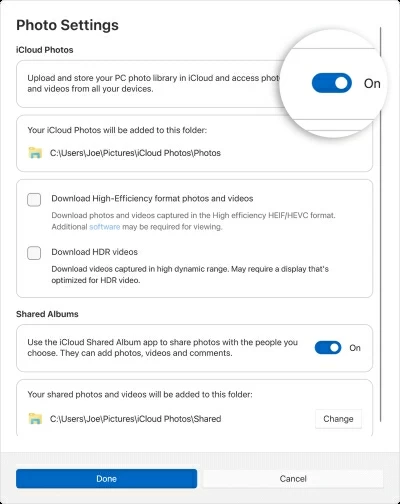
Step 1. Enable iCloud Photos on iPhone 14
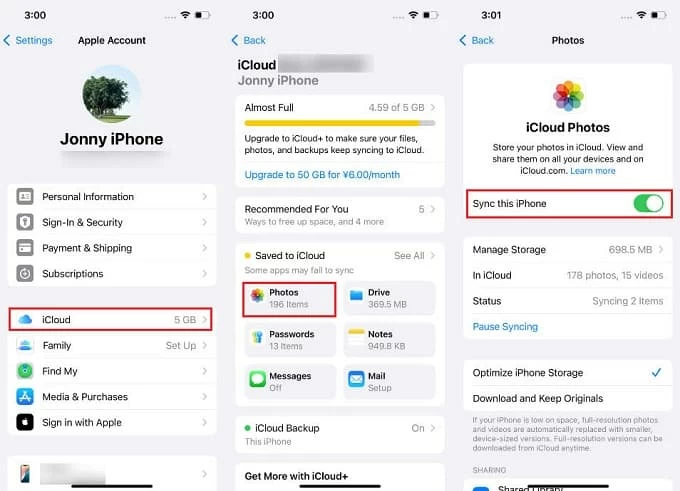
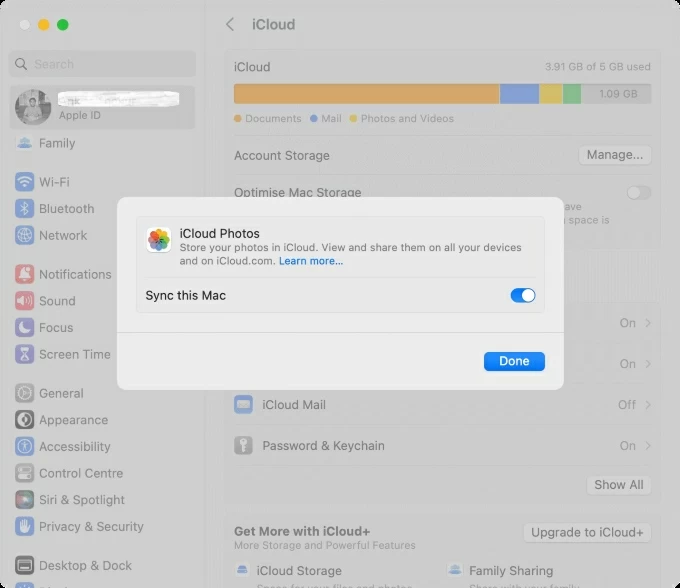
Step 2. Set up iCloud on your computer
For Windows PC:
For Mac:
Alternatively, go to iCloud.com in a browser, sign in, and manually download pictures on your computer.
To quickly share a small batches of iPhone photos to your computer, AirDrop, Apple's peer-to-peer file transfer system, allows you to wirelessly send the photos from your iPhone 14 to your Mac using Wi-Fi and Bluetooth.
Ensure your Mac and iPhone 14 meet the following conditions:
1. Enable AirDrop on your iPhone 14. Swipe down from the top-right corner to open Control Center. Long-press the network settings tile and tap AirDrop. Select Everyone / Everyone for 10 Minutes.
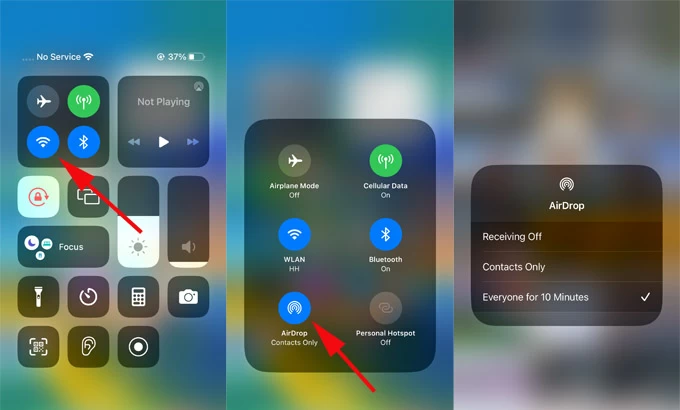
2. Turn on AirDrop on your Mac. Click the control center icon in the upper right corner of the desktop and light up the AirDrop icon, set the receiving setting to Everyone.

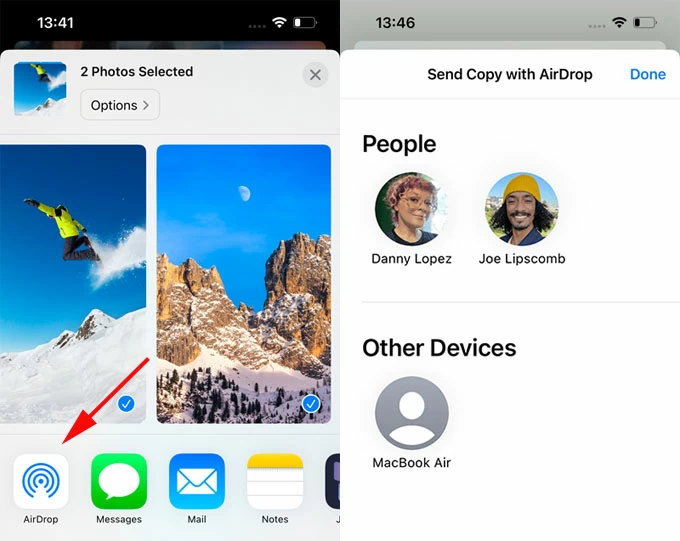
3. Select photos on iPhone 14. Select the images you want to send on iPhone's Photos app.
4. Initiate AirDrop transfer. Tap the Share icon > AirDrop, and your Mac should appear in the AirDrop list, tap to send.
5. Accept on Mac. A notification will pop up on your Mac to accept the AirDrop transfer. Click Accept, and photos will save to the Downloads folder.

Learn more about AirDrop at Where do AirDrop files go.
Conclusion
This article provides a full guide on how to transfer photos from your iPhone 14 to a computer, covering the use of Appgeeker iPhone Data Transfer for both PC and Mac, as well as methods specific to PC or Mac.
For large photo libraries, wired built-in tools are recommended for their efficiency and stability. However, wireless transfer options offer quick and convenient access to your photos. Choose the method that best suits your needs to put iPhone 14 photos on your computer.

