What to Do If iPhone Won't Turn On


The music industry has changed a lot since the function of storing and playing music on smartphone came around. You might have made massive music collection on your iPhone 6 device. Eventually, time will come when you have to transfer music on iPhone 6 over to your Windows 7 laptop & desktop to make way for new songs. You may think something as simple as migrating songs between iDevice and PC on a USB connection could be straightforward. Unfortunately, that's not the case.
No fret. There're a couple of effective ways of copying music from iPhone 6/ 6s (Plus) to Windows 7 computer. In this guide, we're going to dig up the most useful methods make a smooth transfer with or without iTunes.
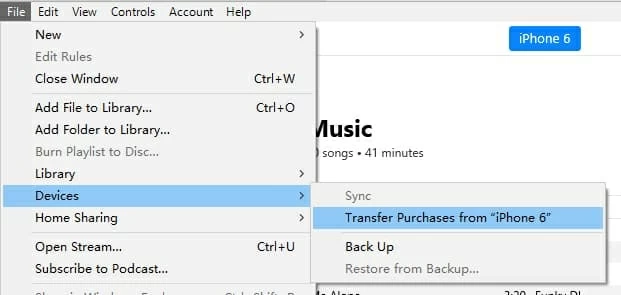
1. Transfer purchased music via iTunes
iTunes, developed by Apple, is rightly praised as a powerful tool to manage your iPhone 6s music library. It offers the nifty option of "Transfer Purchases" to sync purchased music from the iTunes Store with up to five authorized computers. This is Apple's way of protecting copyright material.
With that in mind, launch iTunes and follow the instructions to get iTunes purchases off iPhone 6/ 6s and put onto Windows 7 hard drive.
The tunes should save back onto Music\iTunes\iTunes Media.
Though iTunes have successfully transferred the purchased music to the Windows 7 computer, it is a pity that it doesn't work properly with the non-purchased music. This is where a third-party iPhone data transfer software comes into play.
2. Migrate iPhone 6s songs to Windows 7 without iTunes
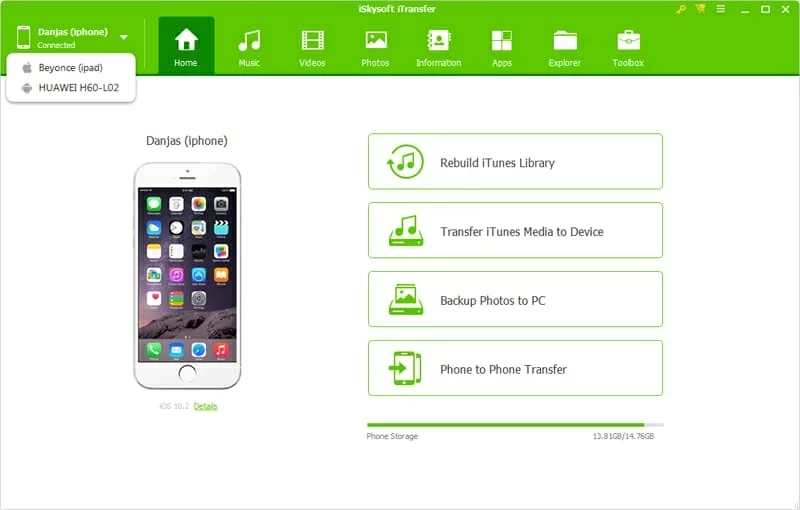
Any smart developers have come forward and built several excellent software options to move music from iPhone 6s to Windows 7. If the masses of tools have you dazzled, iTransfer should be your first stop. It's super easy and works pretty seamless when transferring the tracks that are recorded, ripped from CD or saved from other sources.
With the streamlined interface, you can save tracks on iPhone 6s Plus back to Windows 7 PC as easily and efficiently as possible. It allows an unlimited amount of songs and playlists to be transferred with information on it: name, time, artist, album, genre and more. Better still, you can conveniently transfer other data files including photos, videos, contacts, text messages, etc. in a few simple clicks - among iOS devices, iTunes library and computers.
Besides the ability of transferring music files from iPhone 6 over to Windows 7 hard drive, it features with Rebuild iTunes Library that helps instantly export the songs to iTunes. It's a one-click solution.
Now download the tool and install it on Windows 7 laptop & desktop. It's easy-to-use that all you do is connect iPhone 6/ 6s (Plus) to the computer, choose the tracks you want to copy over, and you're done. If you want to go through a complete guide, we've got you covered below.
Get Started: Add Music from iPhone 6/ 6s (Plus) to Windows 7 Easily
Step 1: Connect iPhone 6/ 6s to Windows 7 computer
One the program is set up on your Windows 7 PC, launch it.
Then grab a USB cable to plug your iPhone 6 device to the computer. It should be recognized within seconds.
Step 2: Choose music from iPhone 6s to transfer
Then, click on the Music from the top navigation bar, and you will see a list of songs of iPhone 6 to choose from.
Place a tick in the tiny box next to the tune you're going to transfer onto Windows 7 PC. It's also available to pick all the tunes by checking the box beside the "Name".

Step 3: Begin moving songs from iPhone 6 over to Windows 7
When you're ready, click Export on the menu bar and then choose Export to PC option from the drop-down menu.
A dialog box will open, prompting you to set a location to saving the resulting tracks on the Windows 7 laptop or desktop.
Once done, hit the Save button. This will complete your music transfer from iPhone 6 to Windows 7 over the USB connection.
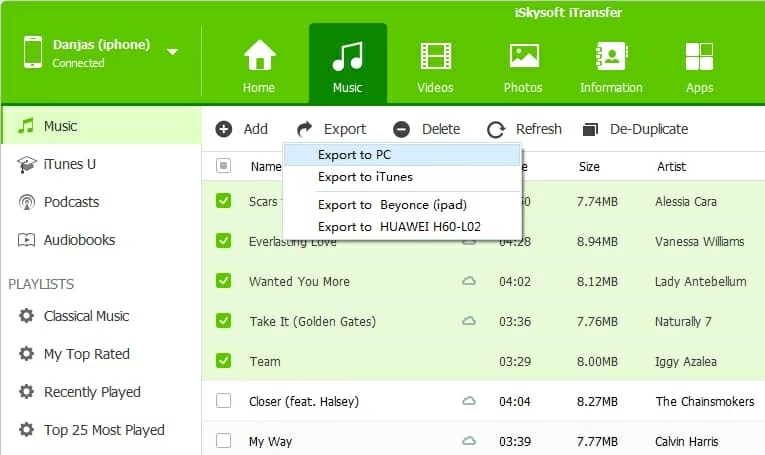
Copying a playlist to Windows 7 PC from iPhone 6s (Plus) is as easy as right-clicking a playlist on the left panel and clicking Export to PC.

Done! Grab your favorite songs or playlists for your personal listening pleasure on the computer.
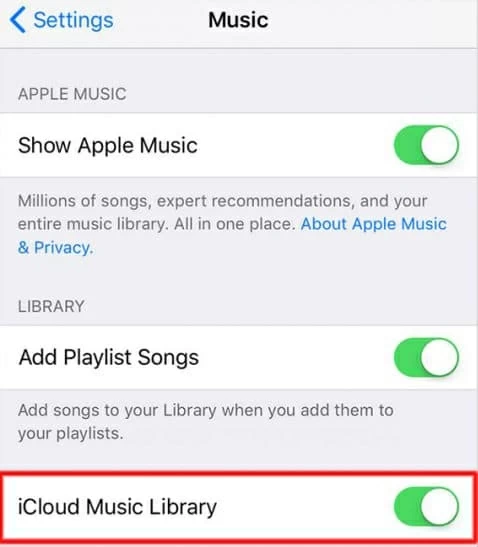
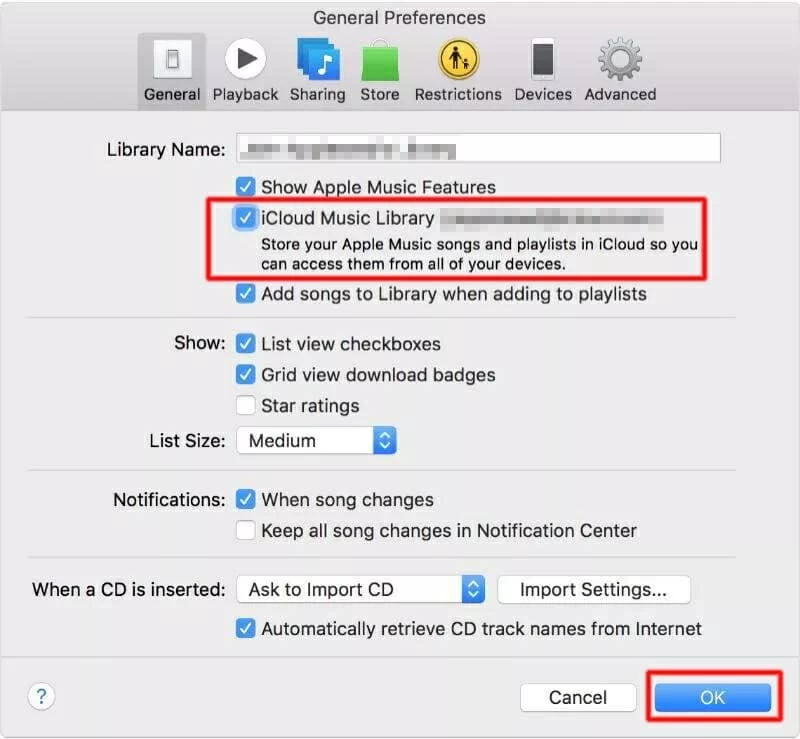
3. Free download music to Windows 7 with iCloud Music Library
iCloud Music Library is Apple's way to store music in iCloud. With a subscription to Apple Music or iTunes Match, you can turn on iCloud Music Library to access your music from all devices. To migrate songs from iPhone 6/ 6s (Plus) into Windows 7 PC, make sure iCloud Music Library is enable in both iPhone 6 and iTunes on Windows 7.
You should immediately see the loading circle to the left of the song title after clicking the download icon, which will disappear once the download is complete. For more details, you can go through this guide: Use iCloud Music Library on PC.