How to Recreate iTunes Music Library from iPhone


I wanna copy some music and save onto my Windows 10 PC machine since my iPhone is running out of space. I really don't wanna lose any single song in my iPhone. But iTunes seems no options available for me to sync the tracks back to my Windows computer, is there a simple, free way I can just backup them?
Let's say you've spent a lot of time downloading new music on your iPhone that you like to listen to while travelling or working, but things become quite annoying when your iPhone is running out of storage space (especially for those who're using an iPhone with 16GB of storage). You're trying to delete apps which are not used much, clear Safari cache, remove unwanted videos and photos, then your device is still getting message "Storage Almost Full" constantly. Take some time this weekend to liberate songs from your music library on iPhone and save to your PC computer.
One thing that should be noted is unlike Android phones that support the usual MTP USB connection on PC, you can't directly pull music off your iPhone and move to a computer. While iTunes, the official tool to manage iPhone an other iOS players, makes it easy and intuitive to sync the music from your PC library to your iPhone, it clams up tight when it comes to transferring iPhone music back to your Windows computer (laptop, desktop).
Luckily, whether you're on a Mac or PC's, there are many applications for copying music from an iPhone back to your computer. To save you the work, today we're going to look at one of the best option— iTransfer software, to get the job done easily and quickly.
What Can iTransfer Do
iTransfer is an easy-to-use and efficient tool that gives you freedom to move music, playlists, contacts, photos, videos, podcasts, TV shows, messages amongst iPhone, iPad, iPod, iTunes and Mac/ Windows computers in just a few clicks. It boasts a host of great features, including managing your device library (search, preview, delete, add, de-duplicate, create playlist, move files between playlists/albums, fix music metadata, etc., make GIF and more.
Step 1: Connect your iPhone
You'll need to start by plugging your iPhone into your laptop or desktop using the included USB cable.
Launch iTransfer on your computer. Your iPhone should load in the menu on the upper left corner. As you can see in the screenshot demonstrated below, the buttons (Home, Music, Videos, Photos, Apps, Toolkit) on the top menu make it easy to find the right area on your iPhone to work on.
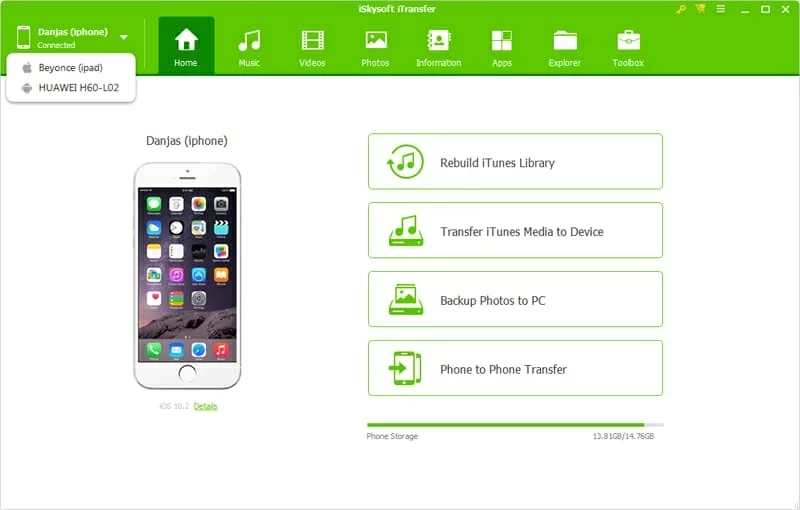
Another good thing you'll definitely like while using this tool is it includes four quick access on the interface to help you get the job done instantly. If you want to backup full library of photos from iPhone to a Mac without any hassle, for example, just click the Backup Photos to Mac shortcut on there, confirm the pop-up message, you're done!
Step 2: Select tracks from iPhone Music library
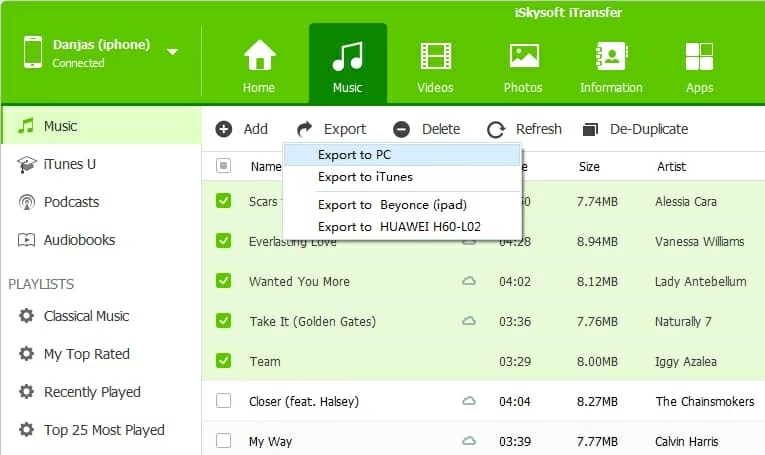
Click Music button on the top menu, you'll be taken to the music summary window which looks like a simplified version of iTunes, with all your content types and playlists located on the left pane and your tunes on the right pane. And your tunes are sorted in a Name file structure by default, but this doesn't matter, since you can filter them by Artist, Album, Genre, Time if required.
Next, start selecting the music files from your iPhone library for transferring to your Windows computer. You can do it by checking the box next to the song to select individual tracks, or checking the box next to Name filter (under Add button) to select the whole playlist of songs. At the bottom of the window, you will see a total number of music files you selected.
Tip: if there are a huge number of tunes on the library which makes finding a song difficulty, you can search for the song through the search box in the upper right-hand corner of the screen.

Step 3: Click "Export" button to save iPhone songs/ playlist onto your PC's
It's time to output all of the selected music files from iPhone. Simply press the Export button on the top row, from its drop-down menu, select Export to PC. In the opening dialog, specify a appropriate folder on your PC computer to store the resulting iPhone songs, click OK and done!
Give the process a little time and once it finishes exporting your songs, you're ready to access the PC folder where you have iPhone tracks saved by clicking the Open Folder button on the pop-up message.
Want to grab a full playlist of music files off iPhone and transfer to a Windows computer (desktop, laptop)? That's just as easy! Select the playlist by clicking on its name in the sidebar, from its right-click menu, choose Export to PC option. In opening dialog, choose a location on your PC's for saving the output tracks.

Beside, the program comes with a Delete option on the top row that lets you remove some of unwanted tunes from your iPhone to free up the storage space. Obviously, using this way makes things a lot quicker than deleting the files manually on the iPhone itself. And the extra music info. fix, de-duplicate and playlist songs migration are great features to have.

Don't Miss: A Quick Way to Migrate Your Music from Google Phone to iPad
Conclusion
If you've been struggling with content (videos, photos, music, contacts, TV shows, etc.) management between your mobile device (iOS) and computer (Mac, PC's), and looking for a simple and powerful tool for common use, iTransfer is definitely a decent all-rounder.
Laptop & desktop (Windows 10, Windows 8, Windows 7, Windows Vista): Lenovo, HP, Acer, ASUS, Dell, Sony, Samsung, IBM, Toshiba, etc.
iPhone Models Supported: iPhone X, iPhone 8/Plus, iPhone 7/Plus, iPhone SE, iPhone 6s/Plus, iPhone 6/Plus, iPhone 5c/5s, iPhone 5, etc.
How to Transfer Music between LG Smartphone and iPad
Use Apple Music in the Music app
Export Songs from iPad to MacBook
How to Transfer Messages from an iPhone to a Samsung Android Handset