Extract Audio Track from WMV Video and Save to .mp3 File


My old computer totally crashed and my music collection disappeared. I have thousands of songs and many playlists on my iPad Air. I am hoping to find a way to get those iPad songs onto my new PC and move them around to different albums. Do they have to be transferred one at a time or a way to select all? Any suggestion would be greatly appreciated.
There have been many reasons when you want to copy a collection of songs from your iPad to a Windows computer. You might want to make a backup of tracks to free up some of storage space on iPad; or you might want to keep your precious tunes onto local media library, or even copy music files back to your iTunes library after your computer crashed leaving nothing in your iTunes library.
Whatever the reason, there is a need to transfer music from an iPad to a Windows PC's now and then. While it's super easy and straightforward to access your photos and videos on the iPad (it should appear as a camera device using PTP) when it's connected with Windows machine, getting into music library and pull songs out of iPad to save on PC seems to be impossible. One thing that we've discovered is that the Apple-supplied iTunes offers no way to sync your music back to computer.
Fortunately, by installing a simple piece of software called iPhone Data Transfer on your computer, you're able to access to your iPad music library and transfer tracks directly to folder of your choice on your PC's.
iTransfer is a remarkably simple utility that makes it easy to manage and transfer contents between iOS, iTunes, Mac and PC's smoothly with just a few quick steps. Apart from copying music and playlists from iPad to your PC's/ Mac/ iPhone and vice versa, the utility also has options for transfer videos, photos, ringtones, audiobooks, TV shows, contacts and more. Better still, you're able to create/ delete playlist(s), move music files from one playlist to another, fix music metadata, delete songs, and more. If you're on a Mac and want to migrate iPad tracks to an iPhone, or just back up on Mac, please refer to its Mac version.
Step 1: Plug your iPad into the PC
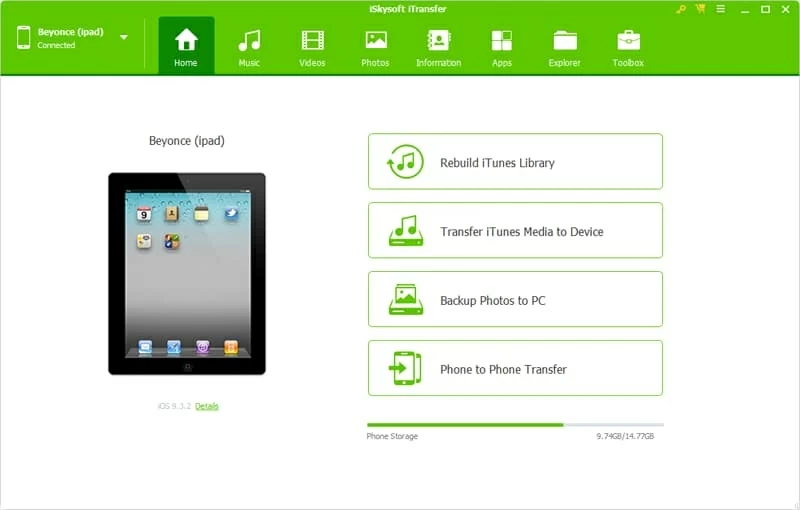
Open the iTransfer software, and attach your iPad to your Windows laptop or desktop. The software will immediately identify your device and return a big iPad icon on the centre area of interface. To the right of icon there are four shortcuts that take care of your most common tasks.
On the top menu bar, you'll see eight (six in Mac version) different buttons that are for navigating around its corresponding features, called Home, Music, Videos, Photos, Information (PC only), Apps, Explorer (PC only), Toolbox—no confusions, no complications, all looks pretty easy-to-understand even for beginners.
Related Article: One Click to Migrate Content between OnePlus and iPhone
Step 2: Choose your transfer settings
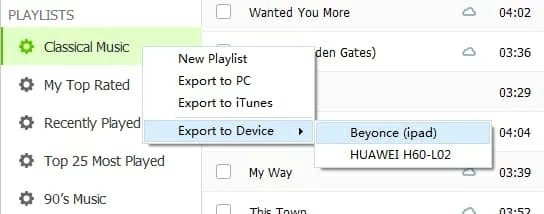
In this step, click Music button on the top menu bar, this should load your iPad music library where houses all of your music tracks. On the left side of the window, it consist of content types that you may want to choose, like Music, iTunes U, Podcasts, iTunes U, Audiobooks and Playlists. Click on any of them will display tracks it contains.
A search box located at the upper right is available to assist you to find the song if you have a large number of tunes in the library.

Step 3: Select iPad music files and export to your Windows PC's
Once your music library loads, you're ready to get off music from iPad onto Windows desktop or laptop. The software gives you flexible to get the job done.
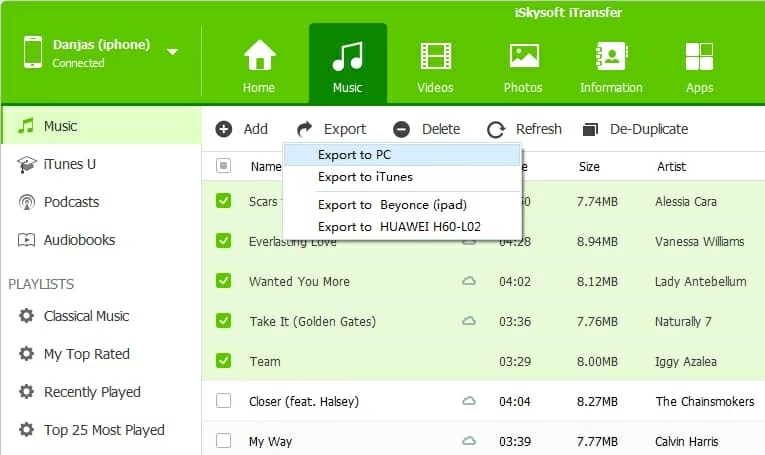
Once your choose Export to PC option, a window should open. You're required to set an output folder on your computer to store resulting files.
Done! You're safe to disconnect your iPad from your laptop or desktop. See also: how to transfer iPhone contacts to ZTE AXON Android phone.
Conclusion
There are more methods to transfer music from your iPad library to PC computer in the web, if you're looking for a quick and easy way to accomplish the tasks, iTransfer, obviously, is a good program to go with. No confusions, no odious steps involved. It's easy enough for beginners. We can also help you convert video and audio files as necessary.
Laptop & desktop (Windows 10, Windows 8, Windows 7, Windows Vista): HP, Lenovo, Dell, ASUS, Acer, Sony, Toshiba, Samsung, IBM, etc.
iPad Models supported: iPad Air 2, iPad Air 1, iPad 4, iPad 3, iPad 2, iPad 1; iPad Mini 4, iPad Mini 3, iPad Mini 2, iPad Mini 1, etc.
How to Import Your Content onto a New iPhone from a Sony Xperia Phone