
Easy Ways to Copy Music from itunes to Android


Proclaimed to be the greatest 4-inch smartphone ever, iPhone SE serves as a popular gateway for music entertainment on-the-go. But it's unfortunately true that the music you've amassed on your iPhone SE might be here today and gone tomorrow as a consequence of software update, unintentional deletion or other reasons. One preventative measure against data loss is to back up music on iPhone SE to your Windows 7 computer by making a transfer.
Thankfully, copying songs from iPhone SE to Windows 7, whether the songs ripped from CDs or iTunes purchases, isn't too complicated or painful a procedure any more—if you have the right tools or services. Here's how to go about both Apple route and third-party software route to get the iPhone SE music files onto Windows 7 desktop or laptop for backup and playback.
Straightforward Way: iTransfer
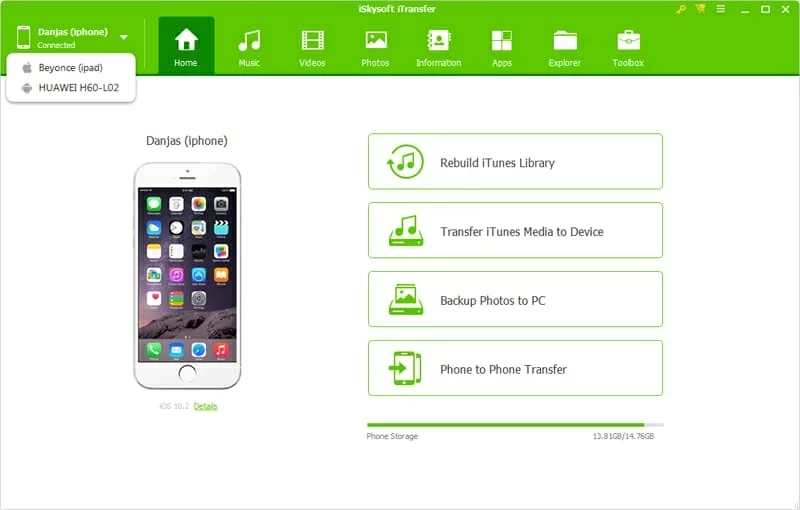
Among the ever-increasing development of iPhone music transfer programs with varied functions, you might easily get confused. If you're seeking for an efficient yet powerful application to transfer music from iPhone SE back to Windows 7 hard drive without tedious steps, iPhone Data Transfer is worth a closer look. It's a simple and intuitive application ideal for all users despite the level of experience.
The utility helps provide an easier and quicker method of making the music transfer from iPhone SE to Windows 7 laptop & desktop - you can preview and select which songs or playlists will be moved over without any hassle. Of course you're capable of going with the opposite journey by importing tracks from computer to iPhones. This is same for copying photos, videos, postcards. iTunes U, Audiobooks, and so on.
Other neat features that's being added to the app is the ability to rebuild iTunes library, transfer iTunes media files to devices, back up photos to PC, and migrate contents between two phones. These are packed as shortcuts on the initial window for easy navigation.
Below is a quick rundown of how the program works on transferring songs from iPhone SE over to Windows 7 machine.
Step 1: Connect your iPhone SE to Windows 7 computer
After installation, open the program on Windows 7.
Then hook up iPhone SE device into the computer via the USB cable that came with the device.
Step 2: Preview and select iPhone SE music to migrate
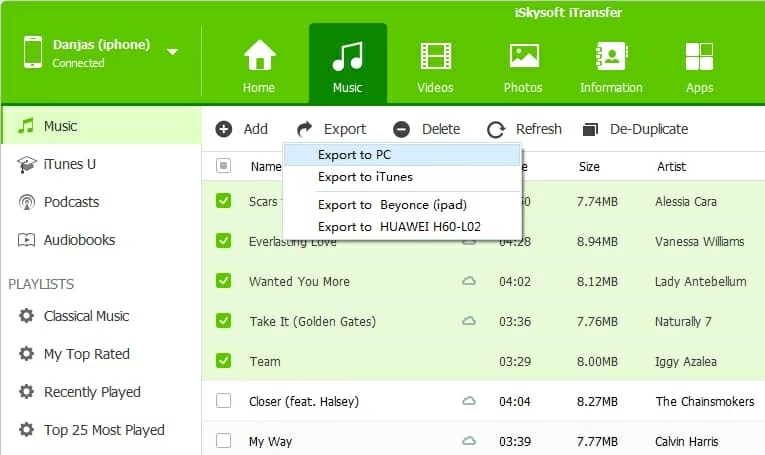
Then, choose the Music tab at the top navigation bar to display the music collection on your iPhone SE device. By default, all tunes are shown on the pane.
Highlight the tracks to save on Windows 7's hard drive by checking the tiny boxes accordingly. For more convenience, tick the box under the Add option to select all songs to copy over.
Tips: Excellent search box on the top-right of the window helps to quickly locate a song. You can enter keywords of the music-related information like name, artist, album, etc. to narrow the list.

Step 3: Trigger the iPhone SE music to Windows 7 transfer process
Once you've selected all tunes you need, click Export under the top navigation bar, then select Export to PC from the drop-down menu.
From the pop-up window, browse to the destination where you want to add iPhone SE songs on Windows 7 PC, and then press Save button to start the music migration process instantly.
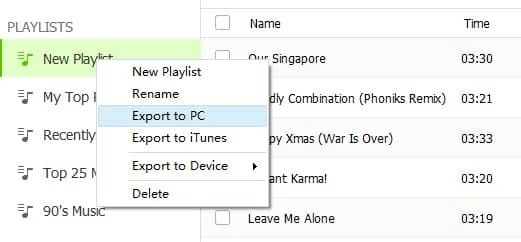
Another way of migrating iPhone SE songs to Windows 7 is export the playlist you've created. To get this done, head over to the "PLAYLISTS" part in the left pane, right-click the playlist(s) you want and hit Export to PC option.
You're good to go and ready to enjoy your music on Windows 7 machine!
Apple Way
Apple, true to form, provides two simple solutions of copying music tracks off iPhone SE onto Windows 7 desktop & laptop. Basically, the methods work for the songs you ever purchased from iTunes Store, or you downloaded from Apple Music or iTunes Match. Follow along for a detailed look at each method.
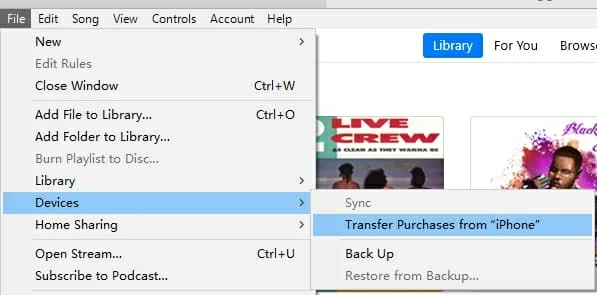
Transfer purchases via iTunes
Apple's iTunes comes packed with syncing feature to put media files on the iDevice, and it's generally a one way deal. However the exception to this is the iTunes purchases thanks to the "Transfer Purchases" function. You're now allowed to export the purchased music on iPhone SE and save onto Windows 7 computer, free of charge. The process is incredibly simple.
Now that the purchased songs are copied to your iTunes library, download them to local directory:
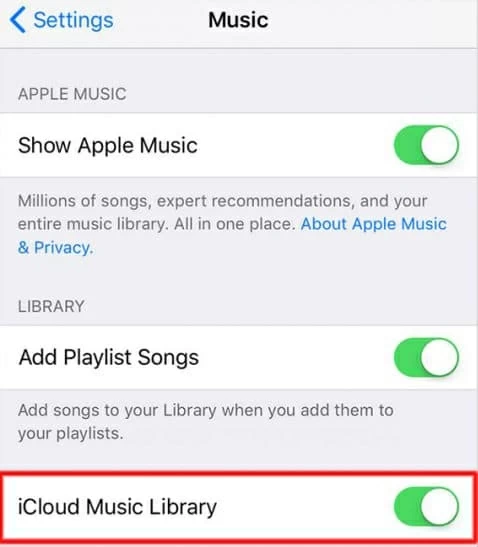
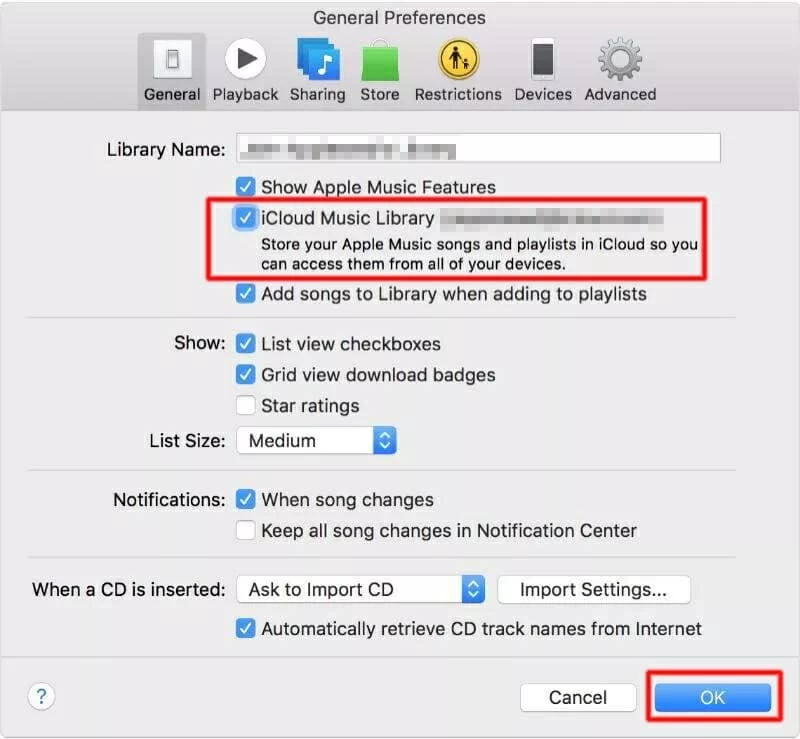
Turn on iCloud Music Library
Apple's iCloud is the default cloud storage service that come with iPhone device. With an Apple Music or iTunes Match subscription, you can take great use of iCloud Music Library to sync music between iPhone and computers that are authorized, by enabling it on both devices.
If you have Apple Music songs on iPhone SE and would like to move them to Windows 7's drive, follow the simple wizard below:
If you want to know more details, please click here: Use iCloud Music Library on PC.


