Transfer SMS Messages from Motorola to iPhone


As a crazy music lover, it comes as no surprise that you have cluttered up your iPhone XR with a huge library of music. This does make sense for you to enjoy songs on the go. However, when you need to transfer music from iPhone XR to your Windows 7 computer for safekeeping, it might seem to be a bumpy road to move such a breathtaking number of songs.
Luckily, loads of iPhone music transfer tools are available on the software market, in an effort to help migrating songs from iPhone XR to Windows 7 PC. It's hard to know which does the job well without trying and testing them all, so we've assembled several apps that will really make you become more productive.
Transfer Purchased Music: iTunes
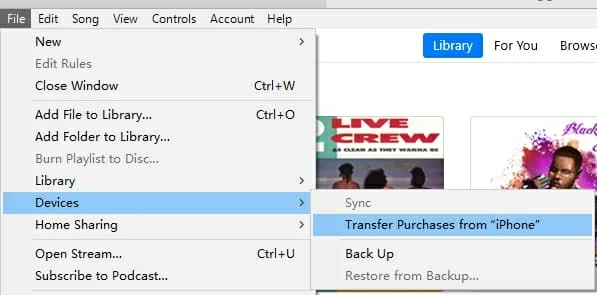
iTunes is Apple's proprietary tool you can use to manage files on your iPhone. With the built-in feature "Transfer Purchases", you're able to copy purchased music from iPhone XR to Windows 7. This is applied to the music files that are purchased from Apple Music or iTunes Store. To get started, install or update iTunes to the latest version.
Transferring Made Easy: iTransfer
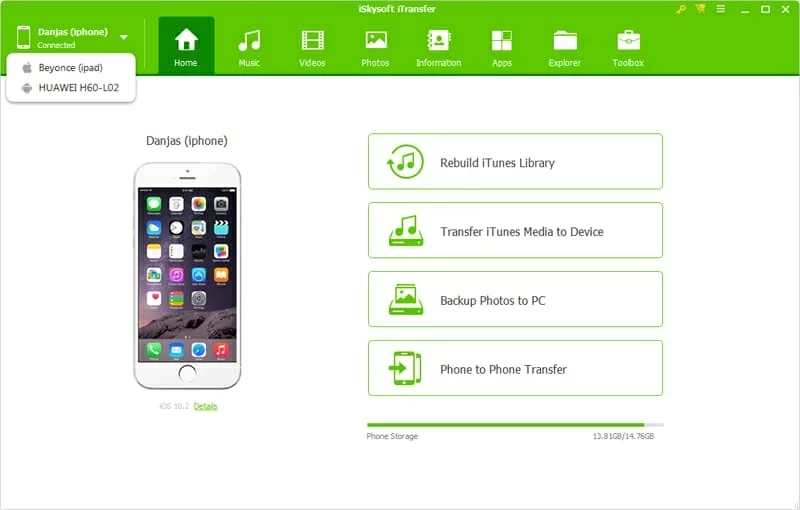
As you've already known, iTunes indeed works for importing purchased songs. Unfortunately, the thing is that you have a whole lot of non-purchased music stored on the iPhone XR and want to put them to the Windows 7 hard drive. This isn't necessarily tricky and it might be a good idea to have a look at the file transferring tools, and one leading option is iPhone Data Transfer. It's a real all-sided program, providing hassle-free experience of getting around iPhone XR music transfer to Windows 7.
From the very beginning, the minimalist layout delivers the convenience to transfer tracks from iPhone XR over to Windows 7 computer, and vice versa. It's smart and works excellent whether you opt for transferring individual or all songs, or the playlist(s) to the Windows 7 PC. Alongside music tracks, you're also granted to transfer photos, videos, contacts, SMS, apps, etc. among iOS, Android, computers and iTunes.
Better still, it also offers other one-click solutions to make things easier, e.g., Rebuild iTunes library, Transfer iTunes media to device, Back up photos to PC and Phone to phone data transfer. All in all, it includes about every feature you could wish.
Gave it a whirl right now! Before you go ahead to the wizard of moving songs from iPhone XR to the Windows 7 desktop & laptop, download the software and install it first.
Step 1: Attach the iPhone XR device with Windows 7 computer
Run the software on your Windows 7 PC. Next, plug your iPhone XR into Windows 7 machine using the device's USB cable. It won't take too long to recognize your smartphone.
Step 2: Select songs to transfer
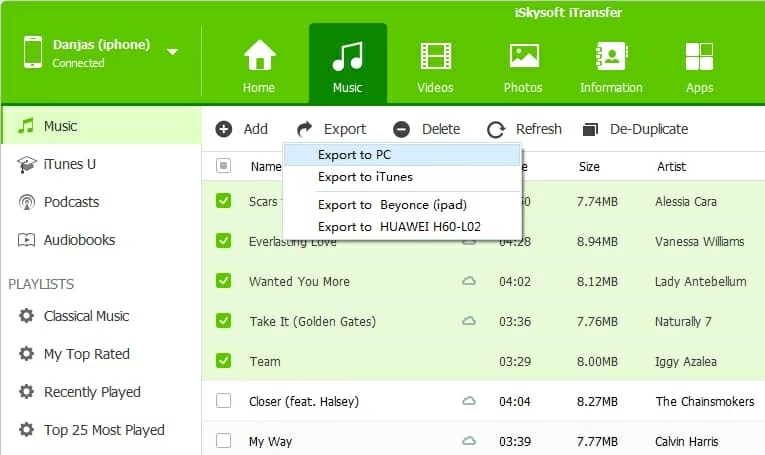
Once your device connected, move the cursor to the Music tab located on the top row, click it. This will then display all the music files saved on iPhone XR. The playlists are listed on the left pane.
Then select the songs you want to migrate onto Windows 7 PC. You can choose all tracks by checking the box beside "Name"; or choose just a few certain tunes by ticking the tiny box correspondingly.
Tips: You can utilize the "Search field" on the top-right corner to narrow down the selection.

Step 3: Copying iPhone XR songs to Windows 7
After making your selections, click on Export > Export to PC on the upper menu bar.
In the resulting pop-up window, choose a save destination on Windows 7 for saving the tunes after transfer process.
Next up, click Save button to confirm. The software should begin migrating music to Windows 7 from iPhone XR device.
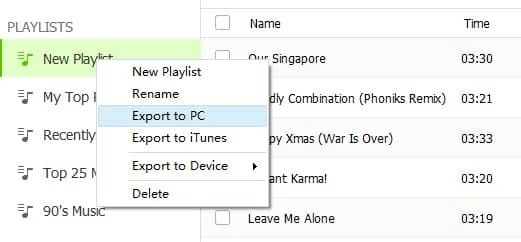
To export playlist on iPhone XR to Windows 7 PC, you need to do this: Under PLAYLISTS heading on the left pane, choose your favorite playlist, right click it, and click "Export to PC" option.
That's all music fans!
Option 3: Stick with iCloud Music Library
iCloud Music Library is only available if you have a subscription to Apple Music or iTunes Match. You can enable it on the computer so you can access your iTunes music library and the songs that you've downloaded from Apple music on the iPhone devices. To save music from iPhone XR back to Windows 7 computer, enable iCloud Music Library in iTunes with these steps:
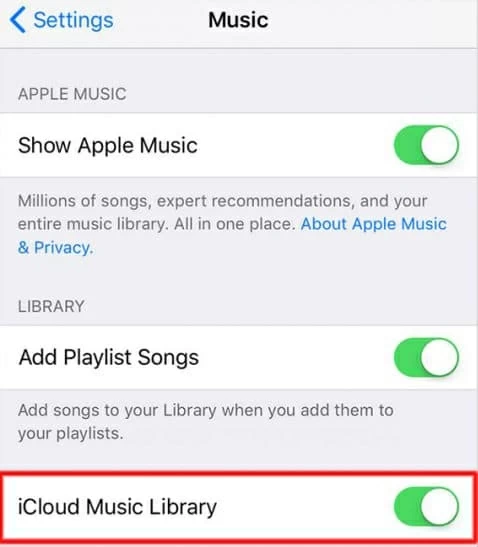
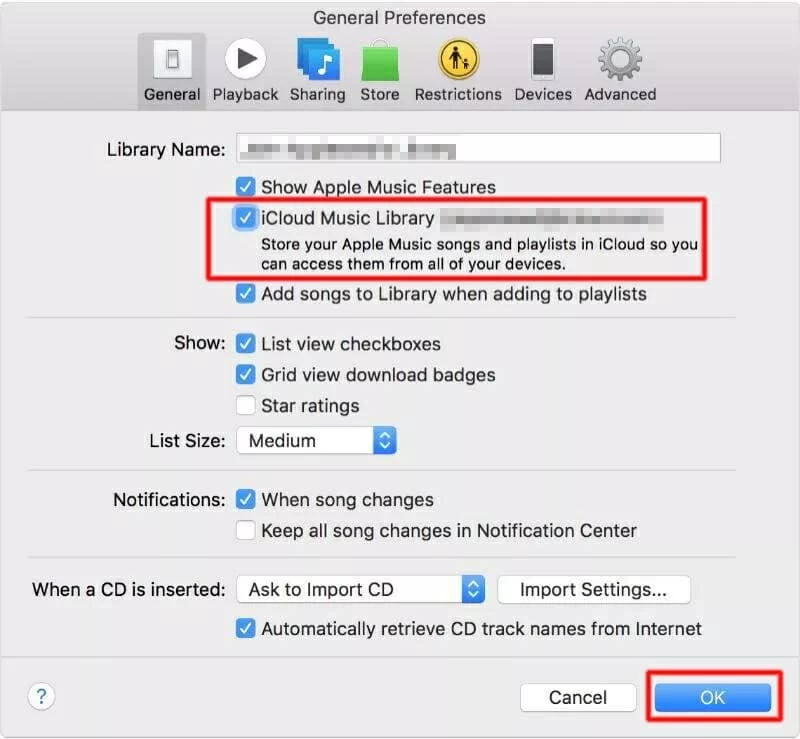
Noted: iCloud Music Library service is not available for all the countries. If you want know more information about iCloud service, please check this: Use iCloud Music Library on PC.