
How Can I Transfer My Music from One iPhone to Another


Music can trigger great things on mood, mind and behavior of mankind. If you end up downloading loads of songs from iTunes Store or saving older music from CDs or such on your iPhone 7 (Plus), you'll undoubtedly want to get those music tracks onto Windows 10 computer at some point—perhaps you want to have copies of iPhone 7 playlists for safekeeping, or maybe you just wish to enjoy the tunes on the desktop when you're at home.
Whatever the purpose is, it's literally possible and easy to transfer music files off iPhone 7 to a Windows 10 computer (laptop & desktop). Whether you're going to move playlists or individual tracks, transfer iTunes purchases or non-purchased music, this tutorial will have you covered.
Option 1: iTransfer
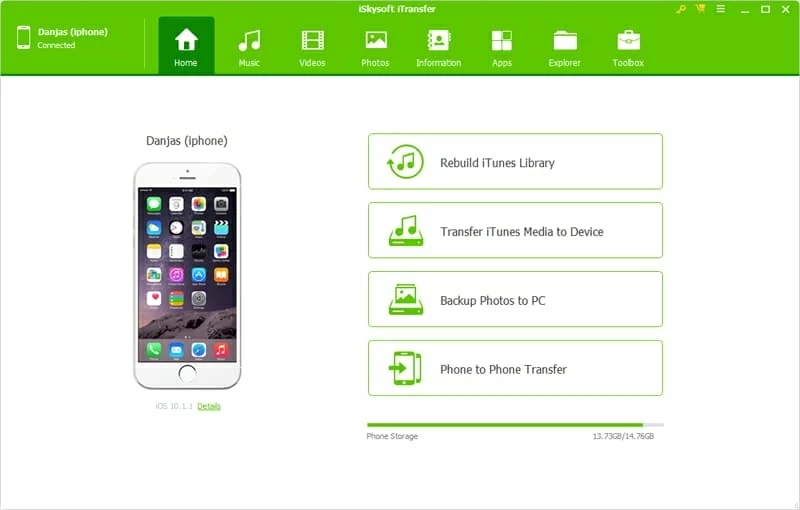
For quite a while, a solid solution was absent for the problem of copying music from iPhone 7 to Windows 10 PC & laptop. Thankfully, iPhone Data Transfer comes along and tackles the issue dedicatedly. It is a reputable program which stands for easy operation and efficient files migration.
With the design of a clean and modern interface, it makes everything hassle-free when moving music and playlists to Windows 10 from the iPhone 7 & iPhone 7 Plus. Apart from music, it's available for migrating over 20 types of data files such as photos and videos within few clicks between iOS devices, iTunes and computers. Carrying the benefit of Fix ID3 tags function and De-Duplicate button, it can let you fix the music information and remove duplicate music when previewing and selecting the tunes before the transfer progress.
It also functions as a powerful backup tool to make copies of your essential data, as a data recovery program to restore data from your iTunes backups to your iOS devices, and as a device manager to let you add, delete, create new album & playlists.
We're going to walk you through the guide on a seamless music transfer between iPhone 7 and Windows 10 computer with this software. First, download it on your computer. Once you've got it installed, check the steps below:
Step 1: Connect iPhone 7 to Windows 10
Launch the software on your Windows 10 desktop and plug the iPhone 7 device into the computer via a lightning cable.
Step 2: Choose the songs on iPhone 7 to import onto Win 10 machine
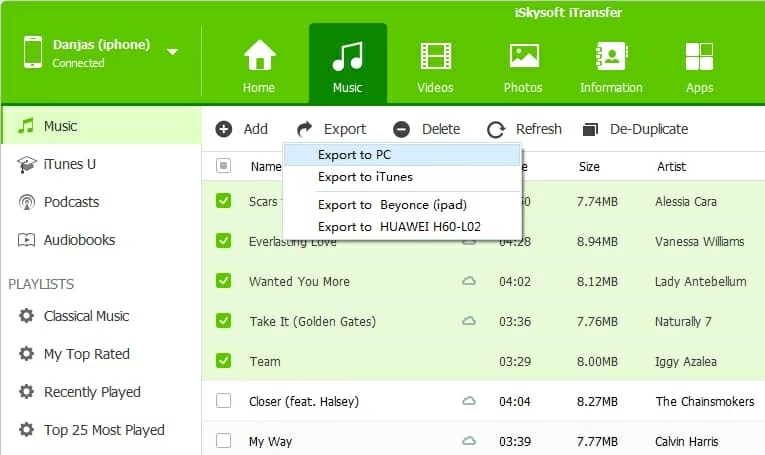
Next, click the Music button on the top menu bar.
Then head to the "Music" option on the left part of the window, click on it, and you can see all the music tunes of iPhone 7 with name, time, artist, album, genre and more on the right pane.
Go through and click on the tracks you'd like to transfer right onto Windows 10 hard drive. If you know you want them all, just tick the box near Name heading.

Step 3: Start to migrate iPhone 7 songs to Windows 10
When everything is ready, click Export button under the Music button on the navigation bar and from its drop-down menu, choose Export to PC.
In the pop-up appears, select a folder where you'd like the music files to go, and click the Save button to copy music tracks on iPhone 7 to Windows 10 PC.
All done! If you wish to save a playlist on iPhone 7 into the Windows 10's drive, simply head to "Playlists" on the left part of the window, right click the one you're interested in, and choose the Export to PC from the menu.

Option 2: iTunes
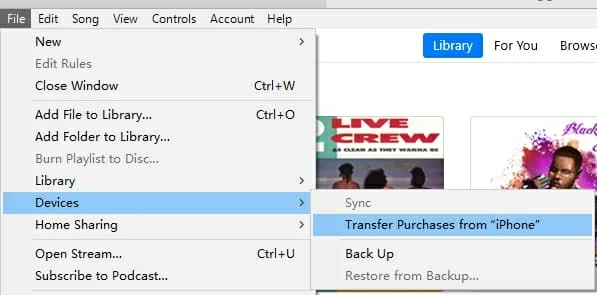
The method only works with music purchased via iTunes. If you have purchased songs from iTunes Store on iPhone 7 (Plus), you will be able to instantly transfer them to the Windows 10 computer (desktop & laptop) you authorized.
To transfer iTunes purchases to Windows 10 from iPhone 7 or iPhone 7 Plus, simply do the following:
Now download music to Windows 10 and save locally:
Once music migration is done, find where your songs are saved on Windows 10 by going to Edit > Preferences > Advanced.
Option 3: Download iCloud Music to Windows 10
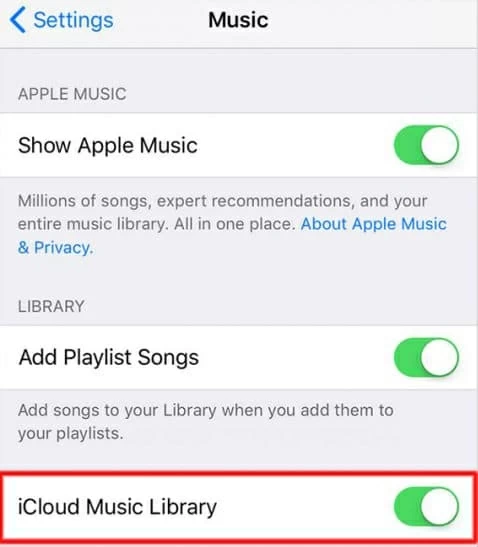
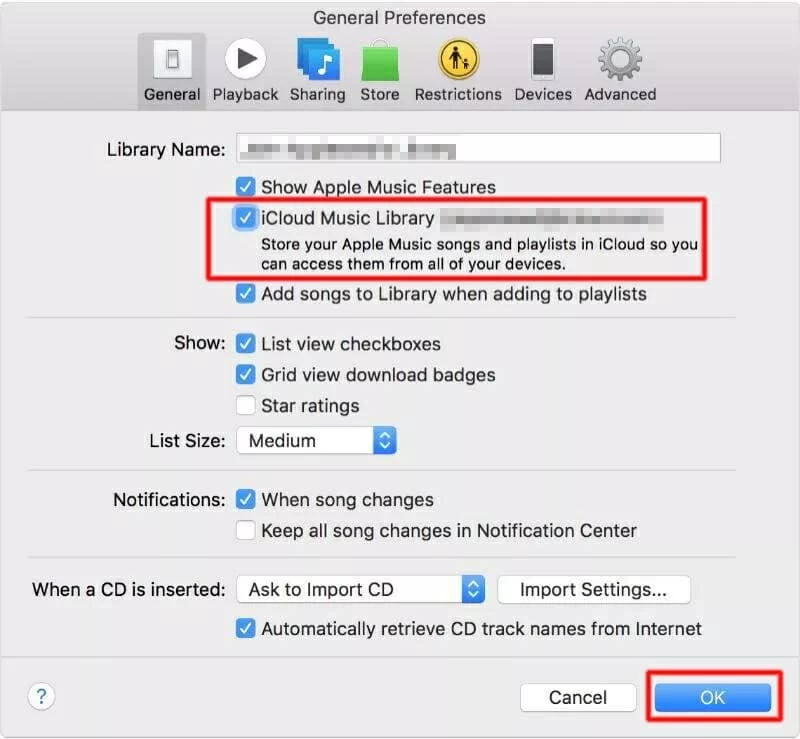
If you've ever subscribed to Apple Music or iTunes Match, the music on iPhone 7 device will save in iCloud Music Library. You can download it to Windows 10 that is authorized access to iTunes purchases. You will need to turn on iCloud Music Library in iTunes as well.
Note: iCloud Music Library isn't available in all countries and regions. Learn the guide on how to use iCloud Music Library on PC.
After that, navigate to Music\iTunes\iTunes Media on Windows 10 computer make sure that the music is transferred.


