
How to Transfer Your iPad Songs to a Motorola Phone


Wanna replace your old Google Pixel device with a new iPhone featuring the merits of Apple's iOS system? Getting a new iPhone sounds nice, but coping your important data from Google phone to iPhone seems more trouble that it is worth. Sometimes it can be very frustrating, time-consuming and even painful when you have to move tons of data files including contacts, texts, music, photos, videos and others.
Thanks to Phone Transfer software, it is no longer a difficult task for transferring data from Google Pixel over to iPhone. Working as a bridge for migrating your data cross mobile platforms, it is a quick and easy transferring tool capable of moving data files to iPhone from Google Pixel and vice versa, including contacts, music, photos, videos, calendar, etc. The whole process is as good as a no brainer, fast and straightforward, allowing you to finish the task in just a few minutes.
Besides, you can back up important data files from your device to computer folder or external drive and put the retrieved data back into your device when necessary. It also offers you the option to restore your data back-ups from iTunes or iCloud. If you want to migrate content from Google Pixel to iPhone on a Mac, please get its Mac version to handle the task.
Step 1: Launch the tool and plug both phones into PC's/ Mac
Open up the software on your computer. On its homepage, you will see four options to choose from, that is, Phone to Phone Transfer, Back Up Your Phone, Restore from Backups and Erase Your Old Phone.
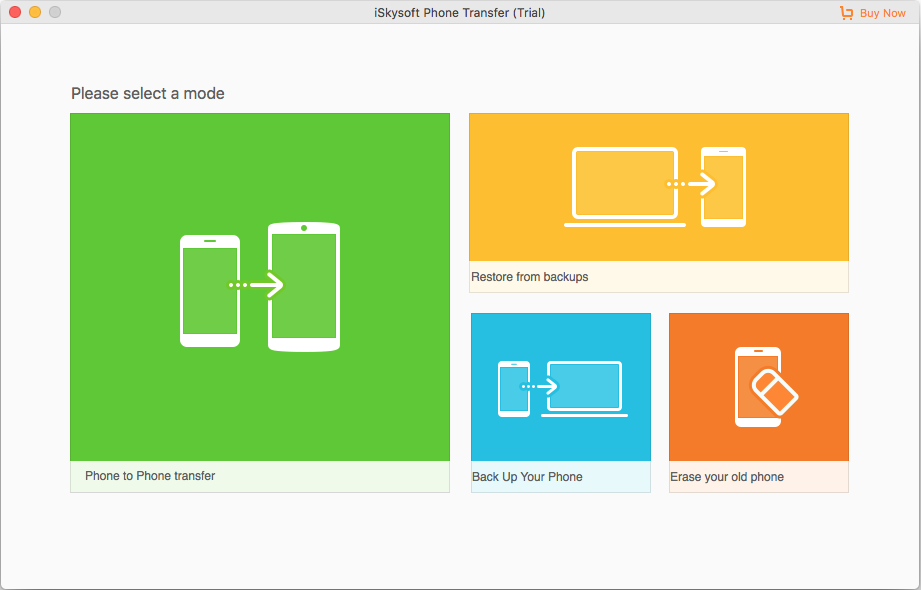
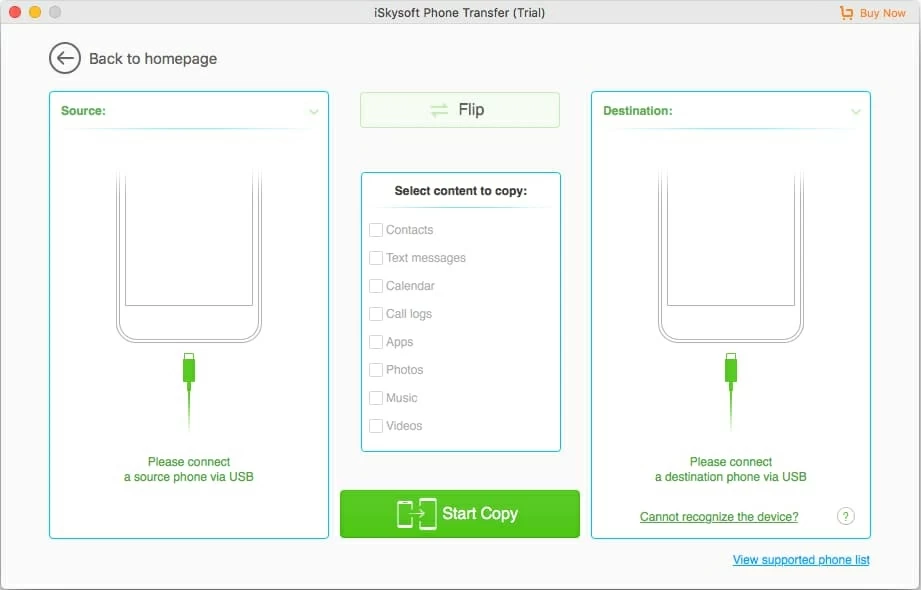
Click the green Phone to Phone Transfer option to enter file transfer screen. Then attach your two devices with the computer using USB cables. The software should recognize automatically both devices and show the device icon on the screen, as image demonstrated below.
Next, you'll have to enable the USB debugging mode on your Google Android phone to access the data. As for iPhone, a authorization request pops up on the device screen, tap Trust to proceed.
Step 2: Select data files you want to move from the scan list
The utility will start scanning the source device on the left box automatically. You can flip the devices by clicking the Flip button on the upper center of screen if they're in the wrong place for the transfer you want to make.
After the scan is complete, it will present you with a list of transferrable data like contacts, photos, music, videos, text messages and other data in the center pane of the window.
Next, ensure everything you want to transfer is checked.
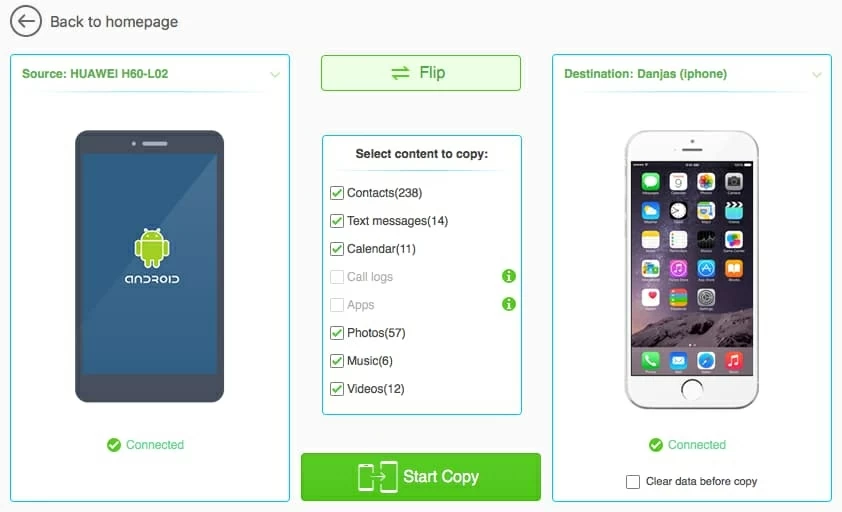
If you need to remove or erase data from your target iPhone before transferring data from your old Google phone, just click Clear data before copy prior to hitting the Start Copy button.
Step 3: Start transferring Google phone content to iPhone
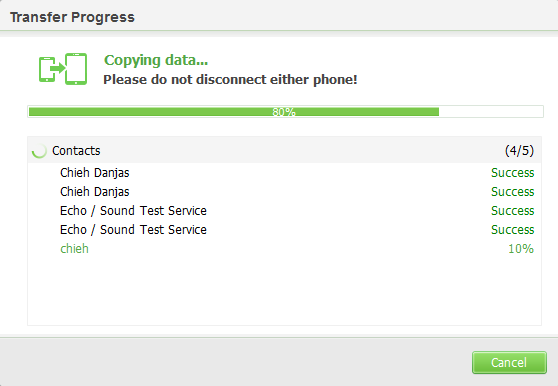
Once you've data files selected, click Start Copy button on the bottom center of the program window. Sit back and wait. The amount of time varies in how much data (contacts, music, photos, videos, call logs, etc.) is being moved. Please avoid disconnection during the data coping.
Done! You're ready to use your iPhone, enjoy!
Want to manage your media files more flexible between iPhone/ iPad and computer? Check iTransfer software, which is much more than just the program that upload and backup your files between iOS device and computer. It's also the tool that lets you manage your content (contacts, music, playlists, videos, photos): create, delete, export, remove duplicates, fix music ID3 tags, etc. See one of our popular tutorials about how to transfer music and playlist on iPhone back to iTunes.


