
Copying Tracks from iPad to iPhone


Computer's hard drives are a good place to back up large amounts of data on smartphones. If you've been a long time user of an iPhone 11 Pro, there's a good chance that the dozens of gigs of songs are tied up inside the device memory, and you will want to copy entire music library to a Windows 7 computer. This may include the music purchased from iTunes Store app or downloaded via Apple Music if you're a subscriber, the songs you've ripped from CDs, and the playlists.
iTunes is dead on macOS with the arrival of Catalina, but it's still alive and well in Windows. The Sync feature, however, makes it not that simple to transfer music from iPhone 11 Pro (Max) back to Windows 7 hard drive due to its one-way synchronization—except those purchased songs. Naturally, there's a workaround. Third-party tools are the new norms for getting non-purchased music to the computer, and iPhone Data Transfer is a standalone application to have at your disposal. Download the program:
It's the reliable one-click music transfer software that focuses on copying songs, as well as everything else (photos, podcasts, iTunes U, audiobooks, videos, etc.), between different platforms and devices. It makes migrating songs from iPhone 11 onto Windows 7 desktop & laptop, and vice versa, as easily as possible, by quickly browsing all the tunes in the internal storage.
Other than transferring music tracks, its Phone to Phone Transfer, Rebuild iTunes Library, Backup Photos to PC, and other smart features make it an obvious choice for managing data on any device.
Here's what you need to do to pull songs off iPhone 11 and onto a Windows 7 based PC, so you can create a music library locally or burn a CD. The program is surprisingly easy to use—Once it's installed, connect your phone so all music show up in the software interface, choose what you'd like to migrate, and click Export button to move over the songs and playlists as well as the related information: music name, artist, genre, etc. The process won't delete any files on your device.
Step 1: Connect iPhone 11 to Windows 7 PC
Once you launch iTransfer, hook up iPhone 11 or iPhone 11 Pro (Max) via the matched USB cable. Your device should be recognized within seconds.
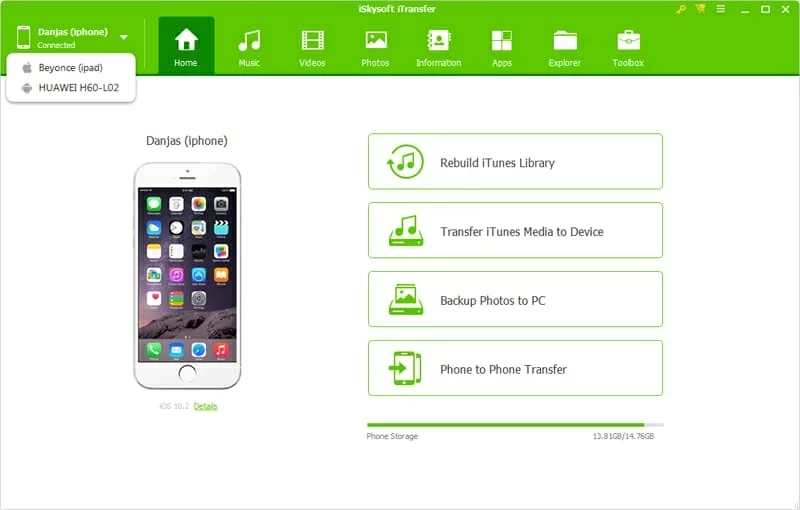
Step 2: Select songs on iPhone 11 to migrate
On the startup interface, click on Music tab on the top navigation bar. This will, by default, show a list of songs that are stored on the iPhone 11 Pro.
Tips: The software uses a column on the left pane to let you easily navigate through the media files like iTunes U, podcasts and audiobooks, as well as the playlists.

Step 3: Moving music on iPhone 11 to Windows 7
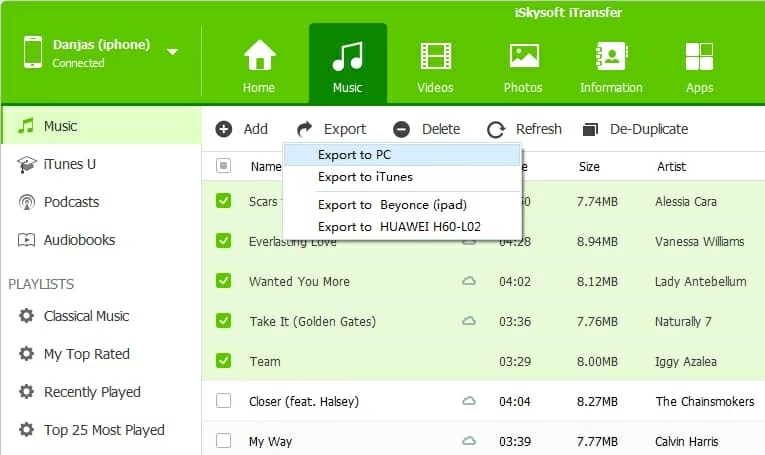
In this step, you need to specify the tracks that you want to copy onto Windows 7 laptop & desktop, by checking the box in front of each song.
Once that's done, click Export button underneath the Music tab to bring up its drop-down menu. Then you choose "Export to PC" from the list, designate a saving folder on your hard drive, and click the Save button to copy iPhone 11 music and other content.
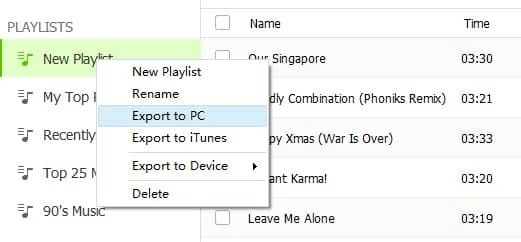
Steps for copying playlist on iPhone 11 Pro (Max) back to Windows 7: Go to "Playlists" on the left pane, choose and right-click on a playlist that you're going to put onto Windows 7 computer, and click "Export to PC" option.
All songs transferred! The iPhone 11 music tracks are backed up to Windows 7 PC.
How to Transfer iTunes Purchases from iPhone 11 to Windows 7 Free
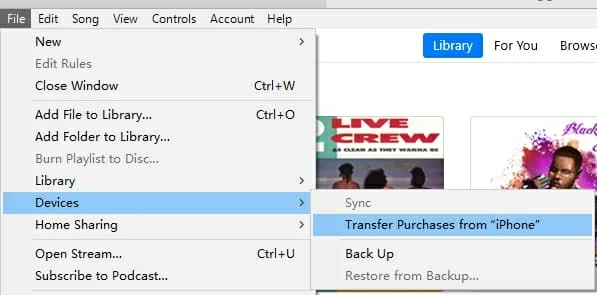
So far, so good. But what happens if have purchased music on the iPhone 11 Pro Max, and would like get it transferred to a folder on the Windows 7 machine—meaning the tunes you've ever bought in iTunes Store app? In fact, Apple has made this simple by introducing "Transfer Purchases" within iTunes. You just use that feature to add iPhone 11 songs to iTunes library, and download them onto Windows 7 computer that's authorized. Read Also: Transfer iTunes Store purchases to your PC
Fantastic straightforward transfer of music from iPhone 11 Pro Max to Windows 7, and all songs should stay safely.
Tips: If you accidentally deleted iTunes Store purchases from your iPhone 11 (Pro), or the songs are just no longer in your iTunes library, you can re-download each item as long as you're signed into the Apple ID that you used to purchase the music. Here's how:
See More: Redownload apps, music, movies, TV shows, and books


