Moving Music from iPad to Mac


To get the most out of your powerful MacBook (Pro, Air) machine, you might have already set a to-do list with several specific tasks. After crossing off "Save My Old iPad Songs onto MacBook" and "Back up My iPhone XR Videos on MacBook" from the list, now you might move to the next "To-Do": Transfer Music from iPhone XR over to MacBook. Before starting the music transfer trip, here are something you need know to avoid unnecessary hassles.
Essentials About iPhone XR Music Transfer to MacBook
Every songs' resource is different, so as determining utilities to migrate them. For iTunes purchased songs, iTunes (or Music app) is an apparent choice; for the songs get outside of Apple, like old CDs ripped tracks, past MP3s, etc., the resolution is turning to a third-party utility. Maybe you've subscribed to Apple Music and bought songs from there, then you can benefit much from using its built-in cloud-based service and AirDrop function.
Now, with all that in mind, you can go on for getting all songs transferred from iPhone XR to MacBook (Pro, Air).
Way 1: Copy Non-Purchased Music without iTunes (or Music app)
If your first step is focused on adding non-purchased songs from iPhone XR into MacBook Pro or MacBook Air, iPhone Data Transfer can direct you to the right way. For years, iTransfer has got the nod for its convenience and flexibility on iPhone music transfer. Whether you'd like to send all the iPhone XR music collections at one time, or specifically export certain tracks or playlists, its included automated functions - such as "Select All" feature and the smart "Export" button - can make your life a lot easier.
What makes it appealing also owes to the fact that every music file comes with all the practical tools you'd expect for songs' management. This can include Duplicates remover, Music tags fixer, Playlist creator, Ringtone maker and more, all of which can be done in a quick-editing screen. If you need to get songs on MacBook back to your iPhone device, it can also convert them to the music formats supported and playable by iPhone.
While staying feature-packed in moving over iPhone XR songs into MacBook (Pro/ Air), it also keep the UI intuitive to let you transfer or archive other data like photos, videos, files, apps, voice memos, movies, etc., between devices (iOS) and computer (PC or Mac).
Detailed Music Transfer Guide
This wizard is totally consumer-oriented, amplifying on getting songs out of iPhone XR and save onto MacBook's library with screenshots and directions.
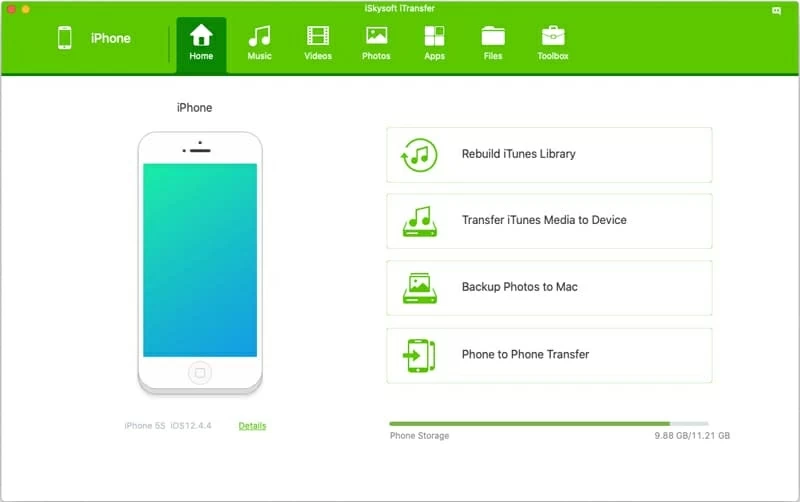
Step 1: Run iTransfer and connect iPhone XR to MacBook (Air, Pro)
To begin with, launch the software on your MacBook Air or Pro, and hook up your iPhone XR device with it using the standard USB cable. After a short while, your device will start to communicate with the MacBook machine over the wired connection.
Extra Tips: iTransfer has set a functional part on the right of the initial screen, letting you navigate through its smart shortcuts for Rebuild iTunes Library, Transfer iTunes Media to Device, Backup Photos to Mac, and Phone to Phone Transfer.
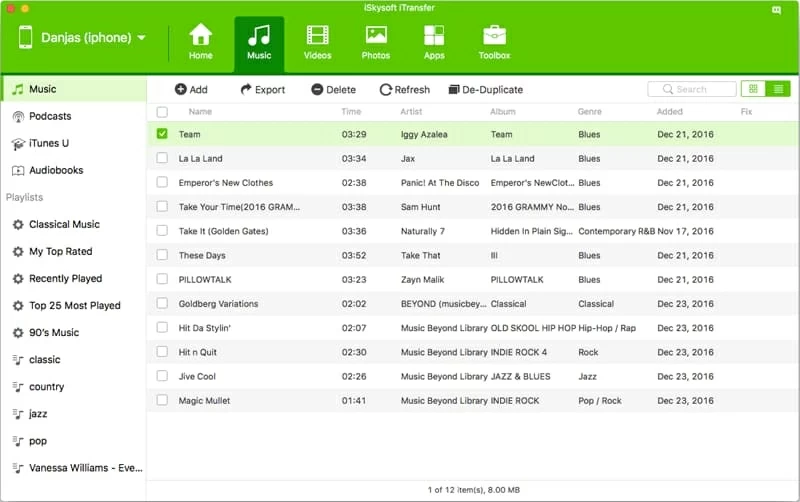
Step 2: Select desired songs under the Music tab
Next, to copy iPhone XR songs over to MacBook, move your mouse to Music tab and click it.
By default, the files in the Music view will appear on the right, loading every track stored on your iPhone XR with the metadata information like song's name, albums, tracks of artists, genre arts, etc. (You can use the column on the left to switch through the sections of Podcasts, iTunes U, Audiobooks and Playlists.)
Then, tick the tiny box(es) next to song(s) you want to transfer, or hit Cmd-A on the keyboard to make all tunes selected. If you want to move over playlist(s), check out "Playlists" part situated on the left-hand side of the window.
Tips: You can click Refresh button to show up the newly imported songs.
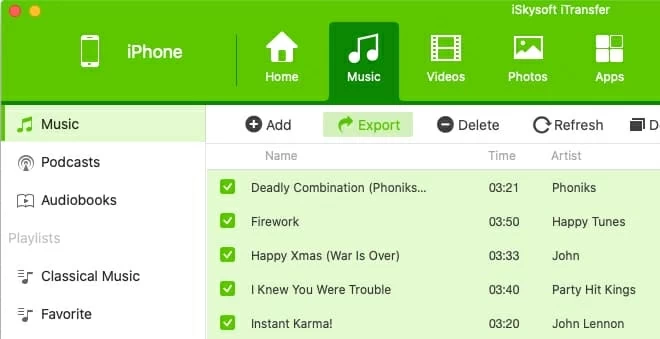
Step 3: Make copies on MacBook of iPhone XR song(s) & playlist(s)
Now, every music files you need should be highlighted.
To export selected or all the tracks into MacBook, position the cursor and click Export button on the top. From the dialogue box pops up, set the storage path to save the transferred songs. Then the program will automatically import songs from iPhone XR into MacBook' folder.
Tips: For simplicity, you can also create a new folder on the desktop of your MacBook Pro or Air machine, then drag the highlighted music contents to the folder.
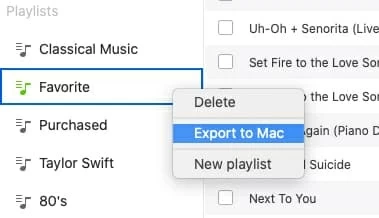
To migrate iPhone XR playlist into MacBook (Air, Pro), hover on the selected playlist and choose Export to Mac from its right-clicking options. Repeat the steps until all you wanted playlist(s) has been migrated.
That's it! Now just sit back and wait until the transfer process completes.
Way 2: Freely Sync iTunes Purchased Music
iTunes has brought the "Transfer Purchases" feature with itself for many years, and it's a good option for folks who make digital music purchases directly from iTunes store and wish to save them onto computer freely. Once logged into iTunes, syncing iPhone XR purchased music over to MacBook that's authorized is just a click away.
Tips: In the new Music app on macOS Catalina or later, you'll find "Transfer Purchases" being located from the iPhone icon's right-clicking menu in the sidebar. Then the rest of the steps are similar to those above.
![]()
When the syncing finished, go the "Recently Added" section and click the cloud download icon to add iPhone XR songs into MacBook. If you lose songs that you purchased previously on iTunes, you can always re-download it for free on an authorized computer. Check out this How to Guide.
Way 3: Migrate over Apple Music Library (Paid)
For Apple Music subscribers, there are two main ways to put iPhone XR songs into MacBook's library. The first one is to set up "Sync Library", so that you can access all the Apple Music tracks at anywhere. The second is to transfer songs over AirDrop.
Set up "Sync Library"
With "Sync Library" turned on, your music files will be uploaded to the cloud's database, which becomes reachable among devices logged into the same Apple account with the subscription. Here, we have a simple guide for syncing music from iPhone XR with MacBook using Music app in Catalina:
Tips: In macOS 10.14 or earlier, the process is similar with doing this in iTunes except for turning on "iCloud Music Library" instead.
Wait until the music syncing finishes. Once completed, click the little cloud icon of the iPhone XR songs to download into MacBook's hard drive.
Share Songs via AirDrop
If both your iPhone handset and MacBook machine are close to each other and on the same Wi-Fi network, consider AirDrop. Only note that this is only viable for music found on the Apple Music subscription service.
If you want to utilize AirDrop to share a whole playlist, check out Apple's detailed tutorial to do it.
Bonus Part
Now, all your music files on iPhone XR should have already saved onto MacBook. Nice work! Aside from music, we've also made a complete walkthrough of transferring other common data. Check out the links below too see if there is something that fits your needs.