
How to An MP4 File to an MP3 Audio Format in Mac


If you're anything like me, you're probably never devoted any time to pondering how can you backup your photo album on iPhone to store them locally on just your Mac. I certainly haven't...until a couple days ago a "Storage almost full you can manage your storage in Settings" message continues to pop-up on my iPhone 6s Plus.
A full iPhone is not fun. One of the biggest known culprit that steals a BIG chunk of iPhone's memory is photos, which you might take with your iPhone built-in camera on a holiday, or got from online mobile photo-sharing site like Instagram. Naturally, most users think of deleting photos in order to free up space on iPhone. In today's discussion, I'm going to talk about how to copy photos from iPhone to your Mac computer in a simple way.
iTunes seems to be the ultimate way to sync your iPhone pictures to a Mac or Windows machine (see how to transfer photos from iPhone to PC computer), but that copies entire photo album on your iPhone at a time, and you can't view the individual picture from the iTunes backup folder.
Another option might come to your mind is using iCloud service from Apple. iCloud Photo Library option enables you to upload your photos from iPhone automatically, and access them across all your devices — Mac, PC, iPad, iPod touch or Apple TV and on iCloud.com. Unfortunately iCloud only allows a limited amount of free storage space (5GB) — It's not ideal, obviously. To get around this, you still need to take some time to manually download the photos from the iCloud onto you Mac machine.
So is there a way that mounts the iPhone like a USB drive, and start copying a selection of photos or full album to your Mac computer? The answer is YES!
iTransfer - Straightforward, Efficient, Versatile
If you're being clogged with tons of images on your iPhone, it's very necessary to have a way to export them to save on your Mac effortlessly. Today we'll use an all-in-one application named iPhone Data Transfer. It lets you easily move photos from your Photo Library, Photo Stream, Camera Roll, or other albums you've already created on iPhone to your Mac for backup, or vice versa. You can choose to export all of your pictures to Mac, or select individual photos on iPhone you want to transfer. You can preview the photo before you decide to do a export. Even better, deleting option is available, making it easy to free up space of your iPhone via the program directly.
iTransfer isn't just a photo manager. The software also gives your ability to quickly transfer other types of data such as music, movies, TV shows, playlists, contacts, Voice Memo, iTunes U, Podcasts and audio books between your iOS device, iTunes and Mac/ PC computer. If you're on a Windows machine, and want to transfer photos and other files you just taken on your iPhone to your PC's, or vice versa, please refer to its PC-based version.
Step 1: Launch the software and connect to your iPhone device.
To transfer photos to your Mac from iPhone, first open iTransfer on the computer, and then hook your iPhone to your Mac via USB cable.
The first time you connect a iPhone, you might need to enter a passcode to unlock the phone, and then tap Trust on the pop-up message on your iPhone screen to trust this computer.
Step 2: Select which photos you want to export
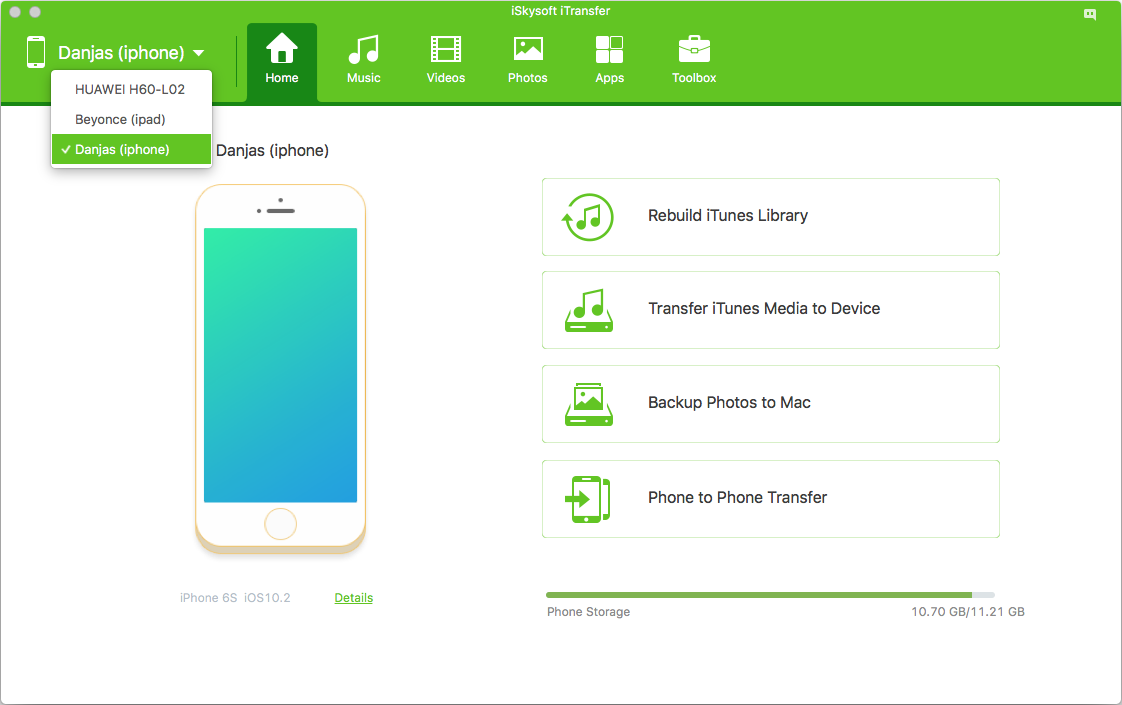
When your iPhone connected, the application will start scanning your iPhone quickly and present with a list of items on the top of the interface — discrete items such as Home, Music, Photos, Videos, Apps and Toolbox. Clicking on one of these items or sub-items will display all the contents contained within that category.
If you just want to move the whole photo library to your Mac, simply click on the Backup Photos to Mac shortcut on the interface, then in the pop-up dialog select a location on your Mac, you're done!
In this article, we need to transfer photos album on iPhone to the computer that's running with Mac OS X. So we go to click the Photos item to expand its sub-item. From there, you can find your photos are sorted by different of albums such as: Camera Roll, Photo Library and My Photo Stream.
Next, choose which photos you want to backup locally. By default, you can select all of your photos in album by simply clicking the square box next to the date label (next to Add button). If you only want to transfer a subset of photos on iPhone to Mac, you can either click the date to select all of photos you collected in that date, or press and hold down the Command key, and then click any photo that you want to select.

Note: you can double-click a photo to preview it prior to making a selecting for exporting.
As we mentioned previously, this iPhone to Mac transfer app enables you to copy other data from you iPhone to store on computer. You can migrate your music, movies, TV shows, ringtones, podcasts, voice memo, iTunes u from your iPhone to another iOS device, or to computer. Check out how to transfer iPhone music to a LG Android phone.
Step 3: Start exporting photos to Mac from your iPhone
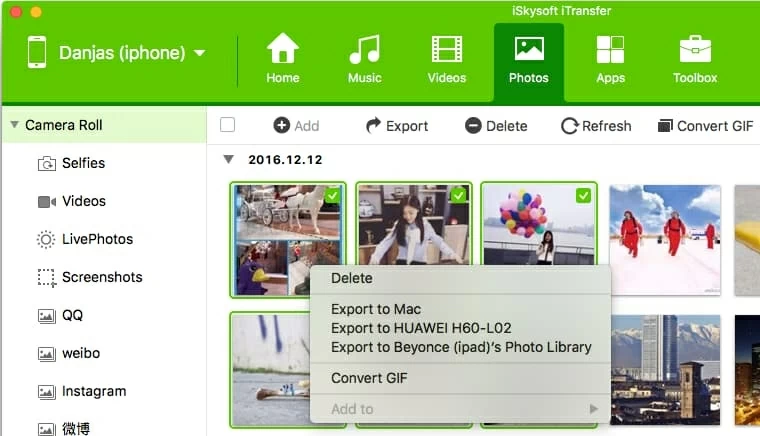
Once you have selected photos from iPhone, it's time to save them on your Mac machine. You can do this either by clicking the Export button on the top menu, then select Export to Mac option from its drop-down list.
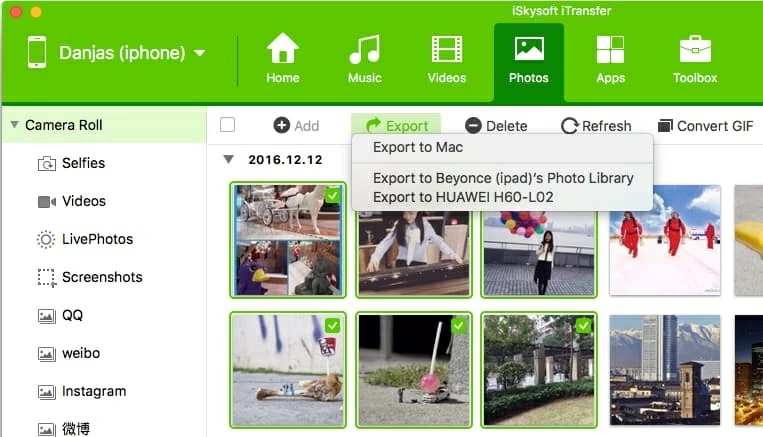
Alternatively, you right-click your mouse, in the pop-up menu, select Export to Mac.
It will then pops up a windows asking you to select a location on your Mac for saving your iPhone photos. The length of time it takes to copy photos album from your iPhone to your Mac computer will depend on how many photos you choose in Step 2. Generally, the software will finish the job in a fast manner.
You're done! When the process is complete, a small window will come up and tell you the transfer is successful. To check you photos, click the Open Folder button in the window to open the local folder containing your pictures.
The following will show you the steps of backing up iPhone photos onto Mac computer using other ways. You might also be interested in our post on transferring contacts between two iPhones with 5 methods.
Image Capture
If you're an Image Capture user, you can use it to download iPhone photos to your Mac. It treats your device as a digital camera, so that you can pull photos off the iPhone and save in Mac machine.
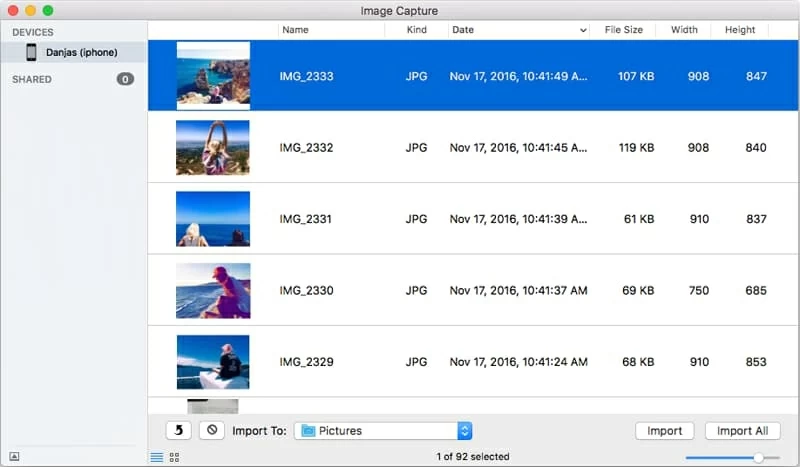
1. Connect your iPhone (iPhone 5/5s, 6/6s + Plus, 7 + Plus, whatever) to your Mac (iMac, MacBook, MacBook Air/Pro, whatever) through USB, and start the Image Capture application from the Application Folder.
2. Your iPhone should now show up under DEVICES on the upper left corner in Image Capture interface. Click your iPhone icon, you will see all of your photos display in the right panel.
3. Click the Import To pop-up menu at the bottom left-side of the interface to specify a folder where you want your iPhone photos to be save on Mac.
4. Select the iPhone photos you want to import, and then press Import button at the bottom right-corner to download only those photos to the Mac; or press the Import All button to import all the photos on the iPhone.
Lost photos on your iPhone and attempt to recover deleted ones? Don't worry. There is still a good chance you can get them back. For more in-depth instructions jump to our tutorial about recovering deleted pictures from an iPhone.
Photos for OS X
Photos for OS X is the default application for Mac users to preview and manage photos after Apple discontinue iPhoto and Aperture. Like the Image Capture, Photos for OS X treats the iPhone as a digital camera.

1. Connect your iPhone (iPhone 7/ Plus, iPhone 6s/ 6 Plus, iPhone 5, whatever) to your Mac with a USB cable.
2. The Photos app automatically opens and once it detects your iPhone. If it doesn't, run the Photos app by clicking the Launchpad icon and hitting Photos. (You might need to unlock your iPhone using passcode, and tap Trust on the pop-up message on the screen to trust the computer which access to content on your device.)
3. In Photos window, clicking iPhone icon under Import will display all the photos that are on your connected iPhone.
4. To import a selection of photos, Command-click the individual ones you want to copy into Mac, then click Import Selected at the top of the screen. Or click Import All to import all of photos.
Note: you can check the Delete items box in Photo window to directly remove the photos on your iPhone after the import.
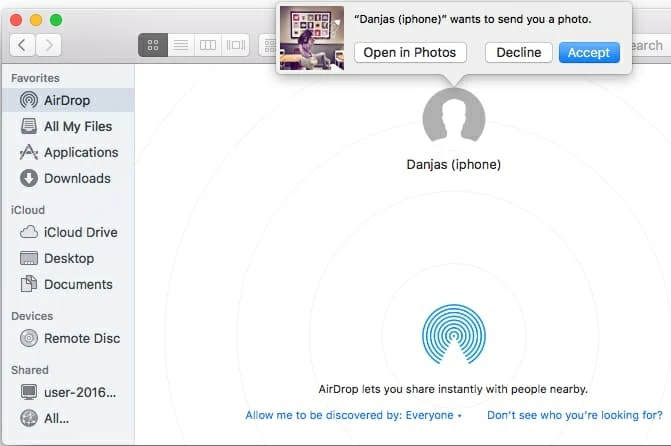
AirDrop
AirDrop is a great way for Apple users to wirelessly share files such as videos, photos, contacts, Voice Memos, Map locations from Mac to Mac, or between a Mac and an iOS device.
To send photos from your iPhone to Mac with AirDrop, make sure that both the source iPhone and the receiving Mac computer are on the same wireless network. And your iPhone (or iPad) must be using iOS 7 or later, and a Mac with OS X Yosemite or later.
1. Turn on Wi-Fi and Bluetooth on your iPhone and Wi-Fi on Mac
2. Swipe up your iPhone screen to launch Control Panel -> AirDrop -> Contacts Only or Everyone; On Mac, open Finder -> AirDrop (or choose Go > AirDrop from the menu bar in the Finder) -> Allow me to be discovered by: -> Contacts Only or Everyone.
3. Select the photo you'd like to share on iPhone, tap the Share button.
4. Locate a nearby AirDrop user or the Apple device you want to share to, and tap the name of it (here you select the Mac where you want to save the photo).
6. Go to Mac, select Accept from the pop-up message to receive the iPhone's image in the window. Done!
Check our detailed guide about how to AirDrop photos from iPhone to a Mac.
It's important to note here that if you have a large number of media files to be shared, using this method will take you a lot of time.
Cloud Service
The Web is full of third-party Cloud services: Apple iCloud, DropBox, Microsoft OneDrive, Amazon Cloud Drive, OpenDrive, Google Photos, which allow you to share and download your photos (and other files) cross multiple platform. You can check a detailed tutorial about how to download photos from a iPhone to Mac with DropBox. With it, you can share your favorite photos on a iPhone for example, and always have access to them while at home through your Mac computer or iPad tablet, or vice versa. Many of those services even has the ability to upload your photos on your smartphone/ tablet/ computer automatically.
However, no matter which service you choose to sync your photos - they all have limited amount of storage space. And if the photo library is large enough, the upload-n-download process between your device and computer is typically pretty clunky.
The Bottom Line
Sure, the AirDrop feature could be nice when it comes to sharing photos between your iPhone, iPad and Mac. If you take a lots of photos on iPhone Photo Library and want to save on your Mac quickly, iOS Transfer is what you need. Also, one thing the iOS Transfer can do for you is the ability to view and export your contacts, videos, music, messages, iTunes U, podcasts, Voice Memos, to your another iPhone, or just on Mac for backup.


