How to Transfer Music from iPhone to iPad


As you give up iPhone and return to Android with Google Pixel phone, you may want to move data from old iPhone to new Google Pixel, namely contacts, texts, songs, photos and other essential files. However, iOS and Android each have their own ways of transferring files and they seldom communicate with each other, making it a little bit difficult to transfer data from iPhone to Google Pixel phone in one go.
So is there any way that allows you to access your iPhone and transfer data to Google Pixel phone without any hassle? Fortunately, using a Quick Switch Adapter to move files is easy.
Option 1: Use Quick Switch Adapter
Google's support site suggests using a Quick Switch Adapter for transferring data files from an iPhone to a Google Pixel. As a part of the retail packaging, Google has included a Quick Switch Adapter in the box. Now, let's go over how to transfer data from an iPhone to a Google Pixel with it.
Option 2: Use Phone Transfer
Don't have a Quick Switch Adapter? No problem. You still have a option to move over your content. That's where Phone Transfer comes in.
Does what it advertises, Phone Transfer is an easy-to-use application with an intuitive interface that helps users transfer data from one phone straight to another one no matter the OS they're running. It also can perform a backup of your phone data to computer as a BAK file. In the event of catastrophic data loss or device damaged, you will be able to restore your data to your (another) device.
We already have a guide on how to transfer music tracks from iPhone back to Mac or PC computer to rebuilt your music library or new iTunes library if you computer completely died accidently or you got a new computer.
Actually, using Phone Transfer is an one-stop method to move your data from iPhone over to Google Pixel Android phone, eliminating many unnecessary settings and skills. Now, download it and install on your computer and follow the guides as below.
Step 1: Run Phone Transfer
To start with, connect your both iPhone and Google Pixel device to your computer and launch the Phone Transfer software.
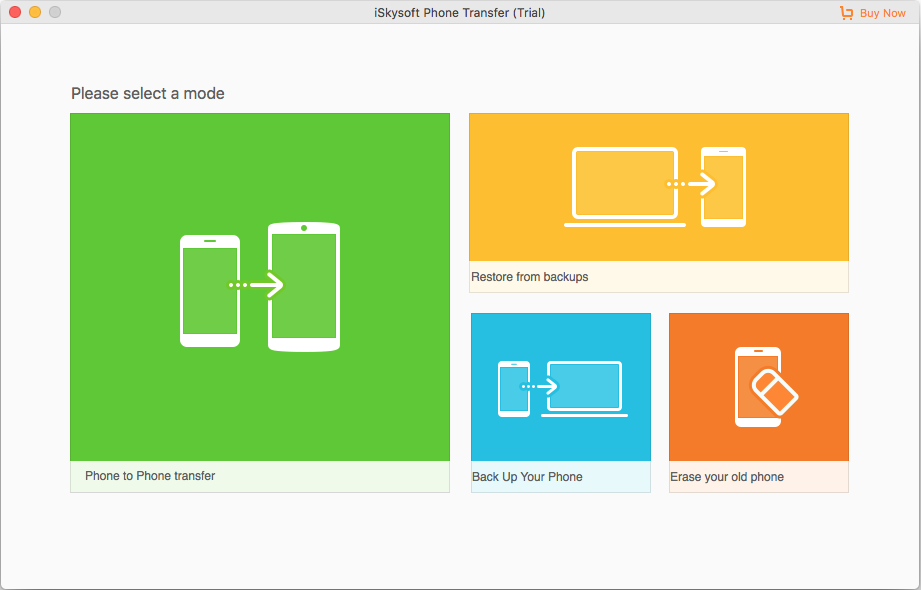
Choose the green mode that says "Phone to Phone Transfer" from the main interface to proceed.
Note that you'll have to turn on USB Debugging mode on Pixel phone and tap trust on iPhone when prompts.
Step 2: Select the contents you'd like to move
Once the connection succeeds, the images of two devices will be visible on the screen, with iPhone representing the source device and Google Pixel the destination device. Use Flip button if both handsets are misplaced.
At this point, you're going to select what data to transfer from old iPhone to new Pixel phone. On the middle pane, simply mark the small box next to data type you want.
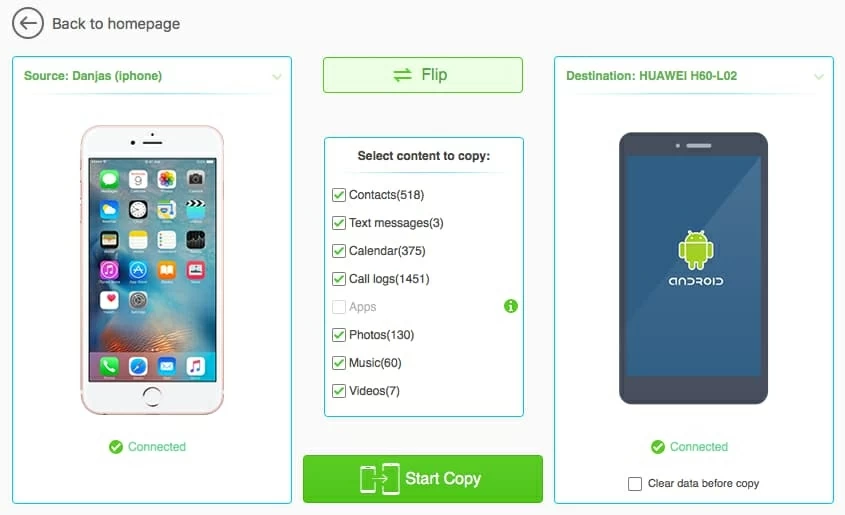
Note that iPhone apps do not work on the Google Pixel device, you'll have to download the corresponding Android version of that iPhone app or replacement that does basically the same thing from Google Play store.
Step 3: Begin copying data from iPhone to Pixel phone
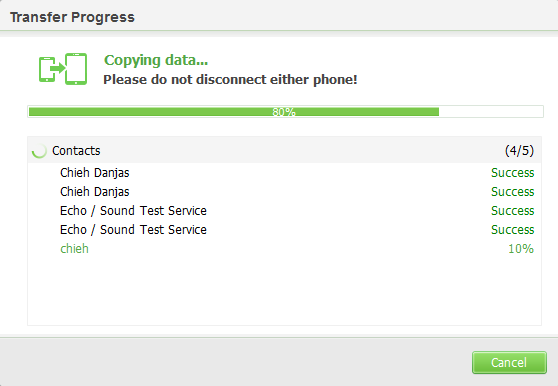
Go ahead and press the Start Copy button at the bottom to begin data transfer from iPhone to Pixel. The process should take a while, depending on the amount of data you're transferring and the power of your machine.
You're done!
The Bottom Line
Hopefully this step-by-step tutorial helps you take everything you need to your new Google Pixel phone from the old iPhone. With a little work you can start enjoying your new device right now without anything left behind.