
How to Migrate Contacts from iPhone to Android Phone


For those who are running a PC machine, please refer to How to Copy Music from PC to an iPad without using a iTunes.
Scenario 1: You've got a bunch of lossless .flac collection on your media library of Mac. When you're trying to import them into iTunes library to sync with your iPad, nothing happen...
Scenario 2: As you used to do in the past, open up iTunes and connect to your iPad, check the Sync Music box to get ready to sync all of songs or selected playlists on your Mac to iPad, a message pops up "The iPhone "xx" is synced with another iTunes library on "xx", Do you want to erase this iPad and sync with this iTunes library?"
Apple's iTunes app is the default utility choice for just about any iOS user to sync content from a PC's or Mac to their iPhone, iPad, or iPod. However, when it comes to synchronizing music files to an iPad from your Mac, iTunes proves to be the very limited management tool. Since iTunes has a limited support of audio file types, if you want to copy a song with .flac, .ape extension to your iPad from Mac, for example, you have to convert it to an Mac's .alac file or a more common .mp3 before you can use iTunes to get it on the iPad. What's worse, an iPad (or iPhone) can only be synced with one single iTunes library at a time. That's to say, if you have your iPad synced with a different iTunes library in the past, any existing content currently on your device will be replaced with whatever is in the new library.
Luckily, you're not strictly limited to use of Apple iTunes. Today, we'll show you a third-party app which makes it extremely easy to add music onto iPad from a Mac as simply as select-and-upload, and gives you more control over the entire transfer process. Say hello to iPhone Data Transfer.
As an all-in-one solution, iTransfer comes with an impressive amount of features for manipulating your music library. Not only can it copy music from Mac to the iPad and vice-versa without iTunes, but also move photos, videos, TV shows, podcasts, audiobooks, ringtones, voice memos, iTunes U, contacts, and messages between your iOS devices, tablets, iTunes and computer effortlessly. You can even manage your device's library such as creating playlists, fix music tags, batch move tracks from one playlist to another, remove duplicates, bulk delete songs, and more.
Step 1: Launch iTransfer
Open up the program on your Mac and hook up your iPad via USB cable. The device should be detected immediately and shown in the upper left corner of the interface.
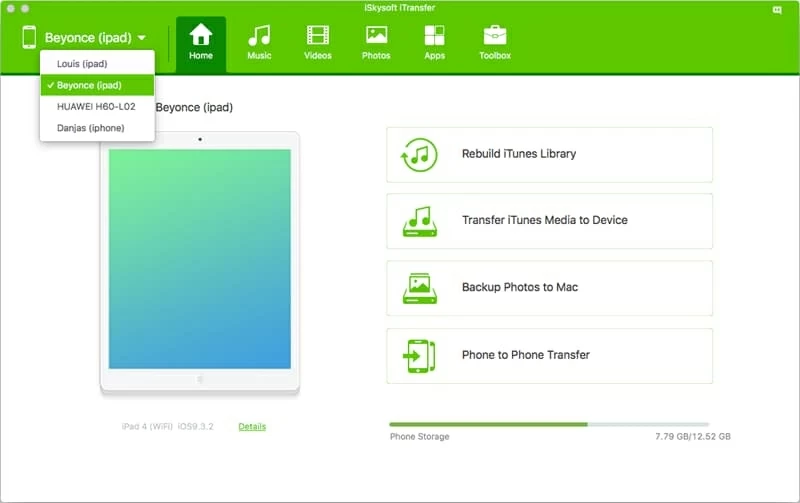
As you can see in the screenshot above, even a novice won't need any guidance to get started or use the program. Six commonly used buttons are available on the top menu for users to find what they need to work on the device, and another four shortcuts are listed on the main area.
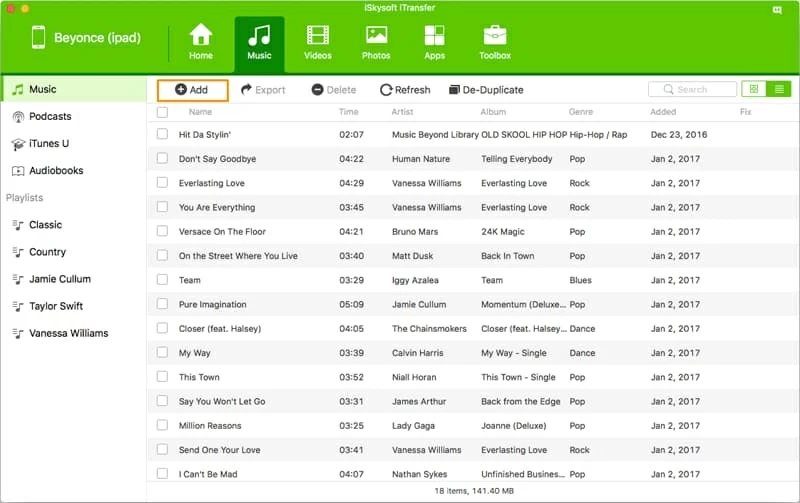
Step 2: Go to Music tab on the top menu and add your music from Mac
After your iPad are connected successfully, click on the Music tab on the top menu, this will show you all of the music tracks and playlists (see sidebar) on your iPad library.
Now, click on the Add button from the screen (beneath Home tab).
A file browse window opens, you'll be asked to select songs that you want to put onto your iPad from Mac media library. Simply using the Shift+Click to select groups of tunes, Command+Click to select multiple songs, or Command+A to select all of music files on your Mac Finder and click Open.
Your tracks will be copied into the iPad. The time it takes depending on how many files on the queue to be transferred. Be patient.

When the transfer process finishes, you'll see that your selected songs from Mac are sitting on your iPad waiting for you to listen to!
Done!
Note that if you're trying to get incompatible music tunes (or digital videos to Video tab) onto iPad from Mac computer, it should pop up a "Convert" window, just press Convert then Transfer button to confirm. The software will take care of the rest things. It supports popular video formats like AVI, FLV, MKV, AVCHD, MTS, M2TS, WMV, ASF, 3GP, MXF, VRO, WTV, OGV, MPG, MPEG, WebM and audio formats including APE, FLAC, AAC, WMA, AC3, MKA, WAV, RAM, AIFF, OGG, RA, MPA, etc.
![]()
Tips and Tricks
After your music files are added to iPad from Mac, you can also this utility to manage them on your iPad music library.
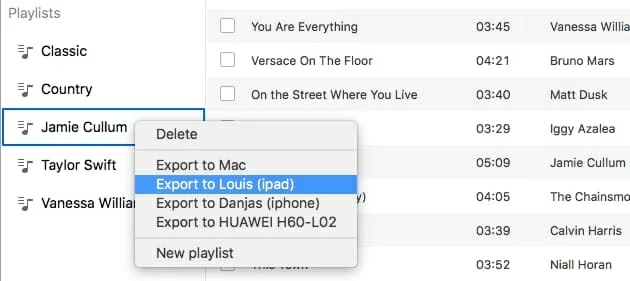
1. Create, delete playlist; export to your another iPad, iPhone. Anyone looking for an easy way on moving music from iPhone to a Mac machine for backup would be well advised to check: How to copy iPhone music and playlists to Mac computer.
2. Delete individual tunes; fix music info; add to another playlist.
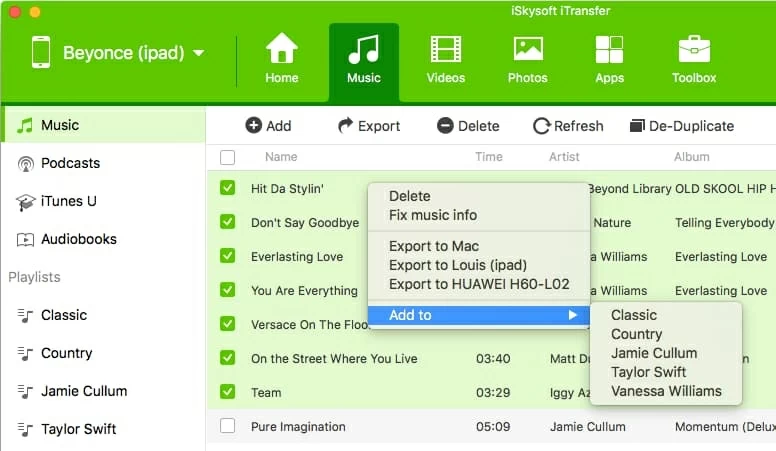
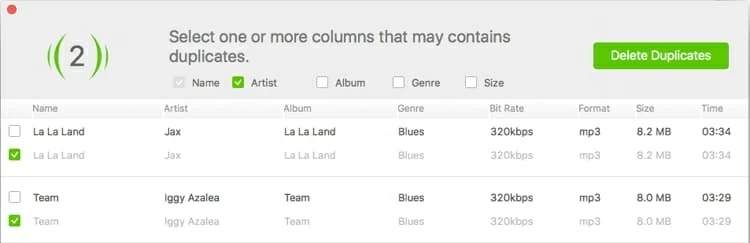
3. Remove duplicates.
Also, for those who would like to export iPad songs back to the iTunes library to keep tracks backup and organized, please refer to our detailed instructions about how to transfer iPad songs and playlists to iTunes library on computer.
The Bottom Line
Undoubtedly, the simplicity and powerful features make iTransfer a terrific iTunes alternative for managing the contents of your iOS device, whether you want to add media files from a computer, or get contents back to your local media library, or even transfer files between your other iOS devices. showing all of the features in detail in this article would take too long, so check out the iPhone Data Transfer to see why so many people continue using iTransfer to this day.
iPad supported: iPad Air 2, iPad Air 1, iPad (4th generation), iPad (3th generation), iPad 2, iPad 1; iPad Mini 4, iPad Mini 3, iPad Mini 2, iPad Mini, etc.
How Can You Transfer Content from a Google Pixel/Nexus to an iPhone


