How to Add Music from PC to iPhone without iTunes


Face it - your ever-expanding music collections have made your iPhone X/ XS (Max) pop music library feel cluttered, needless to say those duplicates created. Rather than wasting time to manage tracks back and forth on your device, it's smarter for you to move over all songs to your MacBook (Air, Pro). This really comes in handy for you to keep mess-up songs organized, fix the broken song titles, artist names, album art, genre, etc. and even better, free up storage space on your handset.
To transfer music from iPhone X/ XS (Max) over to MacBook (Pro/ Air), an appropriate iPhone music transfer tool matters. And here's a roundup to point you toward four doable ways on iPhone-to-MacBook music migration, which includes copying over iTunes purchased music, non-purchased music (ripped tracks, old MP3s, etc.) and the songs you download from Apple Music store.
If you'd like to move songs in the opposite direction, see how to add music from MacBook into iPhone. And for music transfer between iDevices, try how to migrate songs from iPhone to another.
Let's get started!
Way 1: Move Non-purchased Music into MacBook (Air, Pro)
To copy across tracks of artists or albums which are not bought directly from Apple, the first way to go involves installing a third-party music transfer application. If what you're pursuing for is a robust transfer tool with a wide-range of functions, iPhone Data Transfer is a right pick.
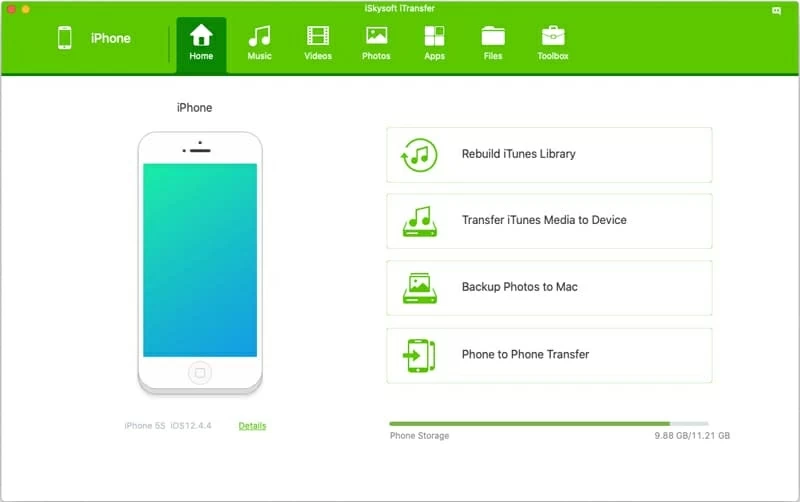
A Closer Look at iTransfer
iTransfer is a single toolkit for everything. It excels at setting an organized layout for management of music, as well as photos, video, audiobooks, podcasts, files, etc., letting you transfer them among an iOS & device, a PC or a Mac with your desired flexibility. It also brings terrific features on instant photo backups onto Mac, data migration from phone to phone and more.
Awesome Music Management Utilities
This program packages a complete set of practical tools for great music organization. Based on different demands, you can remove redundant tracks, create unique playlist(s), fix missing ID music tags, refresh device's music library, make special ringtone and so on. More so, when getting iPhone X/ XS (Max) songs transferred to MacBook, it treats every music migrated through itself as a native file without losing its original sound quality.
Don't Miss: How to Copy over iPhone Music onto Windows Computer
A step-by-step tutorial
To give an easy-to-understand idea of how iTransfer works on transferring songs from iPhone X/ XS (Max) back to MacBook (Pro/ Air), the process is simplified into three steps: connect your device to the machine, select all or individual songs or playlist(s), and start to transfer. Now, download the software, then follow the screenshots and instructions below.
Tips: This wizard is workable irrespective of whether your MacBook is on macOS Catalina, Mojave or other macOS operating systems.
Step 1: Attach your iPhone X/ XS (Max) to the MacBook (Pro/ Air)
Once you've installed the program, launch it on the MacBook Pro or MacBook Air, and you'll greeted with a window asking you to plug your iPhone X or iPhone XS (Max) to it.
Get your device connected via the provided USB cable, which will be recognized within seconds.
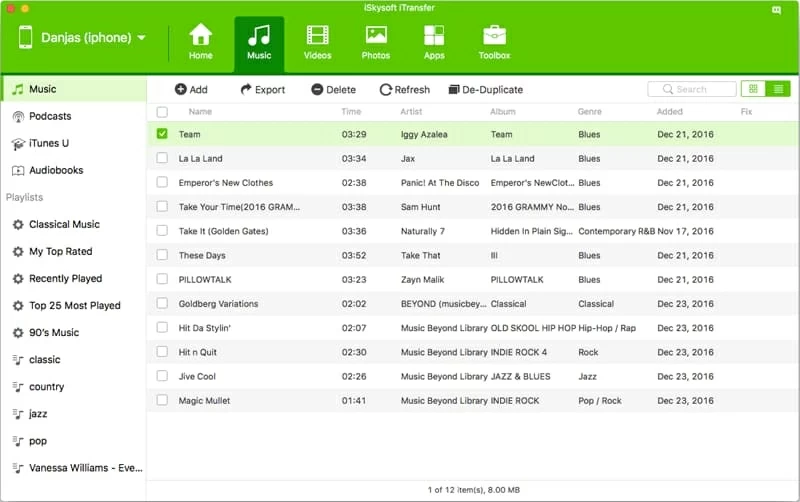
Step 2: Choose the song(s) you wish to export to MacBook (Pro, Air)
Then, make sure you're in the Music tab. By default, "Music" section is selected, showing you all the transferable songs from your iPhone X/ XS (Max) music library. You can sort these songs by Album, Artist, Genre, etc. by clicking corresponding button from the upper row.
You can select individual songs by putting check marks onto the tiny boxes ahead of the music. Also, hitting both Command and A key will wrap all songs from the device library together to migrate over.
Tips: The search field in the upper right corner of the window can help you narrow down results if you just want particular songs or albums.
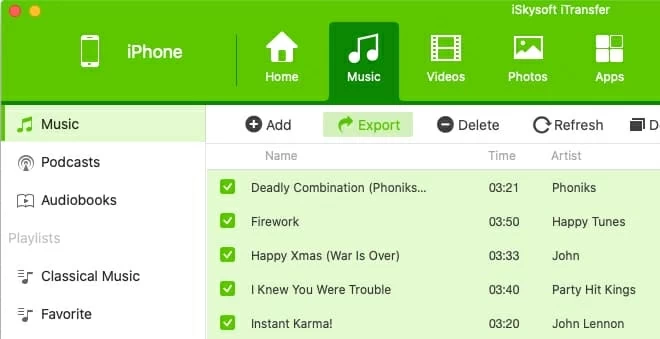
Step 3: Decide a location and copy iPhone X/ XS (Max) songs into MacBook
When satisfied with your selection, move your mouse to click Export button.
From the dialog box that appears, choose a destination to place the songs on MacBook. Then it will start to save iPhone X/ XS (Max) songs onto MacBook's hard drive.
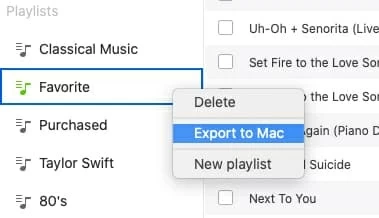
An extra tip: To take whole playlist(s) with you when putting iPhone X/ XS (Max) songs into MacBook's library, highlight playlist heading(s) in the sidebar and choose Export to Mac under the right-clicking menu.
Read also: How to Back up iPhone Data on Mac.
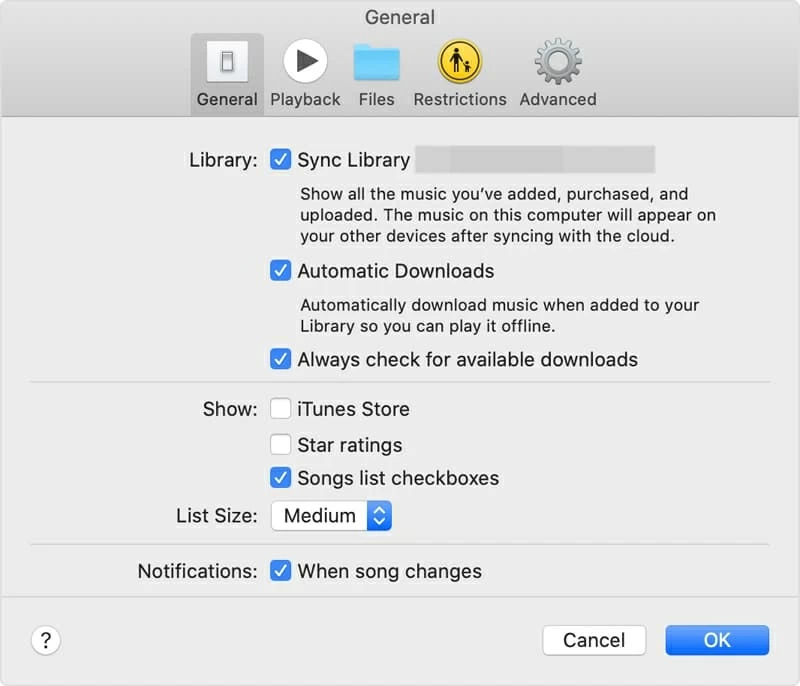
Way 2: Migrate Songs via Sync Library
Cloud service is also a reliable way on transferring iPhone X/ XS (Max) songs into MacBook. In this case, enabling "Sync Library" within your iPhone device considers to be an ideal choice. With it, songs will be uploaded to the cloud's database and synced across all the devices, then you just need to click the cloud icon of song(s) to download them onto your MacBook.
Noted: For this to work, you need to have an Apple Music membership. You can click here to subscribe Apple Music If you haven't got one yet.
Tips: In macOS Mojave system or older, "Sync Library" option is replaced by "iCloud Music Library" in iTunes, but the basic steps are roughly the same with the above instructions to complete the music syncing task.
From now on, any change on your Apple Music catalogue will sync automatically to the cloud's database so that you can add a complete copy of iPhone X/ XS Max songs into MacBook machine, be it the past collections or the latest music downloads.
If you're a member of iTunes Match instead of Apple Music, the "Sync Library" feature is also included into its subscription plan. Read more here.
Way 3: Sync iTunes Purchased Music (Totally Free)
If you're only interested in extracting iTunes purchased music out of your iPhone device, iTunes has you covered. Its native "Transfer Purchases" function (free) will walk your through syncing purchased music from iPhone X/ XS (Max) with iTunes library in MacBook.
Update note: "Transfer Purchases" feature is set right into the new Music app on macOS 10.15 Catalina or newer. To learn more details, check out Apple's How to guide.
Now, all purchased music is sending to the iTunes music library. If finished syncing, check them in the left "Recent Added" view and save them onto MacBook.
Further Reading: How to Redownload Previous Purchases on Mac.
Way 4: What about AirDrop for Music Transfer?
Also works! Apple Music subscribers can conveniently use AirDrop to import songs from iPhone X or iPhone XS (Max) over to MacBook's folder. To do it, first enable Wi-Fi connection and Bluetooth both on your iPhone device and the MacBook machine, then do the following:
Tips: You can also take a look at Apple's walkthrough for more details about sharing music via AirDrop.